
If you had asked me in January if making a Swoon Sixteen quilt was in the cards for 2025, I would have probably laughed in your face.
At the start of this year, the only thing on my mind was bags. I planned to release four different patterns this year (I managed two), and was not thinking about quilts at all.
But, things change, I guess!
Choosing a Quilt Pattern
I go to two quilting retreats every year in Altoona, WI with a group of friends who have become very dear to me. When I attended our March 2025 session, the only thing on my mind was my next pattern (a bag that would later be named the Altoona Tote). I spent that entire week working on this project, fine tuning the design. Then I spent the next few months sewing samples of it.
But by mid-year, I was kind of burned out on bags and wanted to make a good ol’ fashioned quilt. I spent the summer making my Twinkle quilt, and then wanted to keep the ball rolling.
When my retreat friends asked me what projects I had planned for our Oct 2025 get together, I was stumped. Although there are a MILLION amazing quilt designs out there, I wanted to use one of the patterns that I had already purchased. I looked through my binders and Google Drive folders and found only two patterns that I had purchased and not yet made.
One of them was the Swoon Sixteen, so I said what the heck and jumped in!
For anyone dying to know: the other pattern was Emily Dennis’ Lucky Links Irish Chain pattern. But that’s a story for another day.
Picking Fabrics
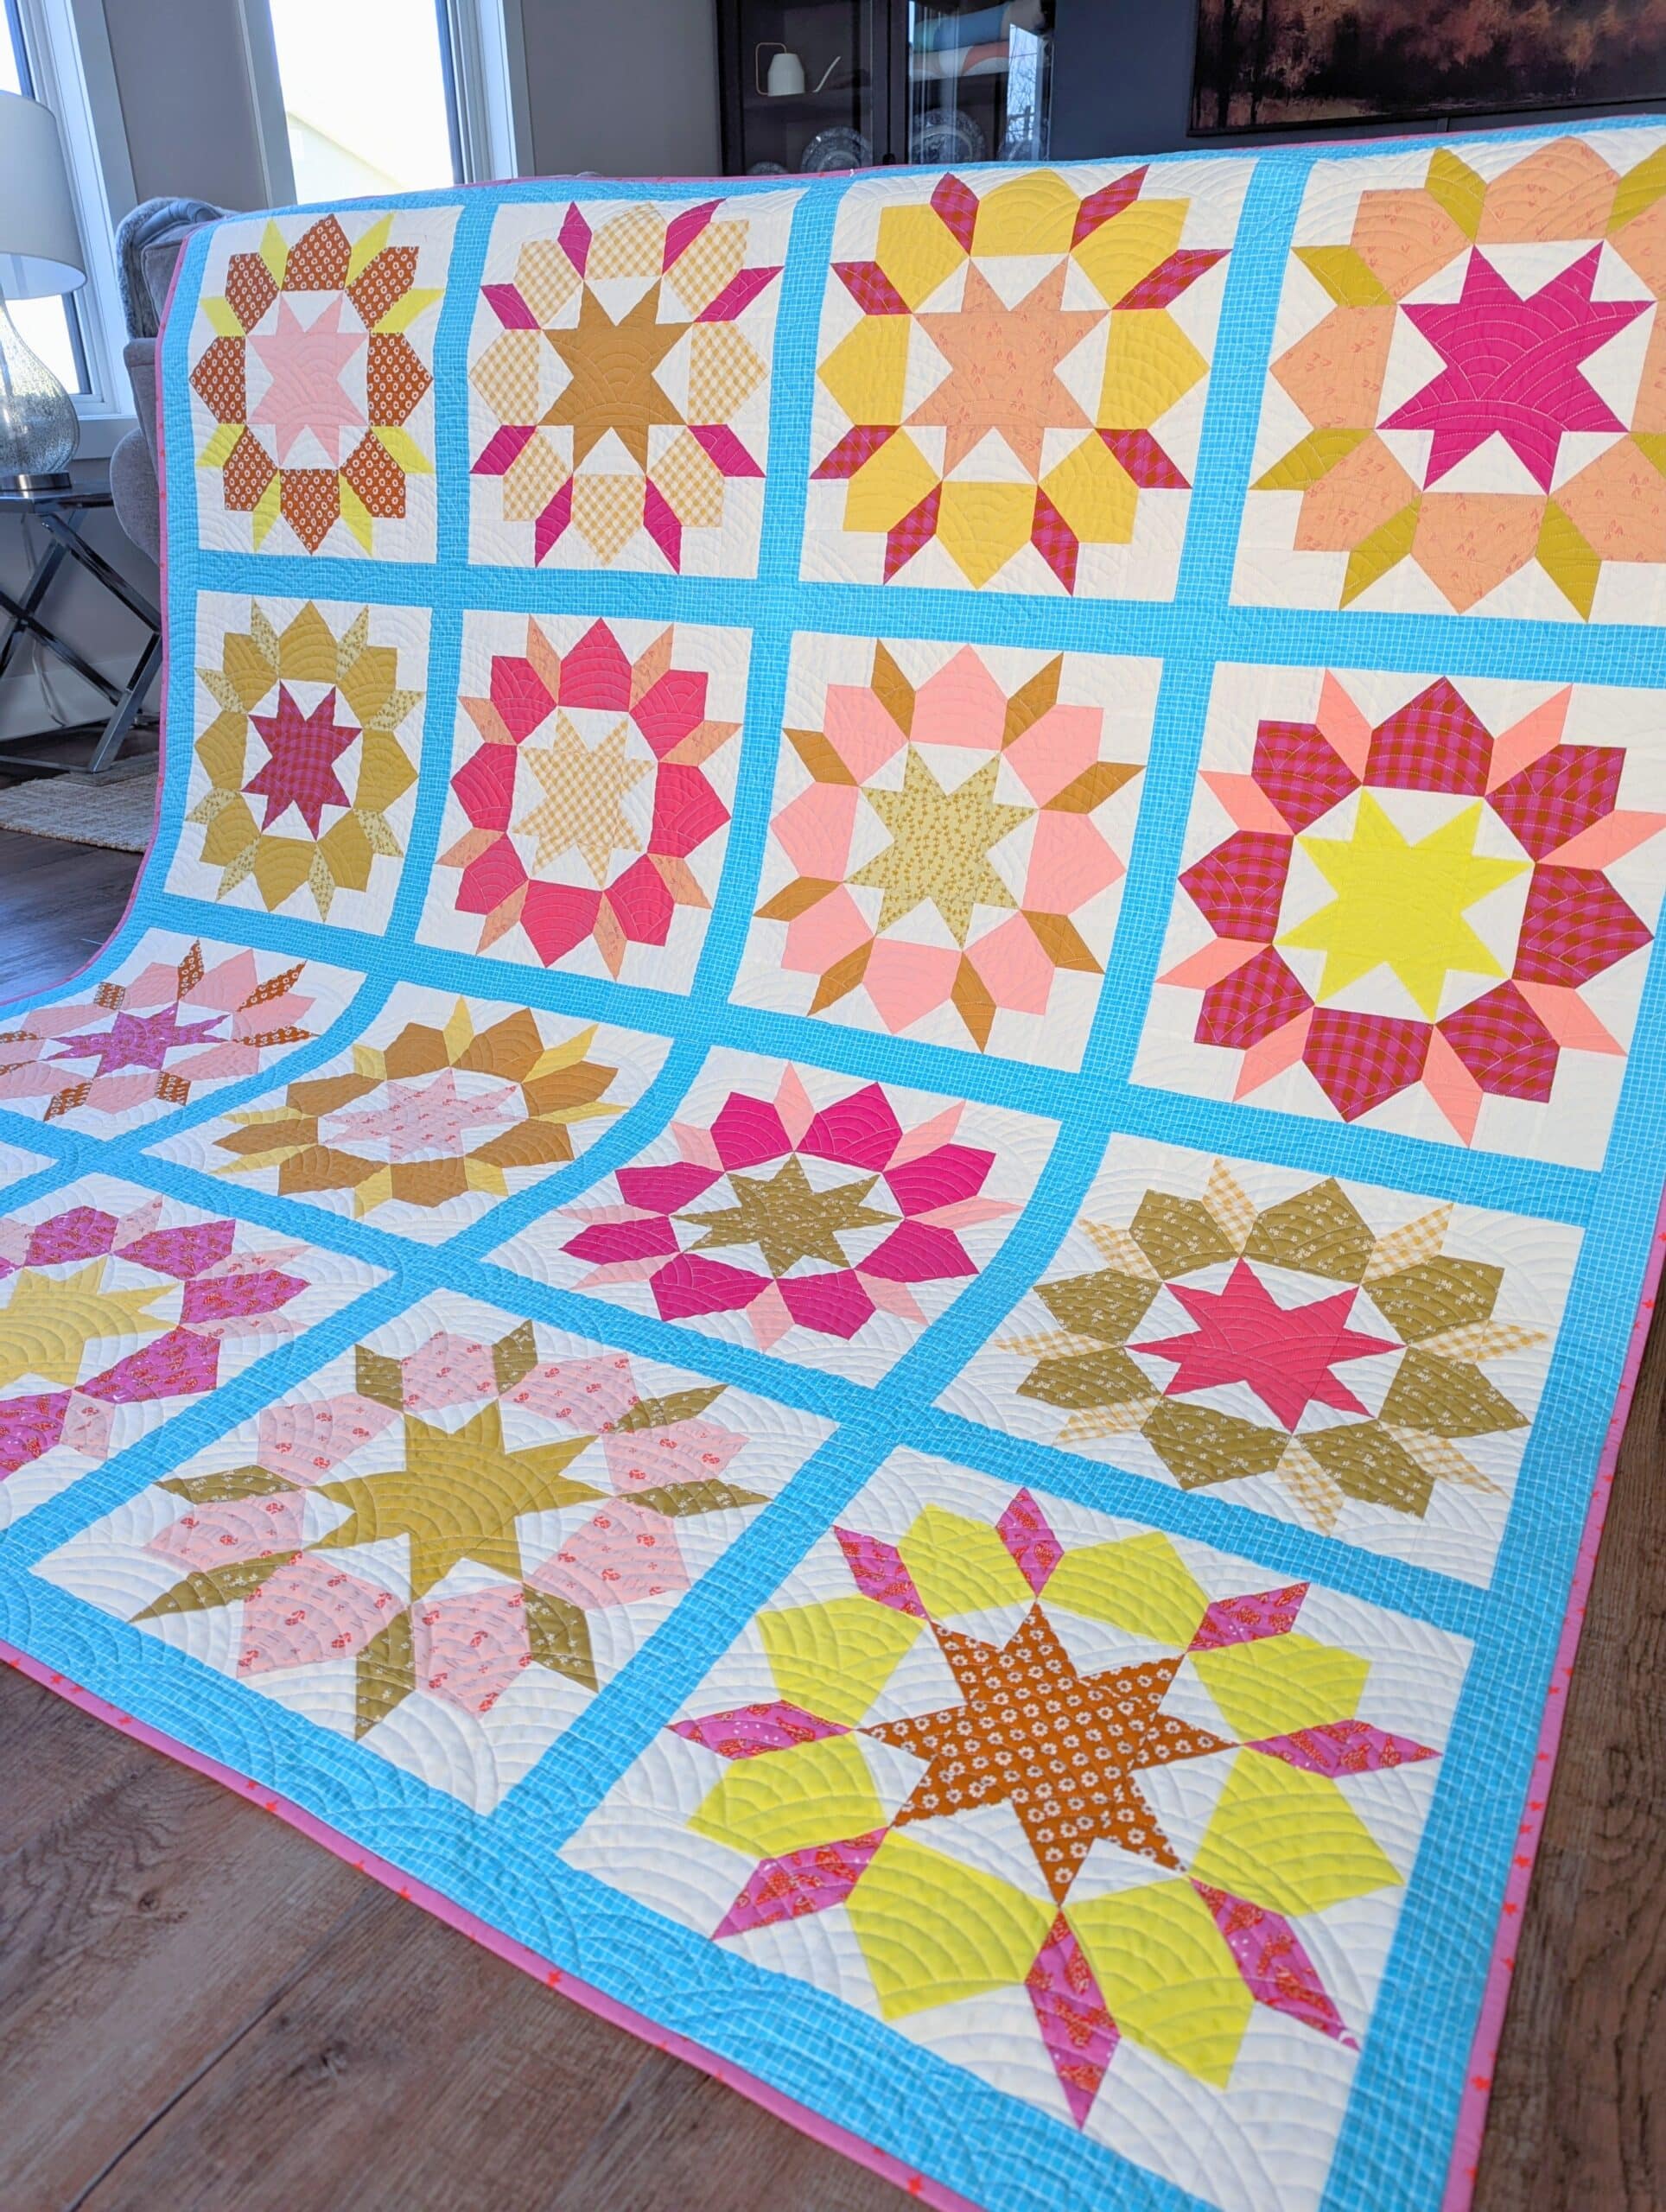
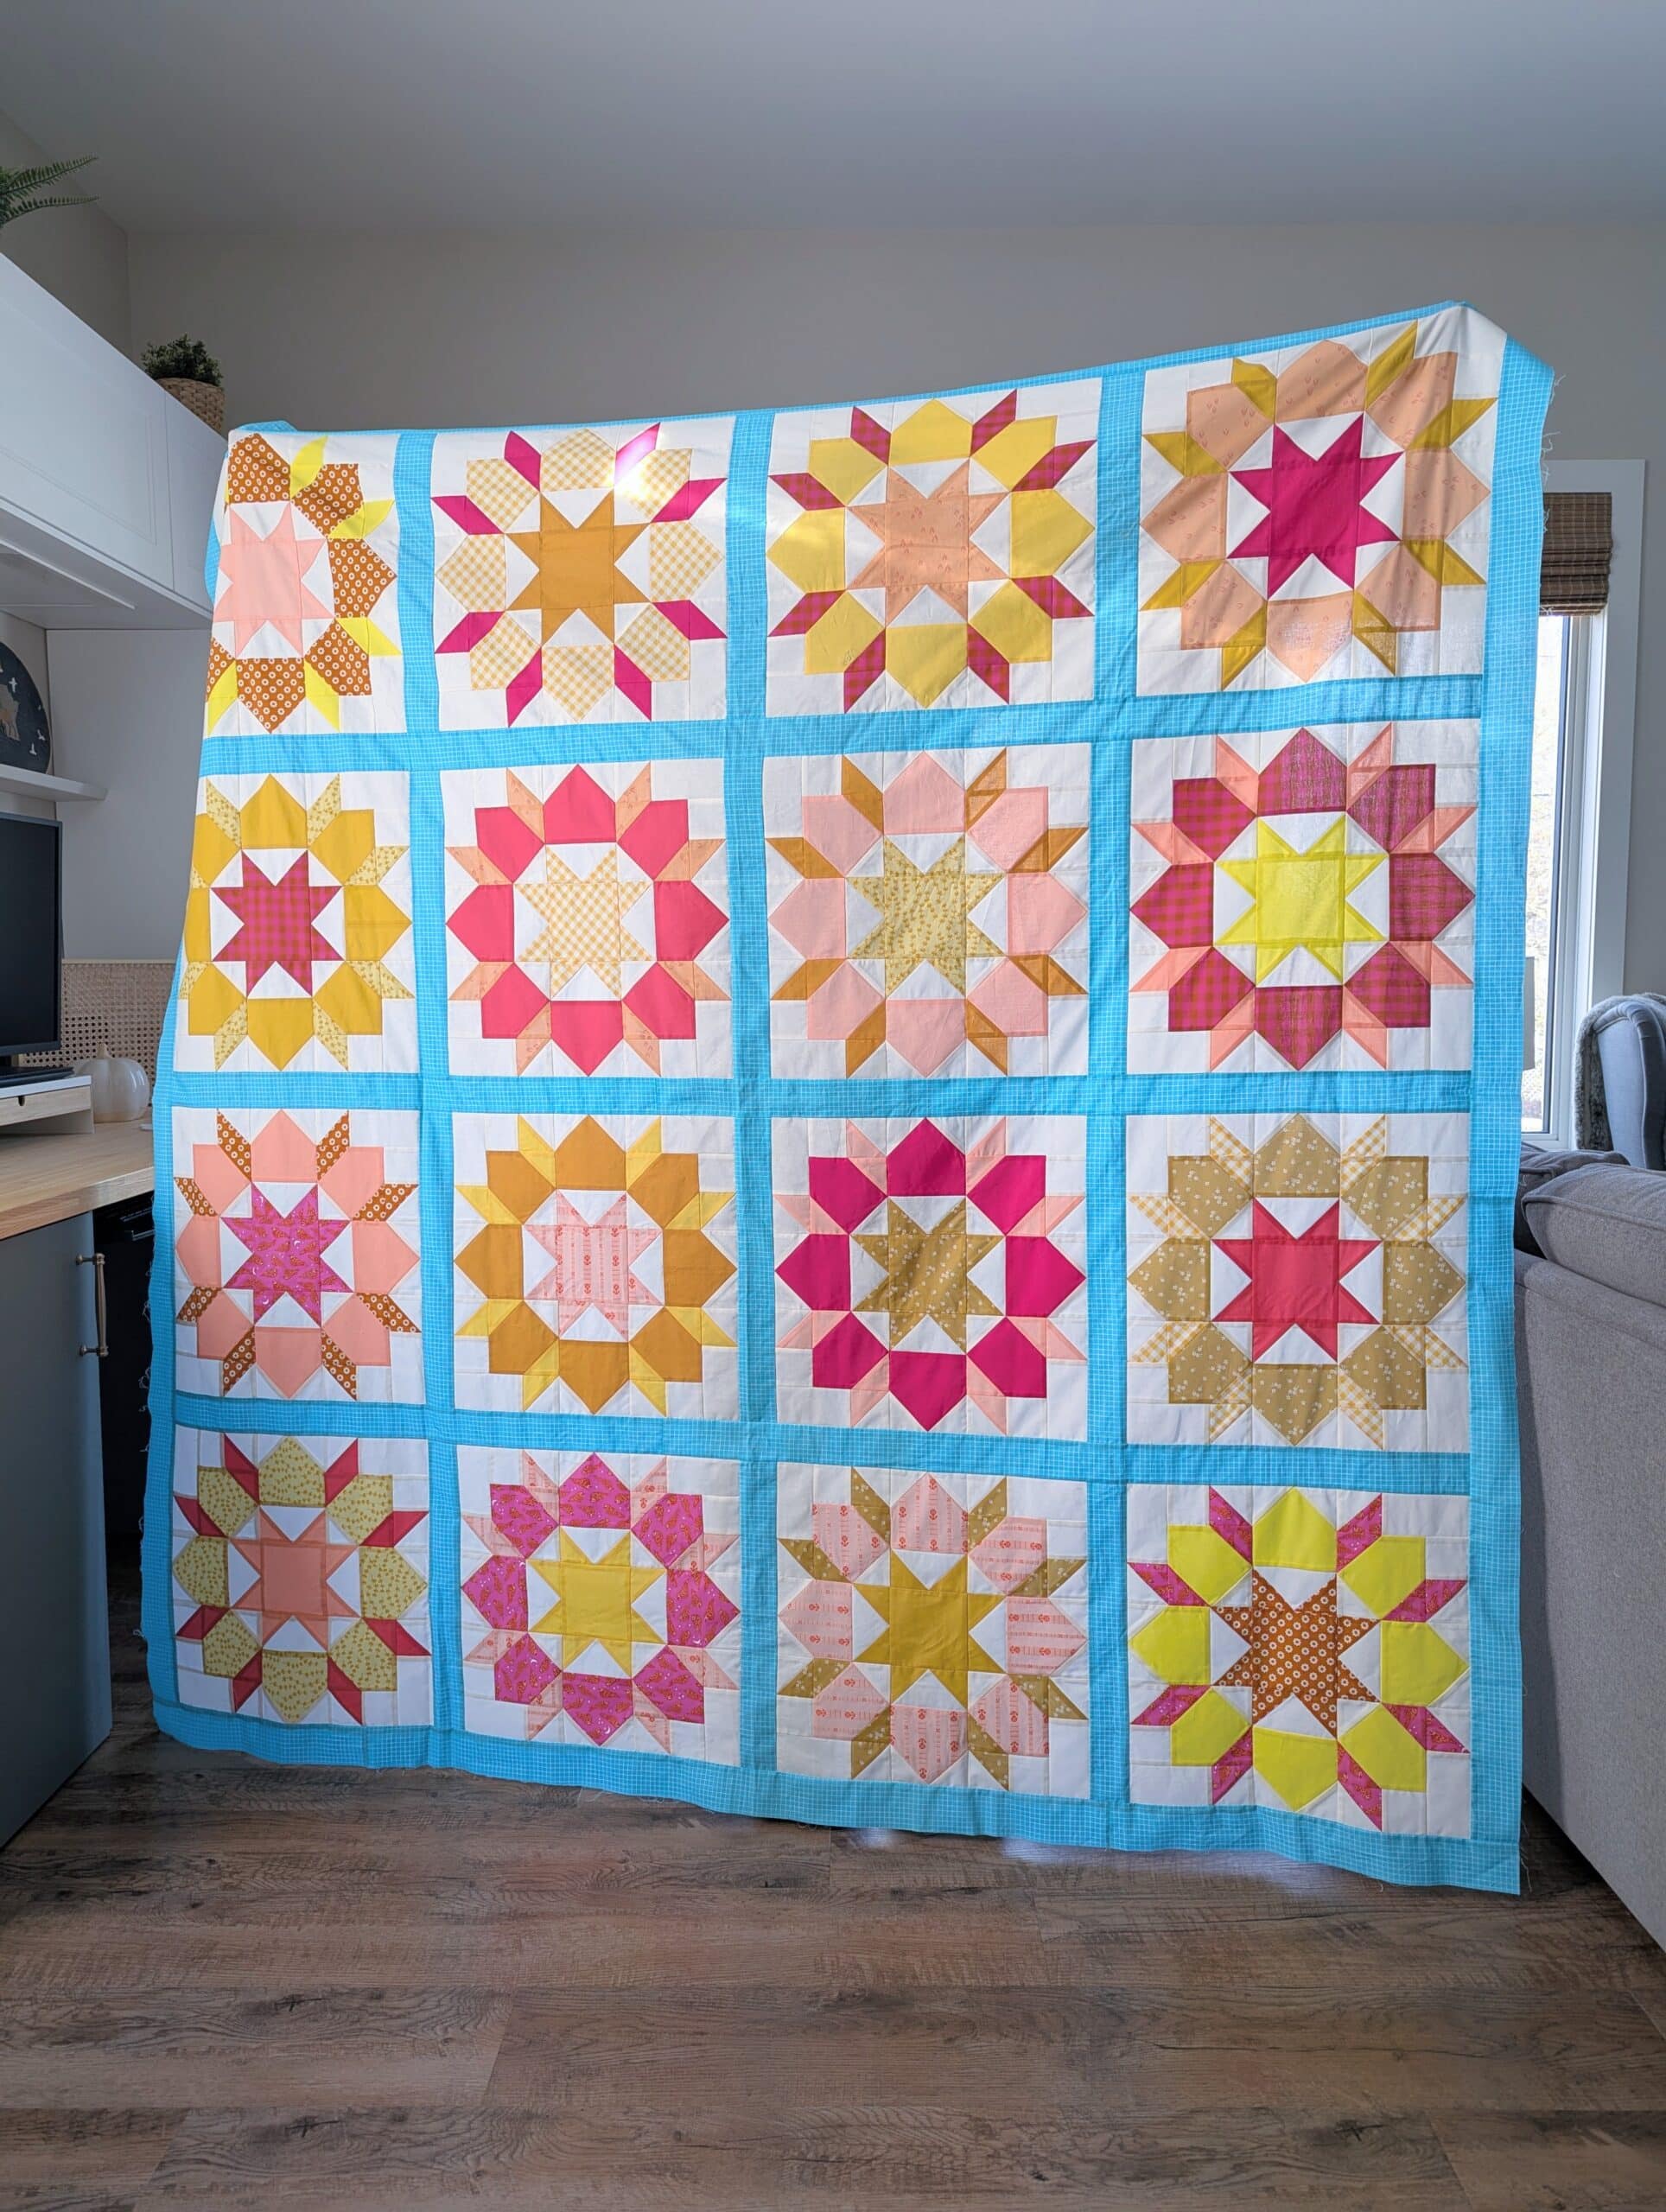
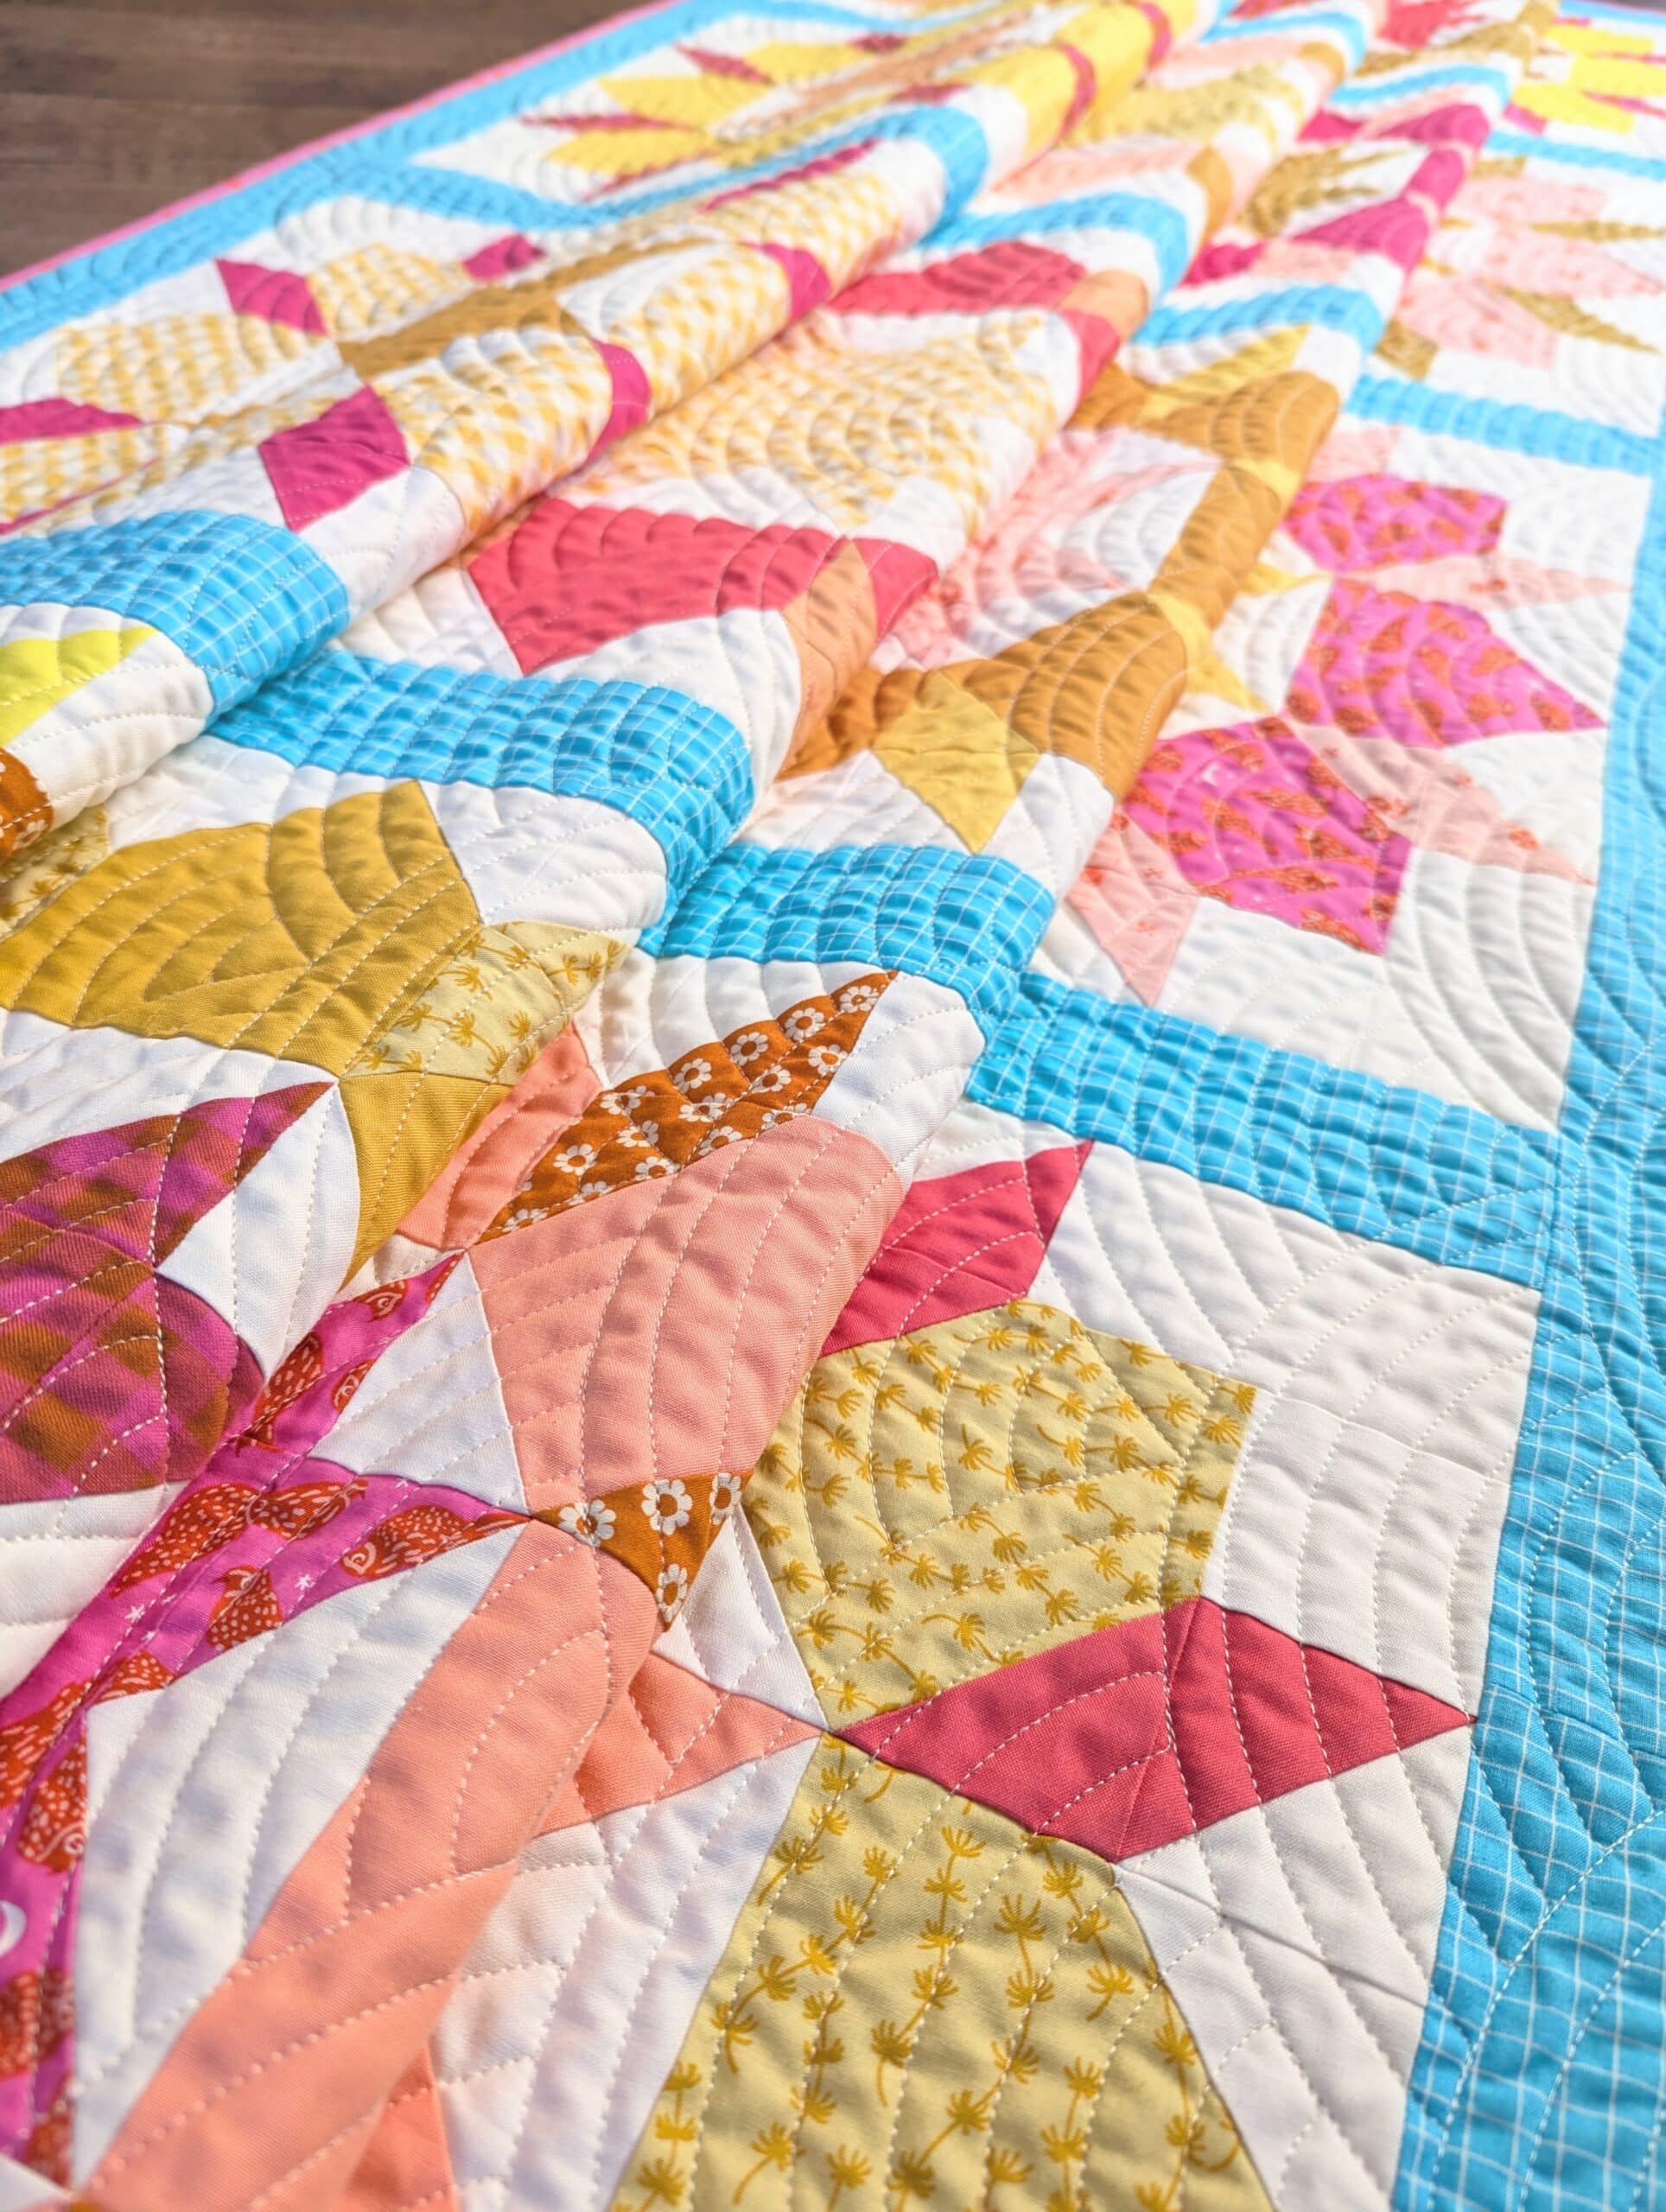
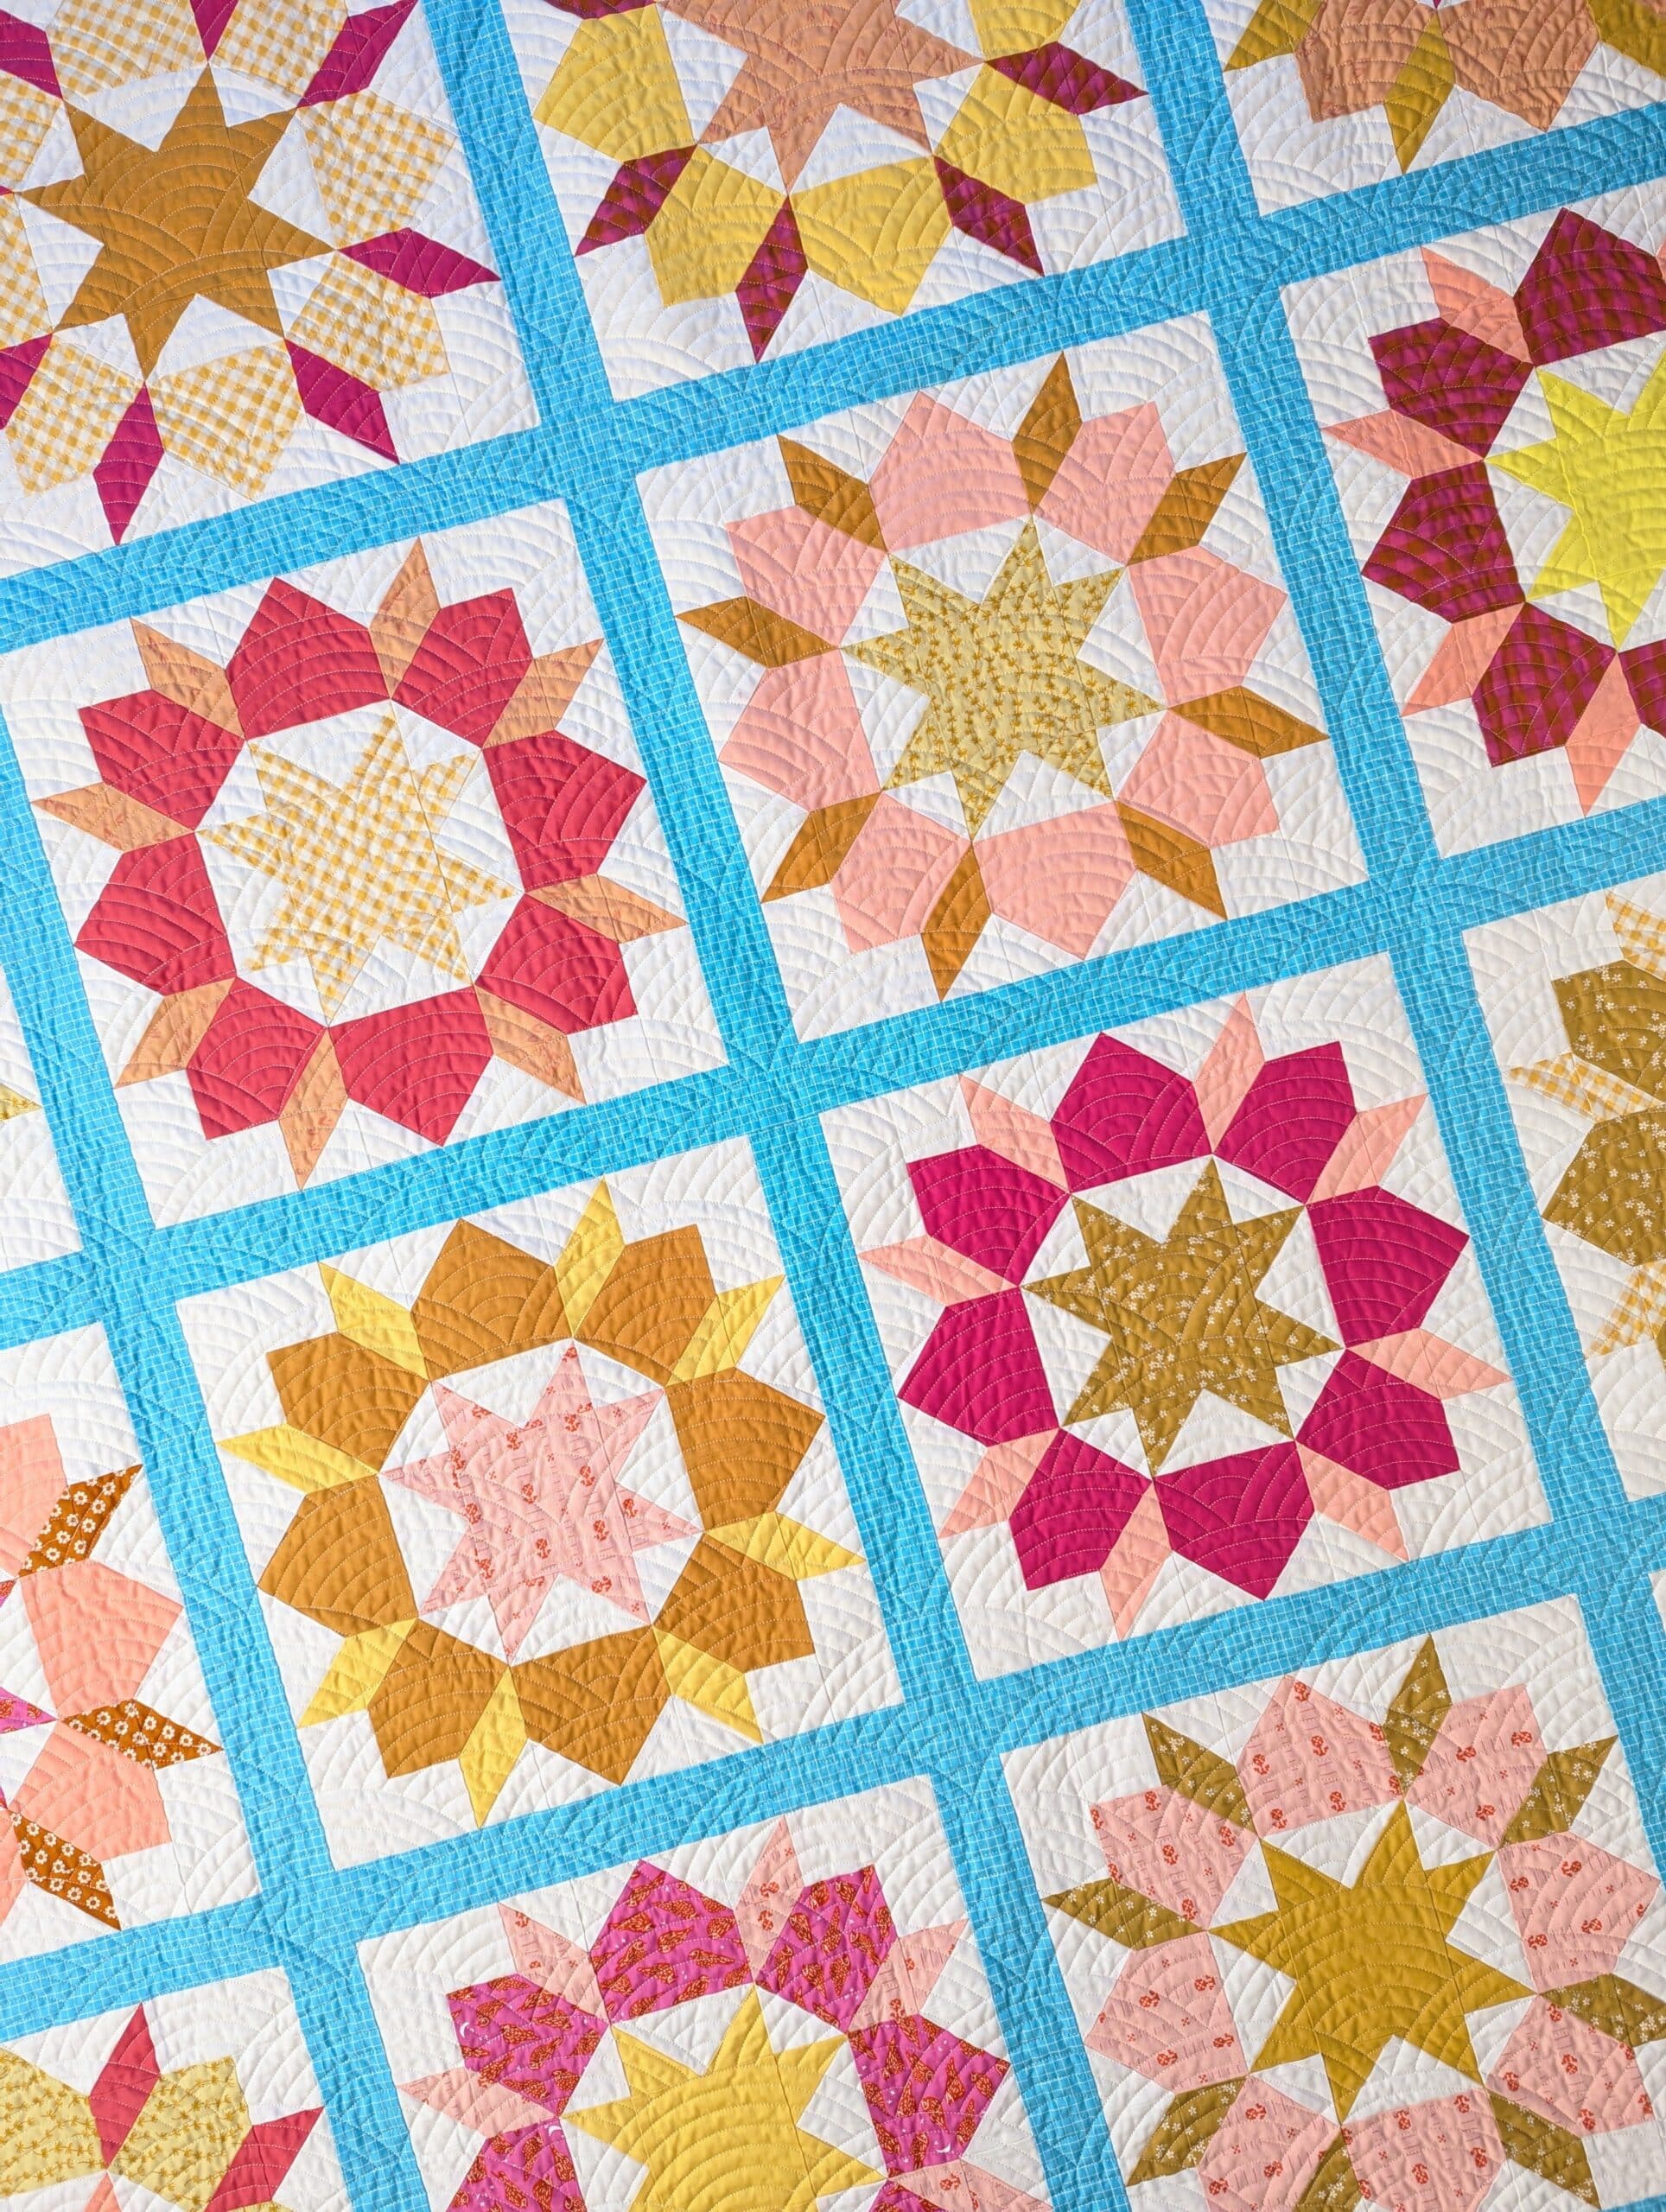
The genius of the Swoon Sixteen pattern is that it only takes 16 fat quarters (plus a bit of background fabric and some sashing) to make a nice large quilt. The finished project measures 74” x 74”.
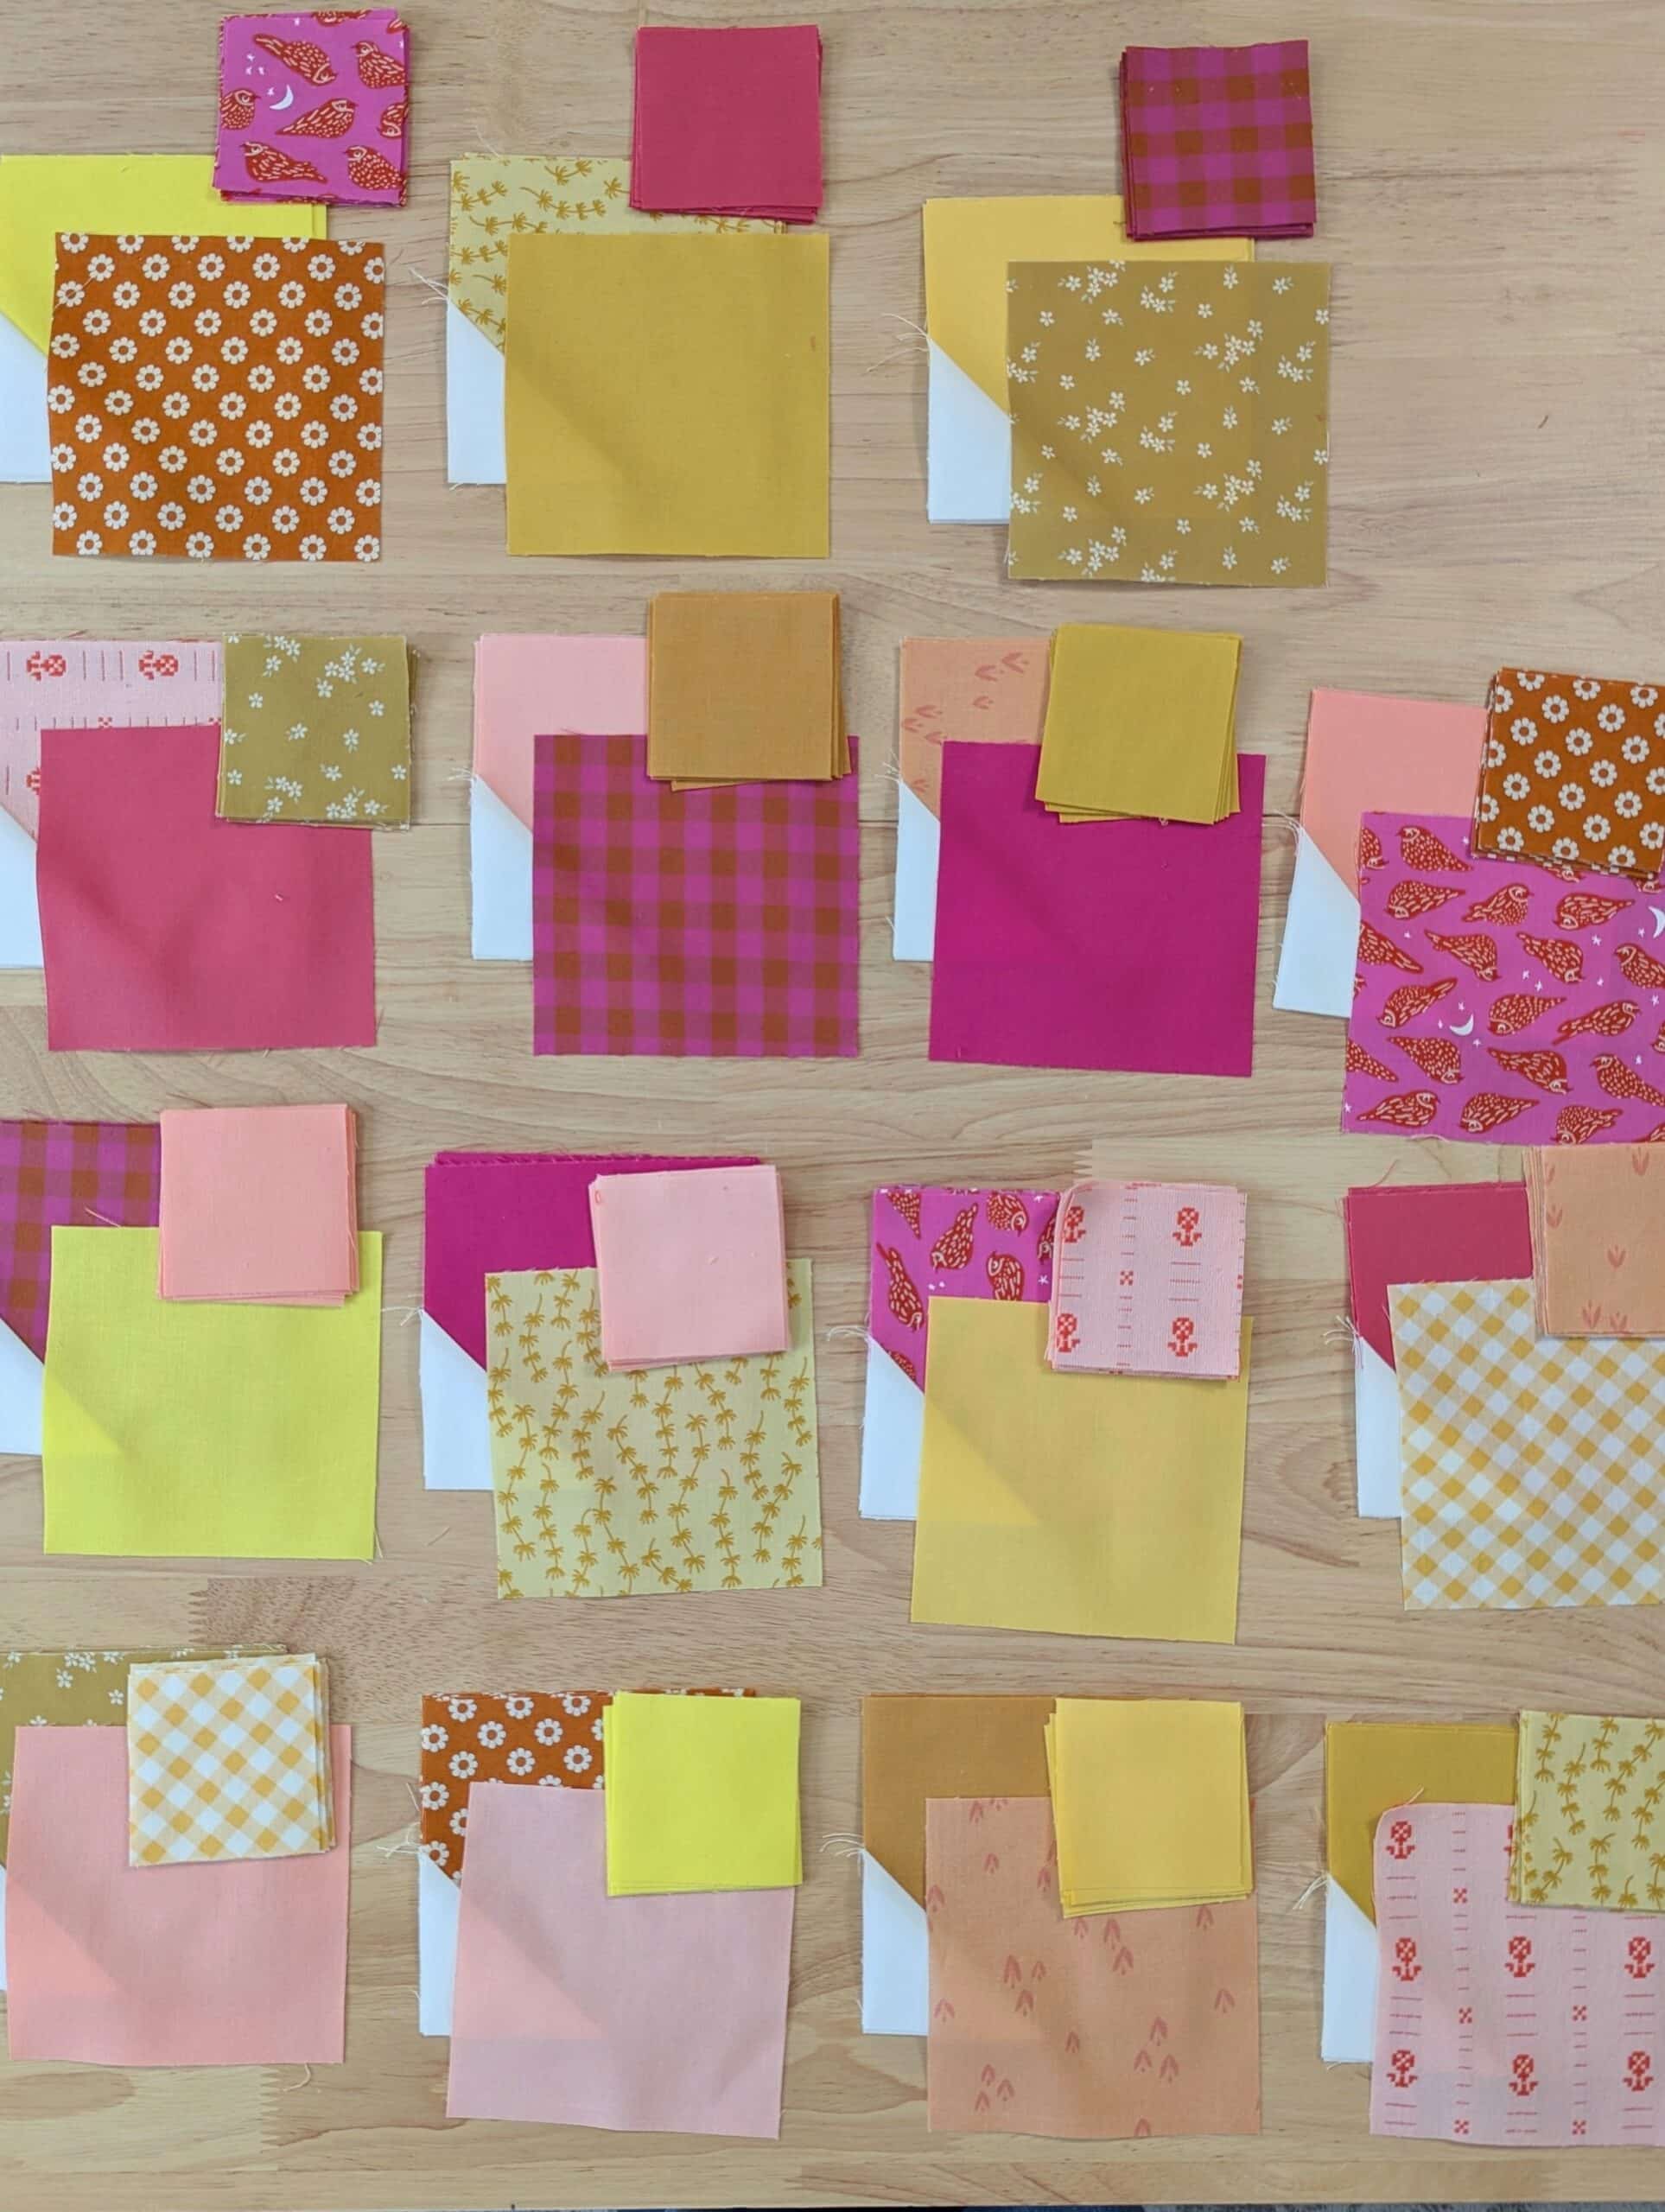
Off to my FQ filing cabinet I went! As I mentioned in this video about my modest stash, I keep all of my fat quarters (a cut of fabric that measures approx 18” x 21”) folded in a large tub in my closet. I love pulling out the bin and seeing all of my cute little fabrics at once.

You can see that I’m well stocked in the pink and yellow department, and am sorely lacking in other areas (green? Never heard of her!)
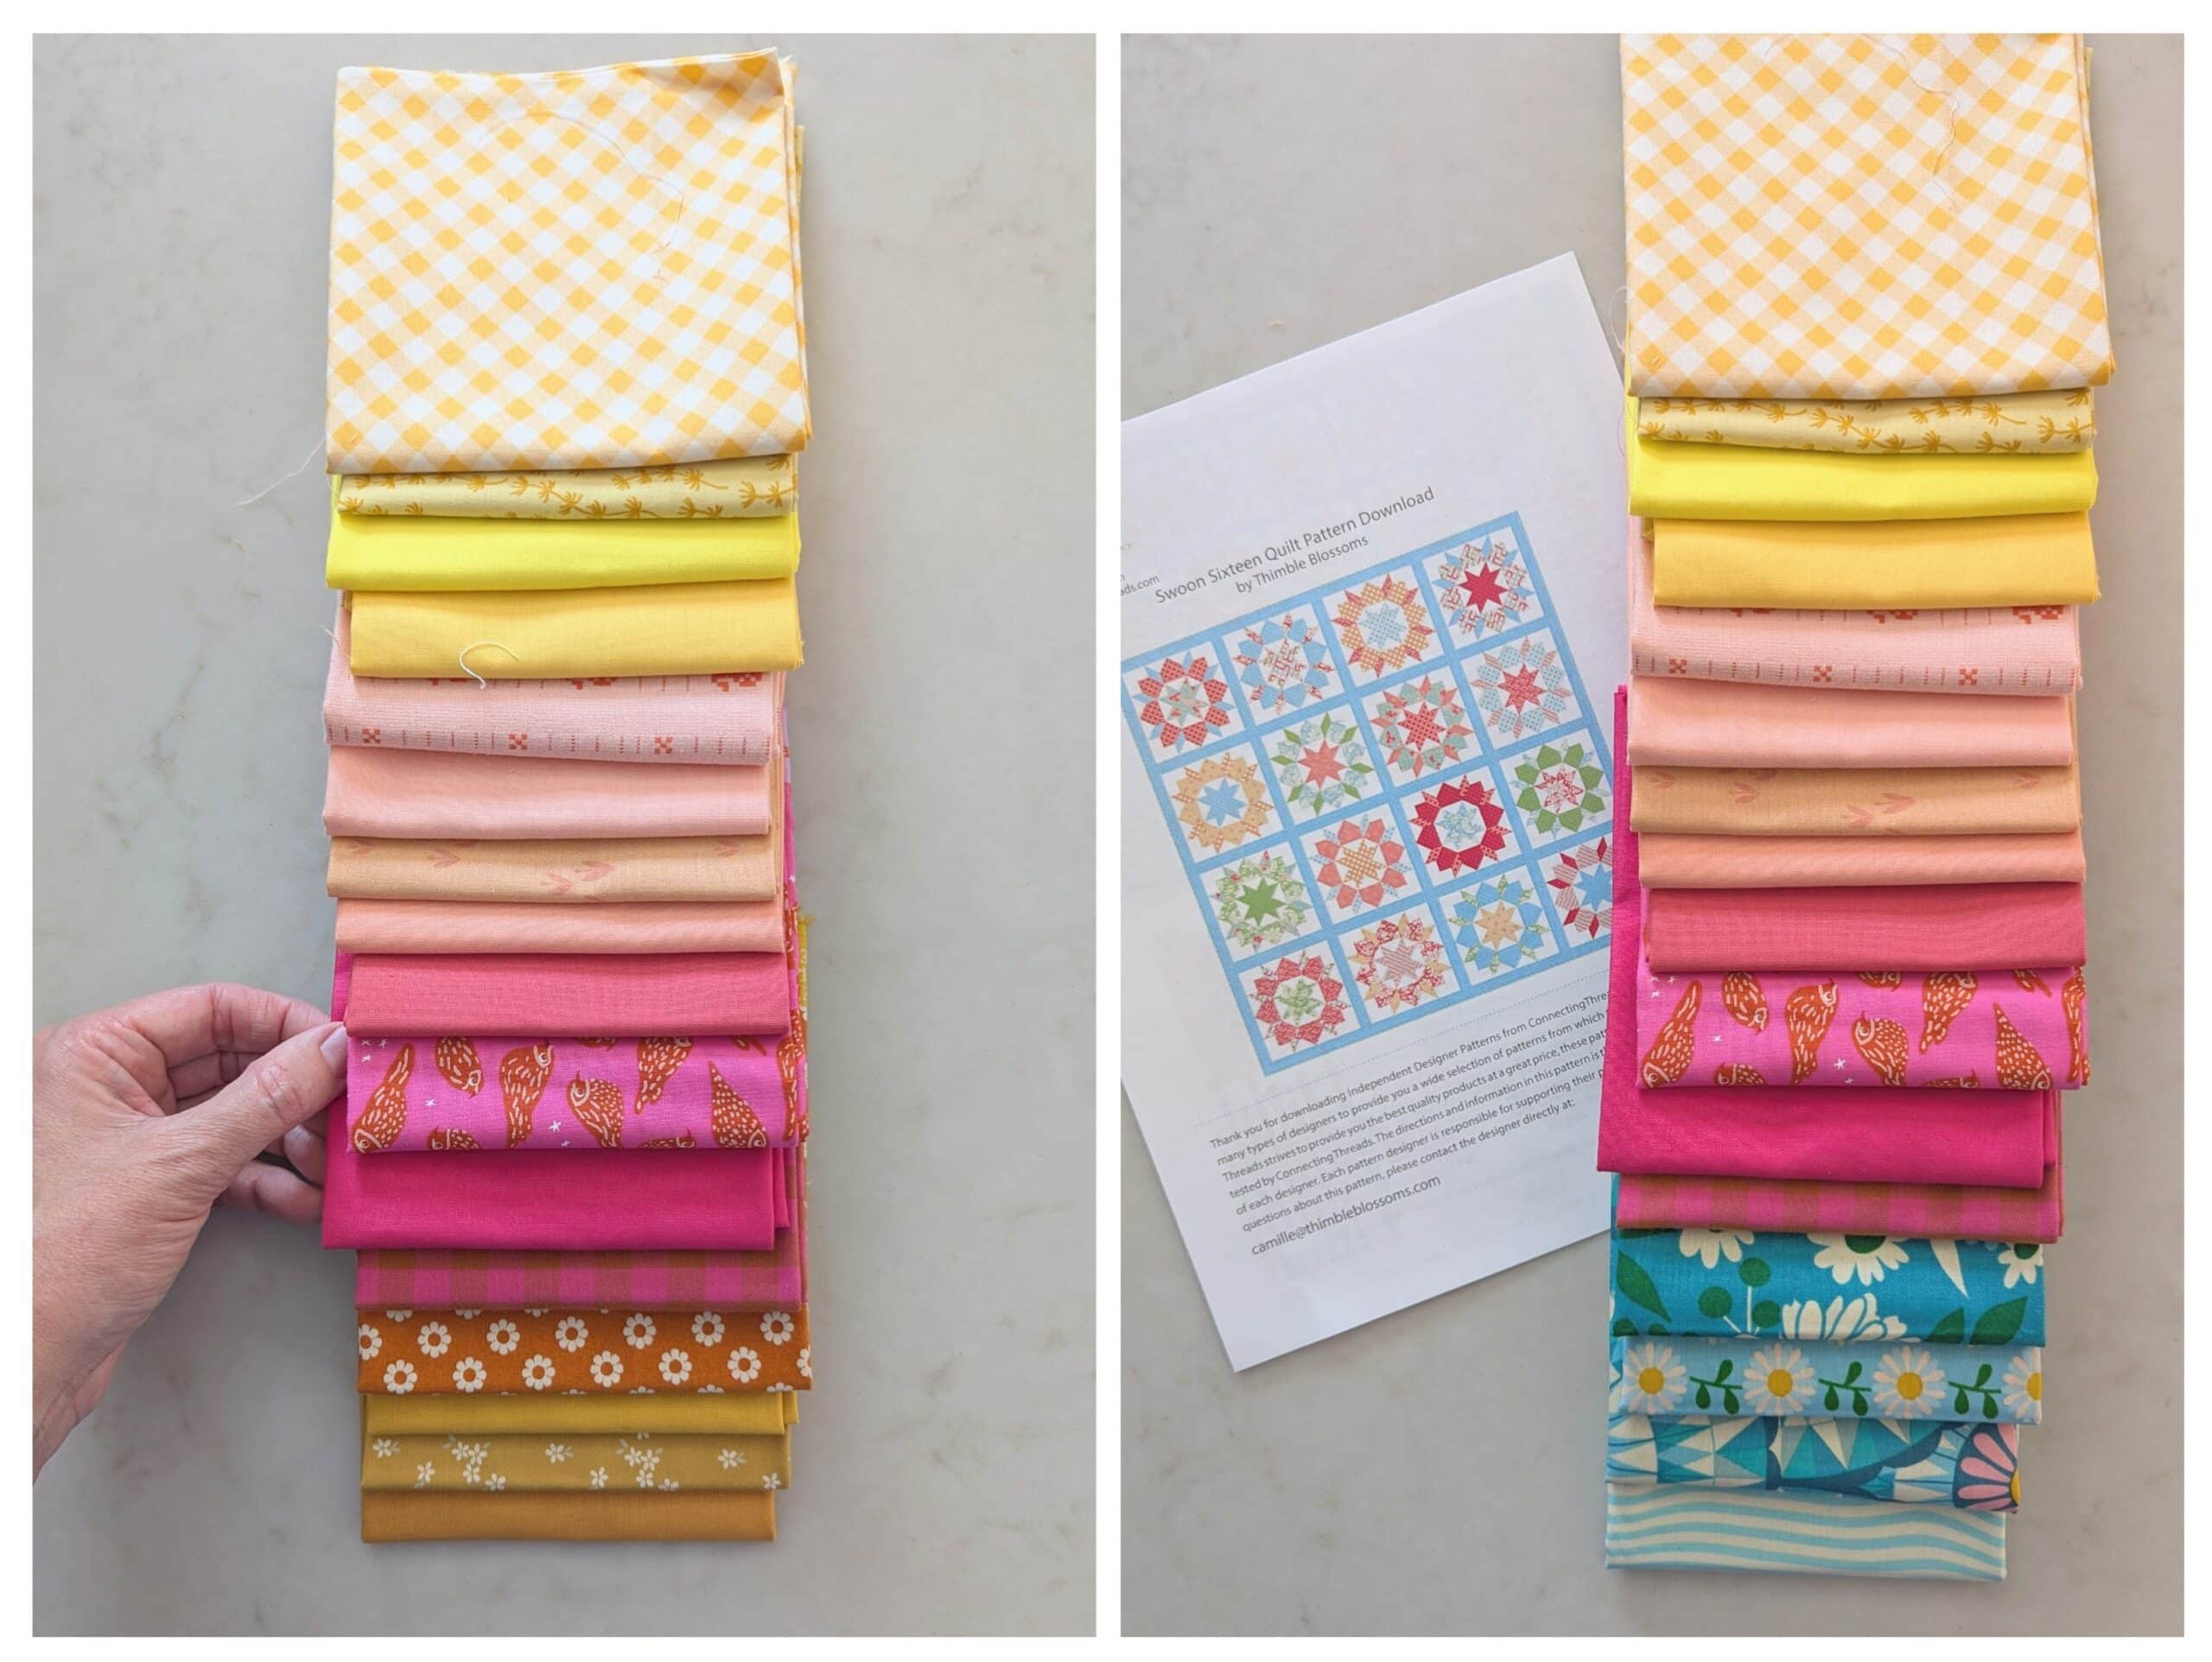
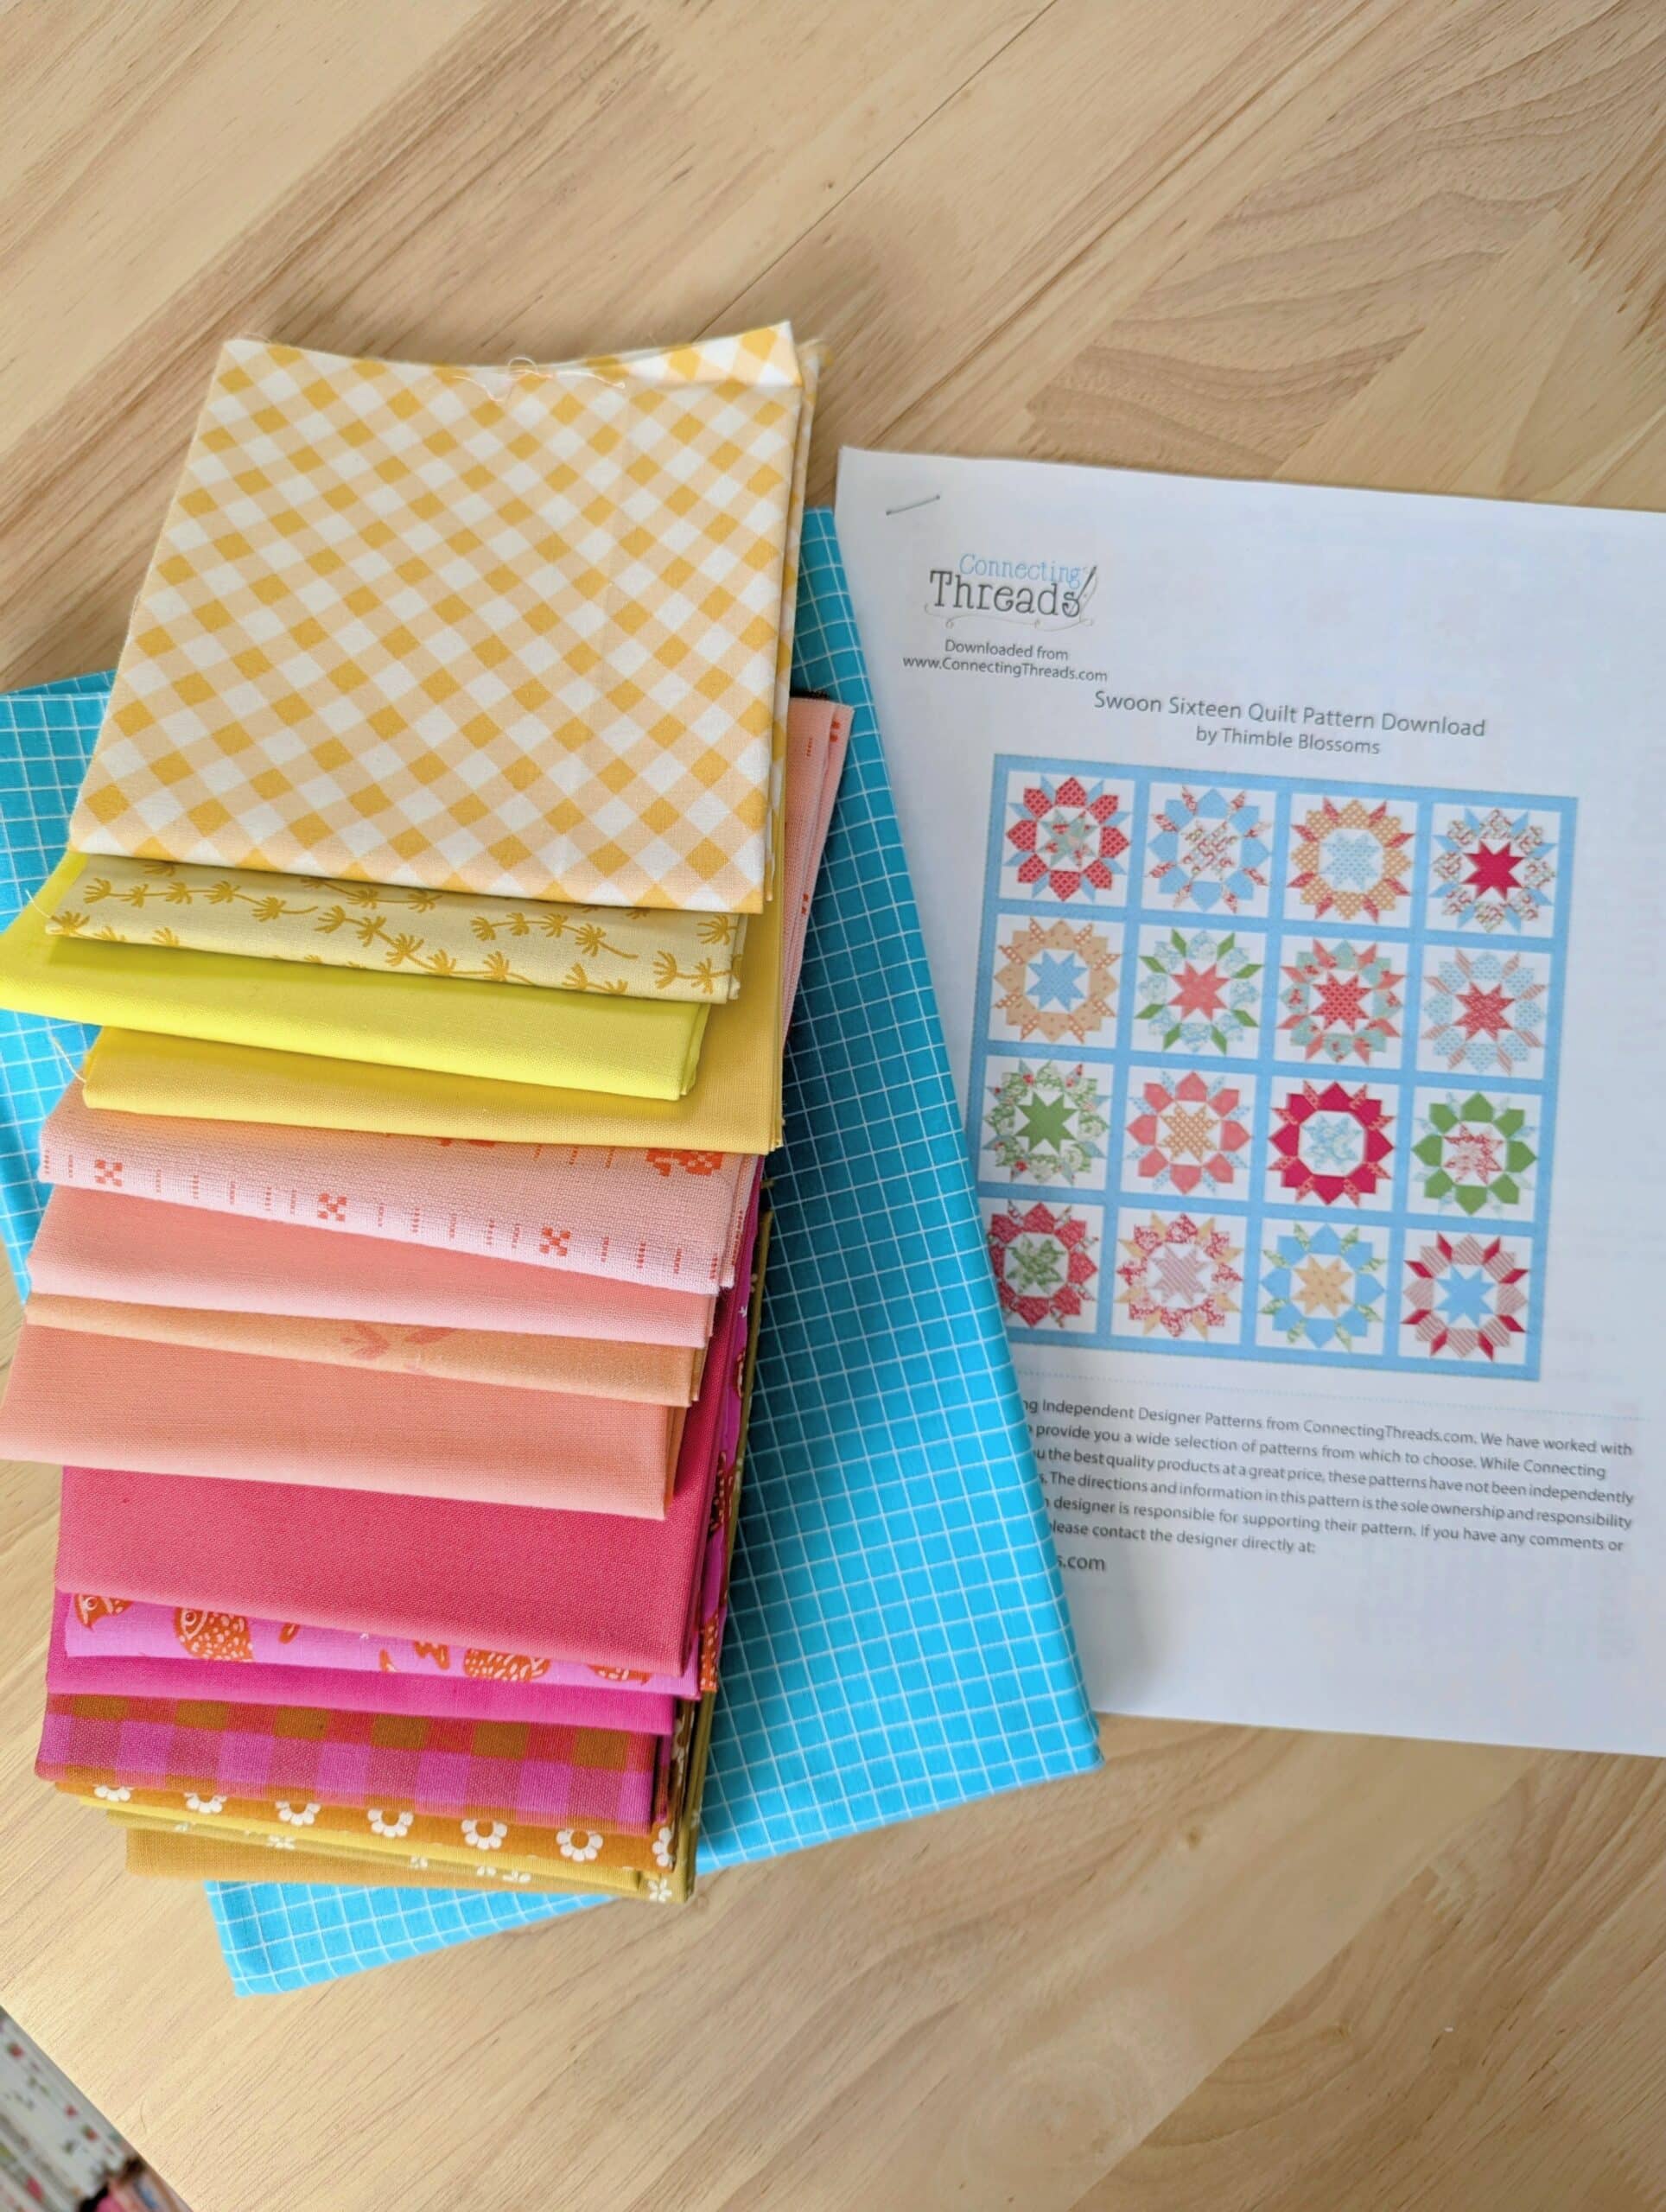
I wanted to use what I had on hand, so I picked out a selection of yellows, peaches, pinks, and caramels. For each colour way, I chose two solids and two prints, and tried to pull a range from light to dark colours.
I loved the initial pull, but after looking at the pattern decided it might look better with some blue fabrics mixed in. Both options looked great to me, so I put it to a vote on Instagram, asking my audience which they preferred.
That’s when Tasha came through with a great suggestion: use the original pull, but add blue fabric for the sashing. GENIUS!!

I found some lovely blue yardage (it’s an out of print Ruby Star Society design called Grid) in *just* the right hue in my stash, so I committed to this combination of fabrics. I was in love and couldn’t wait to get started!

Cutting Pieces
Around this time, I started to realize what an undertaking this quilt was going to be.
First of all, whenever I mentioned on Instagram that I was making a Swoon Sixteen, several people would send me direct messages letting me know that they had *started* one of these quilts, but had never finished it. Huh.
I started to receive SO MANY messages like this that I got a bit concerned about the amount of work it would take to follow through with this pattern.
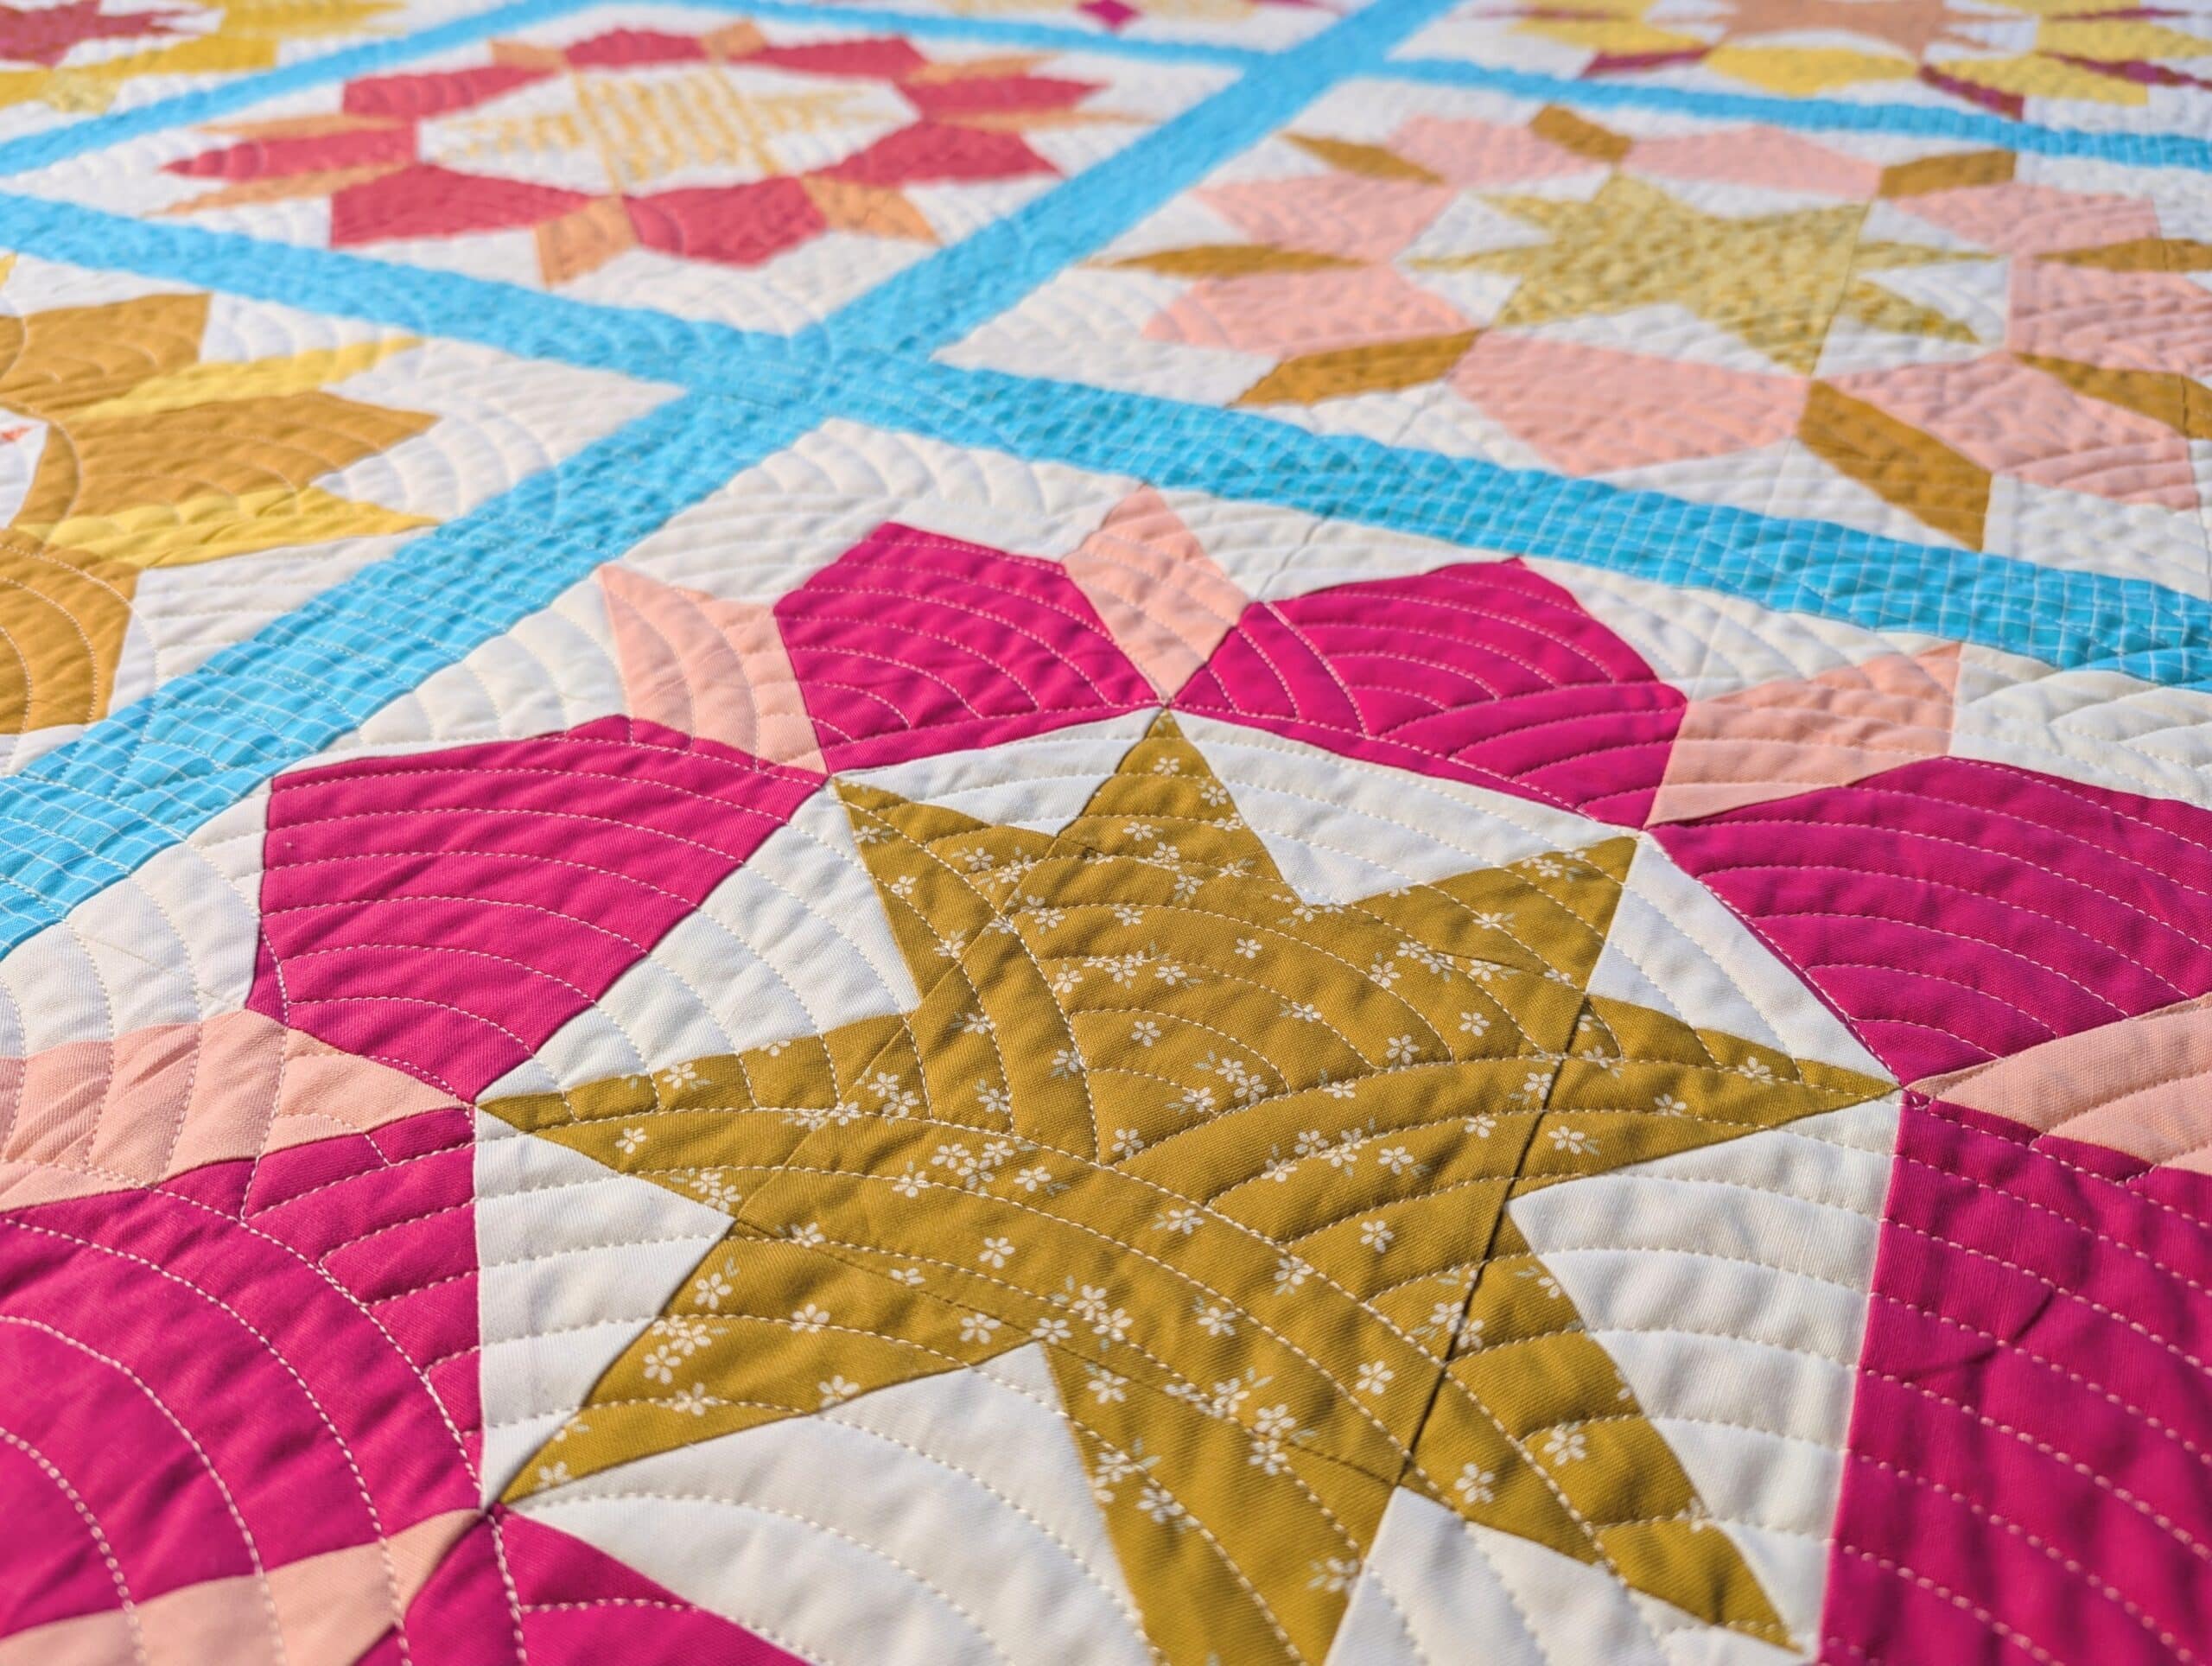
Then I cut out all the fabric and thought “this sure seems like a lot of pieces for only sixteen blocks!”. I later did the math and realized that each block required 57 different pieces of fabric. Fifty-seven. That's not a typo.

I mean… I understand there are a lot more detailed patterns out there that have more pieces per block, but this seemed a bit daunting.
Not to be deterred, I decided to sew a test block and see if maybe it would come together faster than I thought.
Dear reader, it did not.
Sewing a Test Block
The test block almost made me give up on this project entirely.
Not because it wasn’t cute - it’s obviously SO CUTE. But it showed me that I lacked some of the skills required to sew this block accurately.
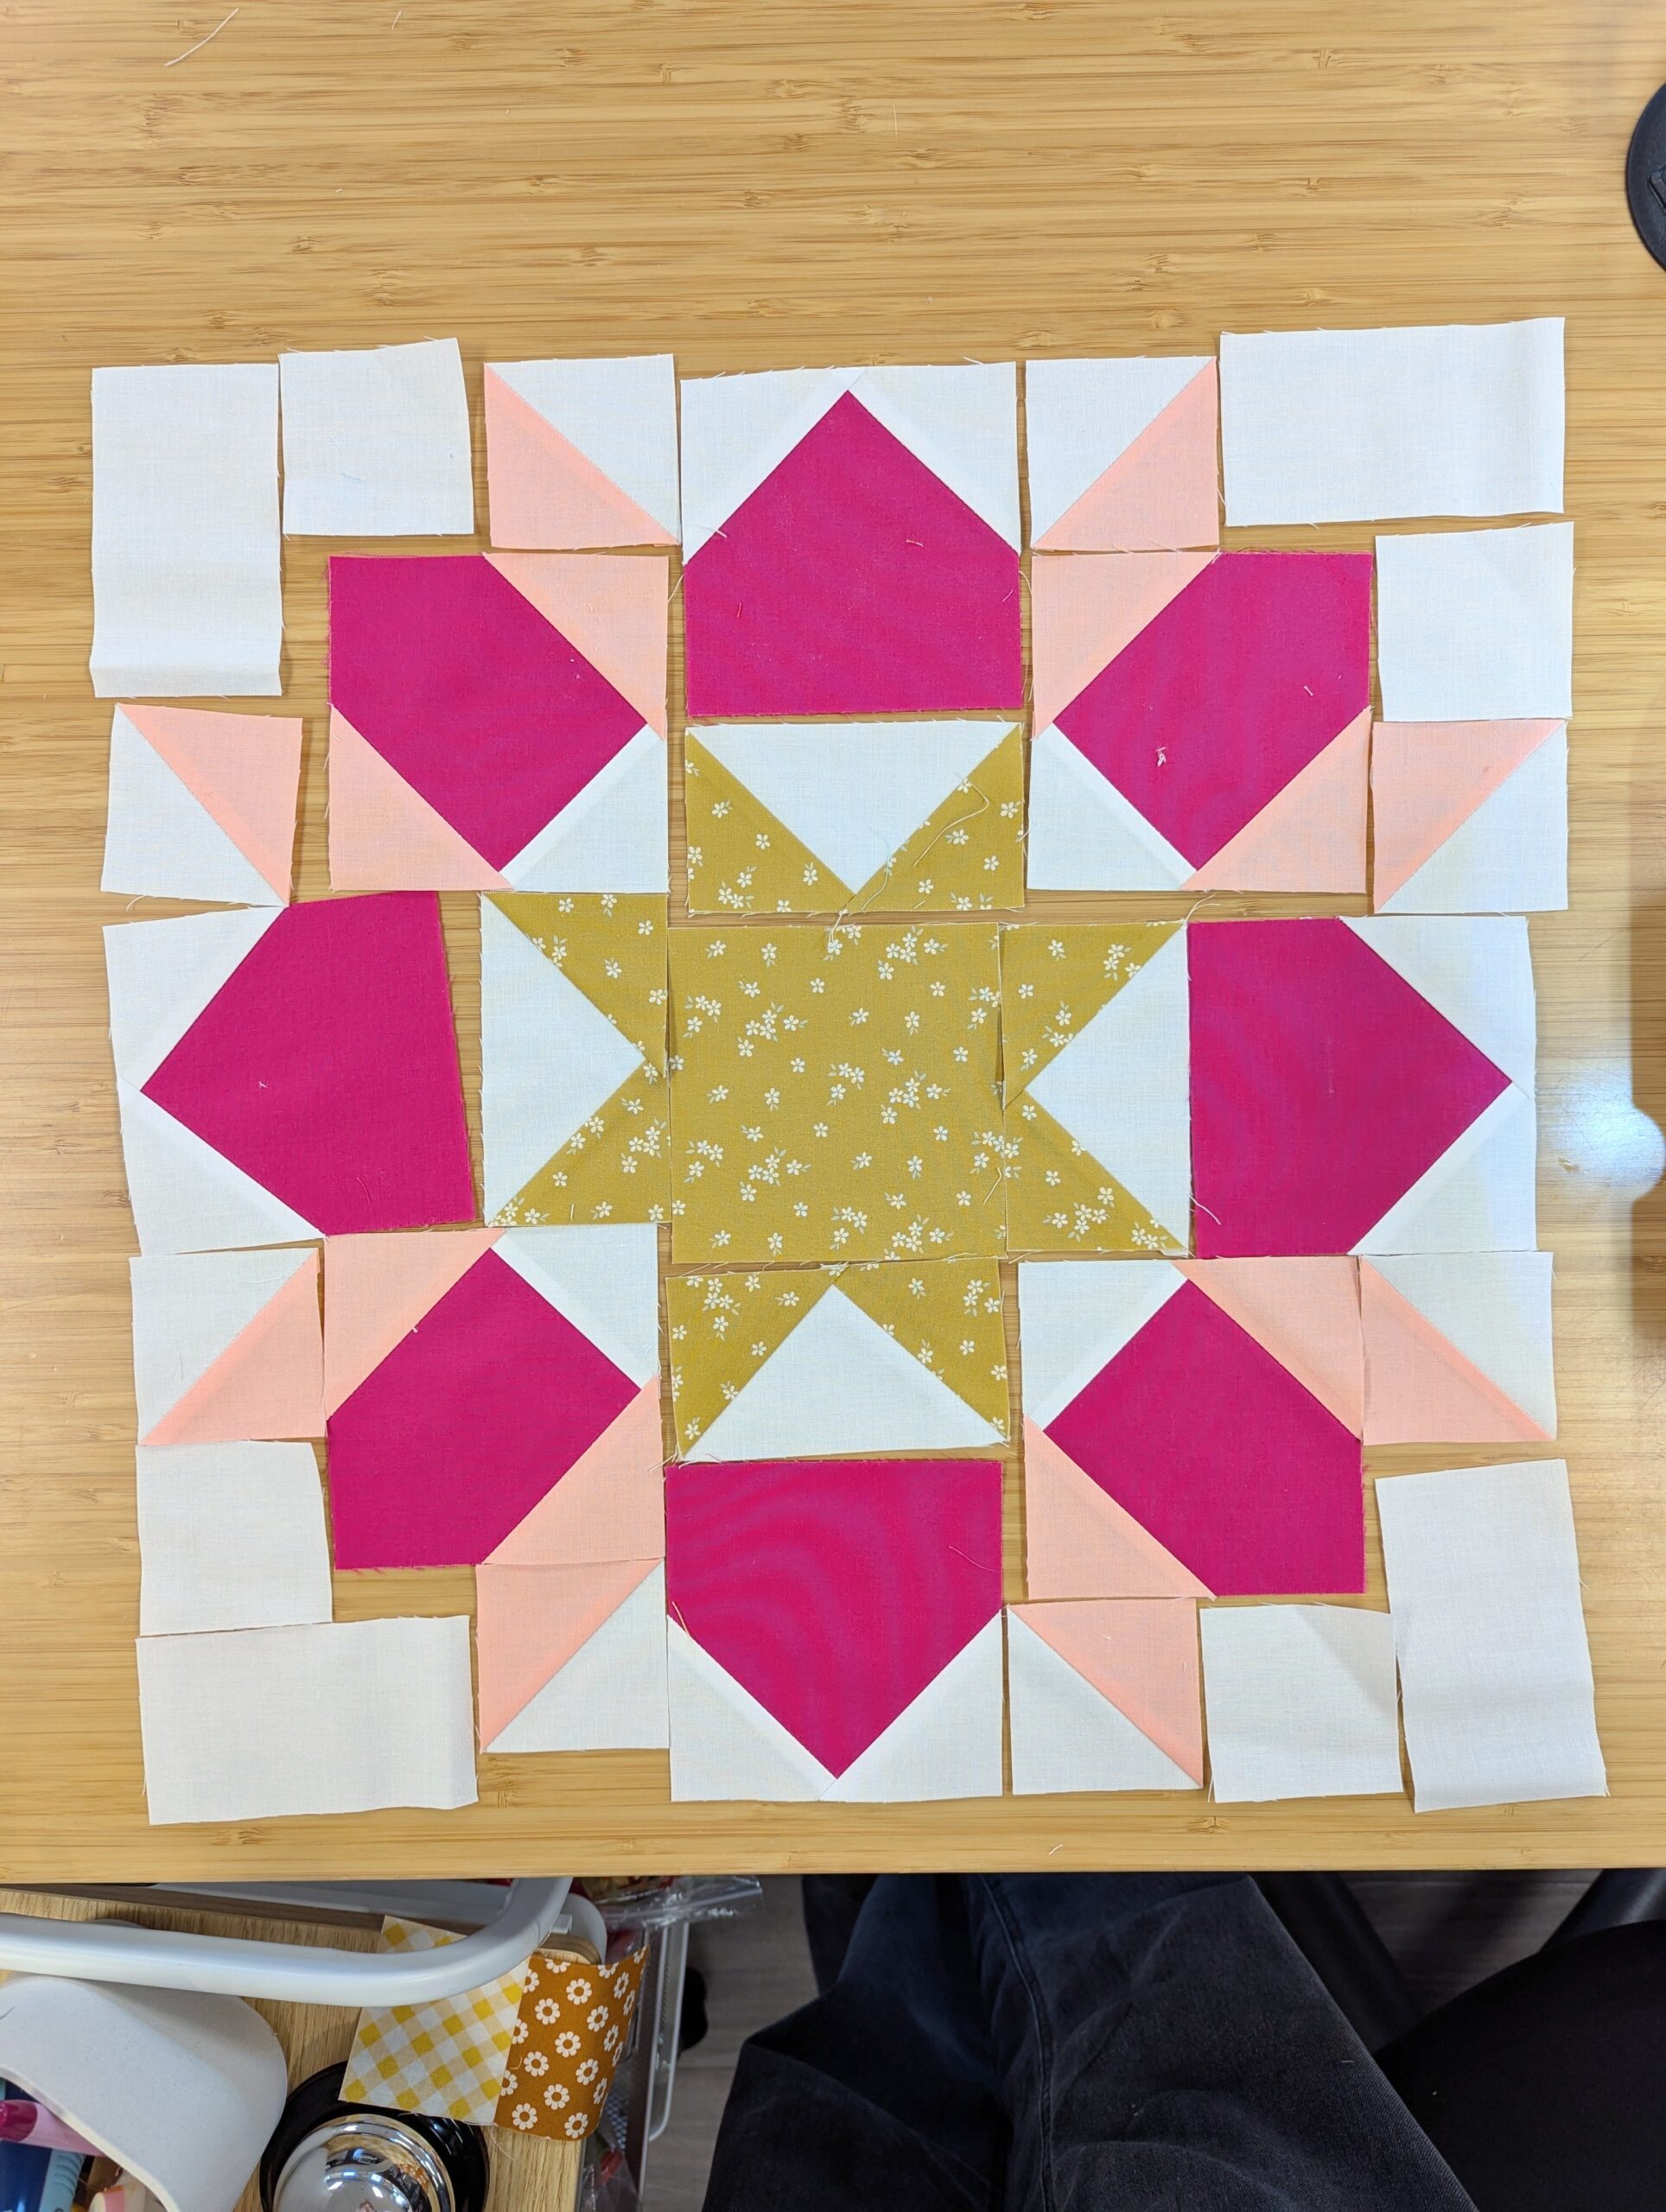
It started well enough. I picked three colours at random and sewed all of the small units together. The pattern had clear directions, and this video provided some additional visual support. I was in love with these little units - SO CUTE!
But what I didn’t realize was that they were all different sizes. Some of them were off by ⅛”, and some were off by more. I only figured this out when I tried to sew the units together and saw how wonky they were.
I tried my best to cheat some of the smaller seam allowances, but my finished block ended up nearly ¼” smaller than it was supposed to be. If you know anything about me at all, you know that this is NOT OKAY.
It wouldn’t really bother me that my blocks or the finished quilt weren’t the “right size”, but I really do not enjoy trying to sew things together that are different sizes. Not only is it stressful, it results in a lumpy quilt that doesn’t longarm well.
Wanting to spare Future Shelly any undue frustration, I decided to improve some of my skills before tackling the rest of this project.
Also? That one test block took for-ev-ER to make. I still wanted to work on this project at Retreat, but quickly understood that it would take me the entire week if I didn’t do any pre-sewing. So I set about making all of the sub-units before I left.
Assembling Sub-Units
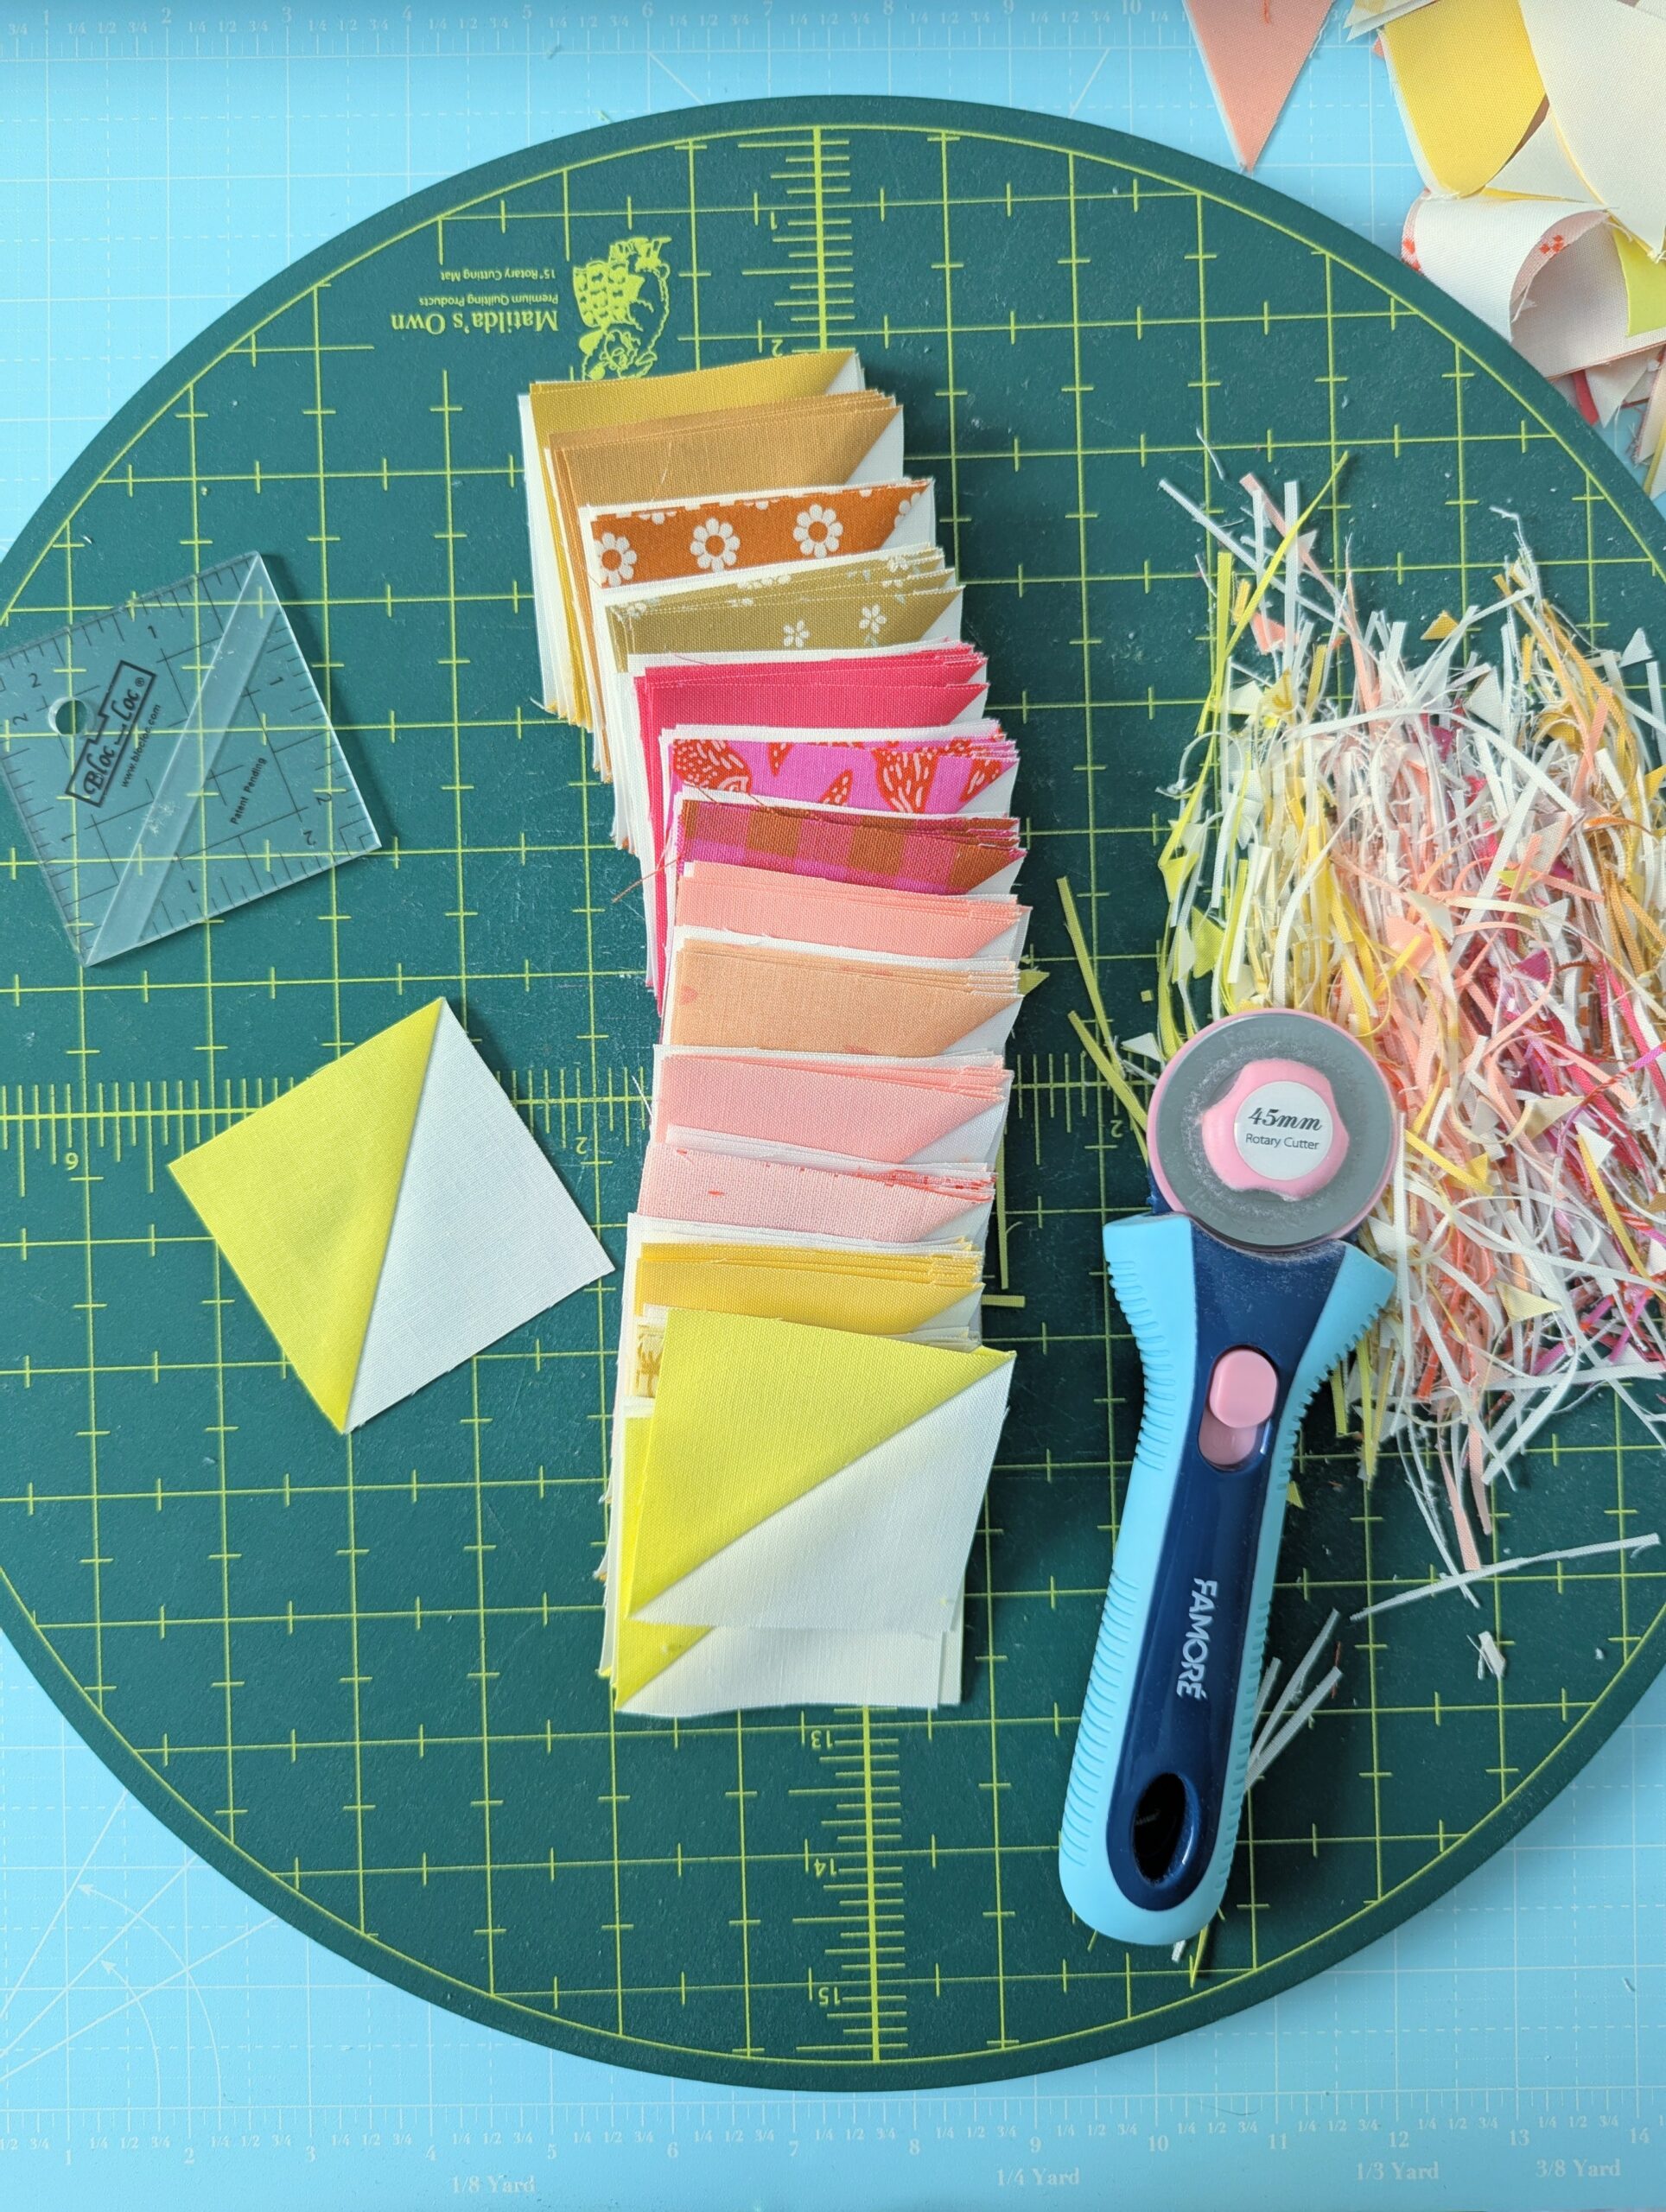
The first thing I sewed were the Half Square Triangles. I’ve made a million of these in my quilting life, and have got the technique down pat. I love to make them slightly oversized and then trim them using a Bloc Loc ruler. Perfect results every time!
Luckily, the pattern was written using this exact method which made this step easy peasy.
Then came the flying geese.
I love the four-at-a-time no waste method because it’s fast, accurate, and works perfectly for directional fabric. This handout gives you the dimensions required to make slightly oversized blocks which you can then cut down using a Bloc Loc ruler (or other tool of your choice) to get really precise results.
Unfortunately that’s not how the pattern was written, and I didn’t notice until I had cut out all of my pieces (at which point, there was little to no leftover fabric). Always read the pattern carefully before you begin cutting!
If I was to make this quilt again, I’d definitely try to make the FG units using the four-at-a-time dimensions. Have you ever modified the cutting for this quilt? Is it possible with a fat quarter? Let me know in the comments!
In any case, I knew I had to make my flying geese (and every other part of the blocks) using the snowball corner method.
Mastering Snowball Corners
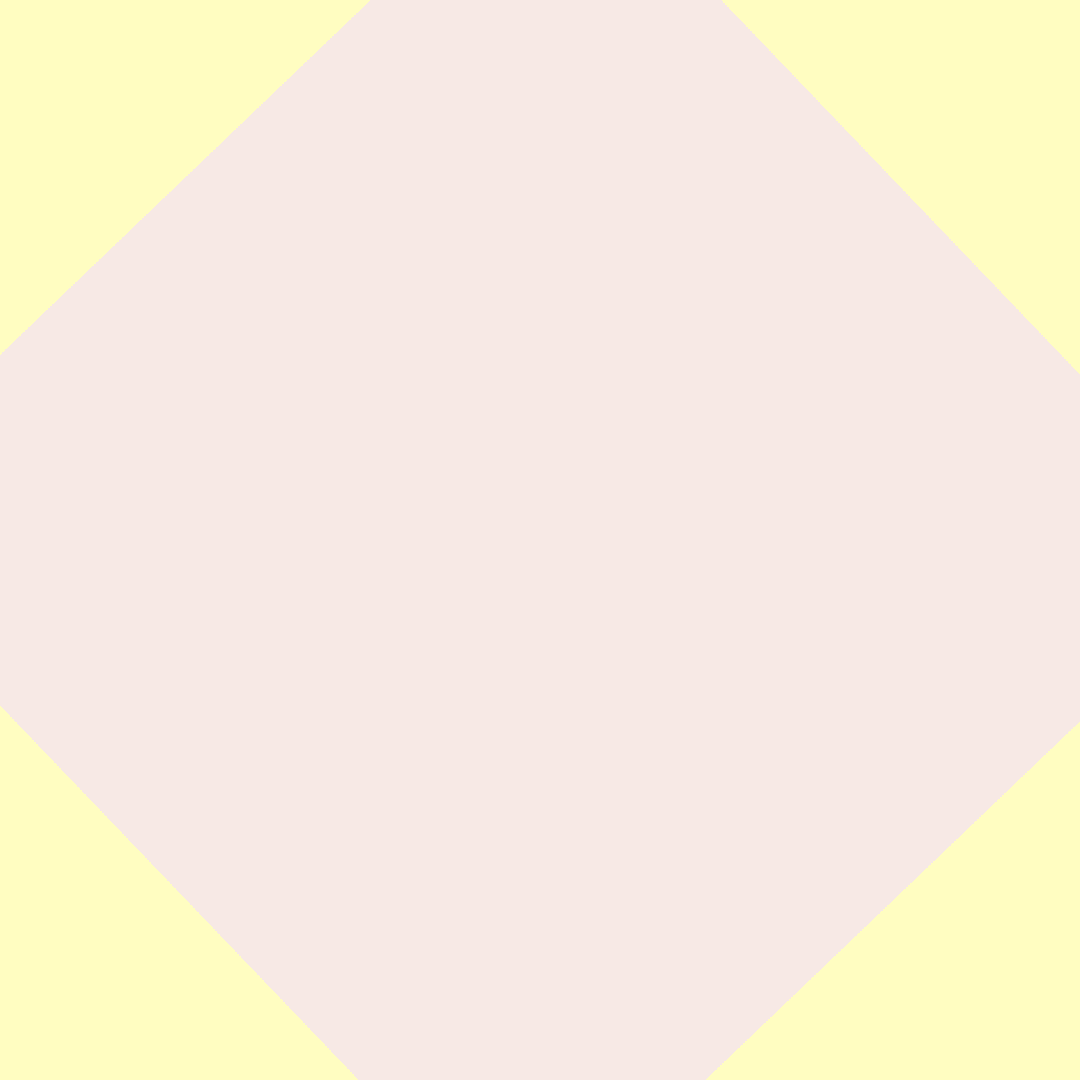
Sometimes referred to as the stitch-and-flip method (and I’m sure many other names), this technique has you attach a small square to a corner of a larger piece of fabric by sewing from corner to corner, trimming the excess, and then flipping the smaller square over (towards the cut-off corner).
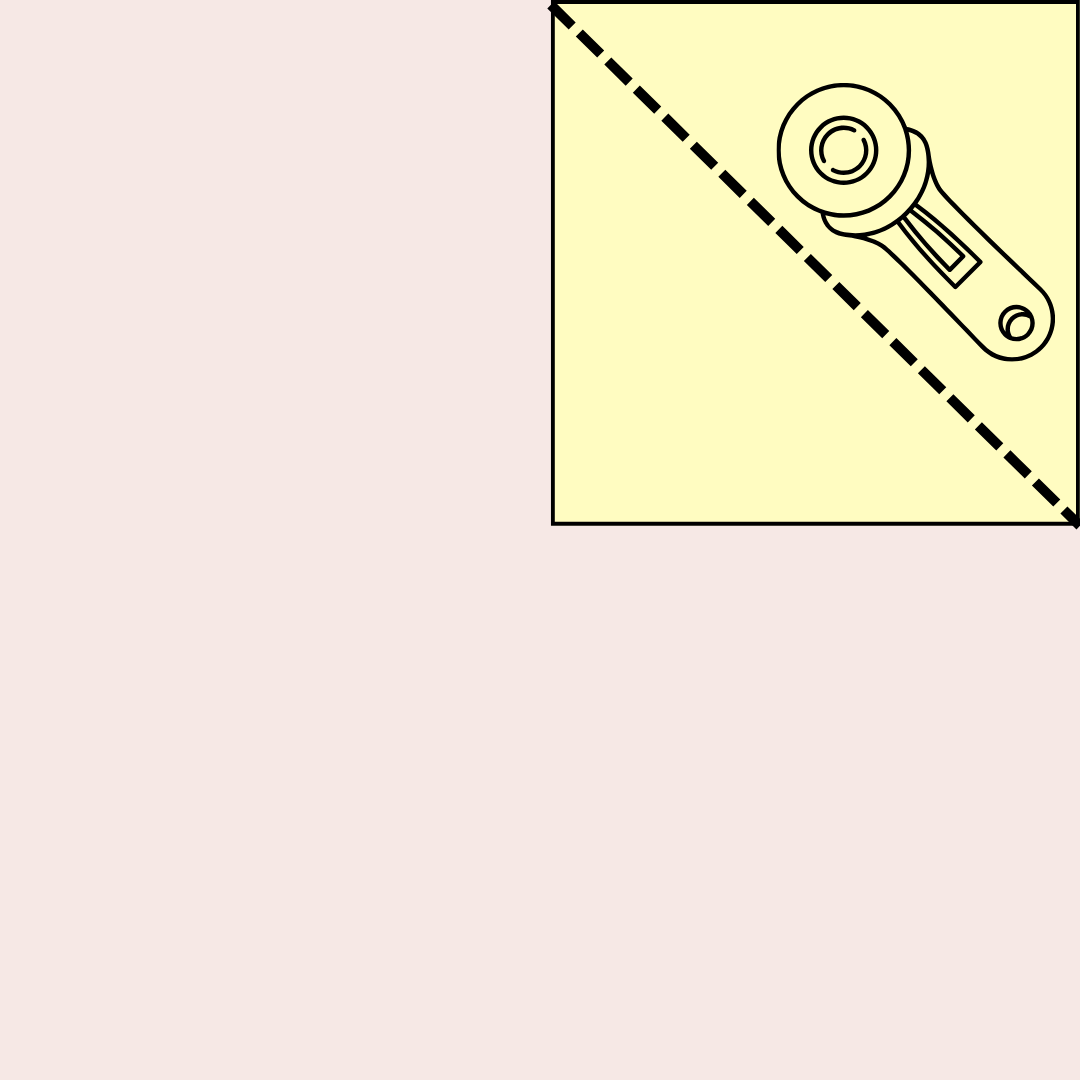
If you do this to all four corners of a square, it resembles a snowball (hence the name).
It’s a method that *seems* simple but actually requires a fair amount of precision in order for the final unit to turn out the correct size. I know this because every single unit I sewed for my test block (with the exception of the HSTs) turned out the wrong shape / size.
There are a million different ways to accomplish this, and please believe me when I say I went on a JOURNEY to find the method that works best for me. I made a tonne of stories in real time and saved them to a highlight on Instagram.
My Step-by-Step Snowball Corner Method
You may have a completely different way to create accurate snowball corners (and I love that for you and encourage you to continue using that method), but what works best for *ME* is to:
- Lay my smaller piece of fabric on top of the larger one (RST)
- Place the ¼” line of my Creative Grids ruler one thread-width to the right of the imaginary line that runs corner-to-corner on the smaller piece of fabric
- Trim the excess fabric
- Sew the cut fabric using my ¼” foot with guide
- Cut between chain pieced blocks using scissors
- Set the seam using a dry iron (I LOVE my Reliable Velocity 270IR)
- Manually press the fabric over using my fingers
- Set my iron on top of the seam and use steam once in place.
Did I mention that this is a finicky technique??

But once I unlocked these steps, my snowball corners turned out SO precise. Like, every time.

I went from despising this method to looking forward to sewing the other bajillion units for this quilt. No joke - I had so much fun making all the other parts, and I was so proud of myself for mastering this technique.
What a great feeling!
On Quilting Perfection
The last thing I want is for you to read the above section and feel discouraged about your own precision / quilting practice. I truly want everyone to make quilts exactly the way they want to.
Believe it or not, striving for the most accurate quilt blocks I can make actually brings me joy. That’s just the way my brain works. If your brain is wired differently, I think you should respect that and embrace it.
There is no right or wrong way to make a quilt, and however you go about your quilting practice seems awesome to me.
Also? If anyone ever tries to tell you that your quilt isn’t “good enough” (even if it’s yourself telling you this!) I want you to give me their name so I can give them a stern talking to.
If you spend time making something you love, then it’s amazing. Period.
Okay, back to this quilt.
Staying Organized at Retreat
Once I had all of my small units sewn, I packed them all up and headed off to Retreat.
I love to use my Stitch Supply Co project bags to corral small pieces and keep them organized while I travel. You fit a tonne of these small project bags into an All The Things Tote (size large) which feels like a perfect use of a handmade bag.

I brought several projects to sew at Retreat, but decided to save my Swoon Sixteen quilt for last. I was really excited to work on it, but wanted to get a few projects that I was less enthusiastic about out of the way first.
Like with any mix-and-match quilt pattern (where you cut all the pieces required for one block from each fabric), I like to use the paper plate method. I first saw Libs Elliott use this approach, and it’s so simple it’s genius.
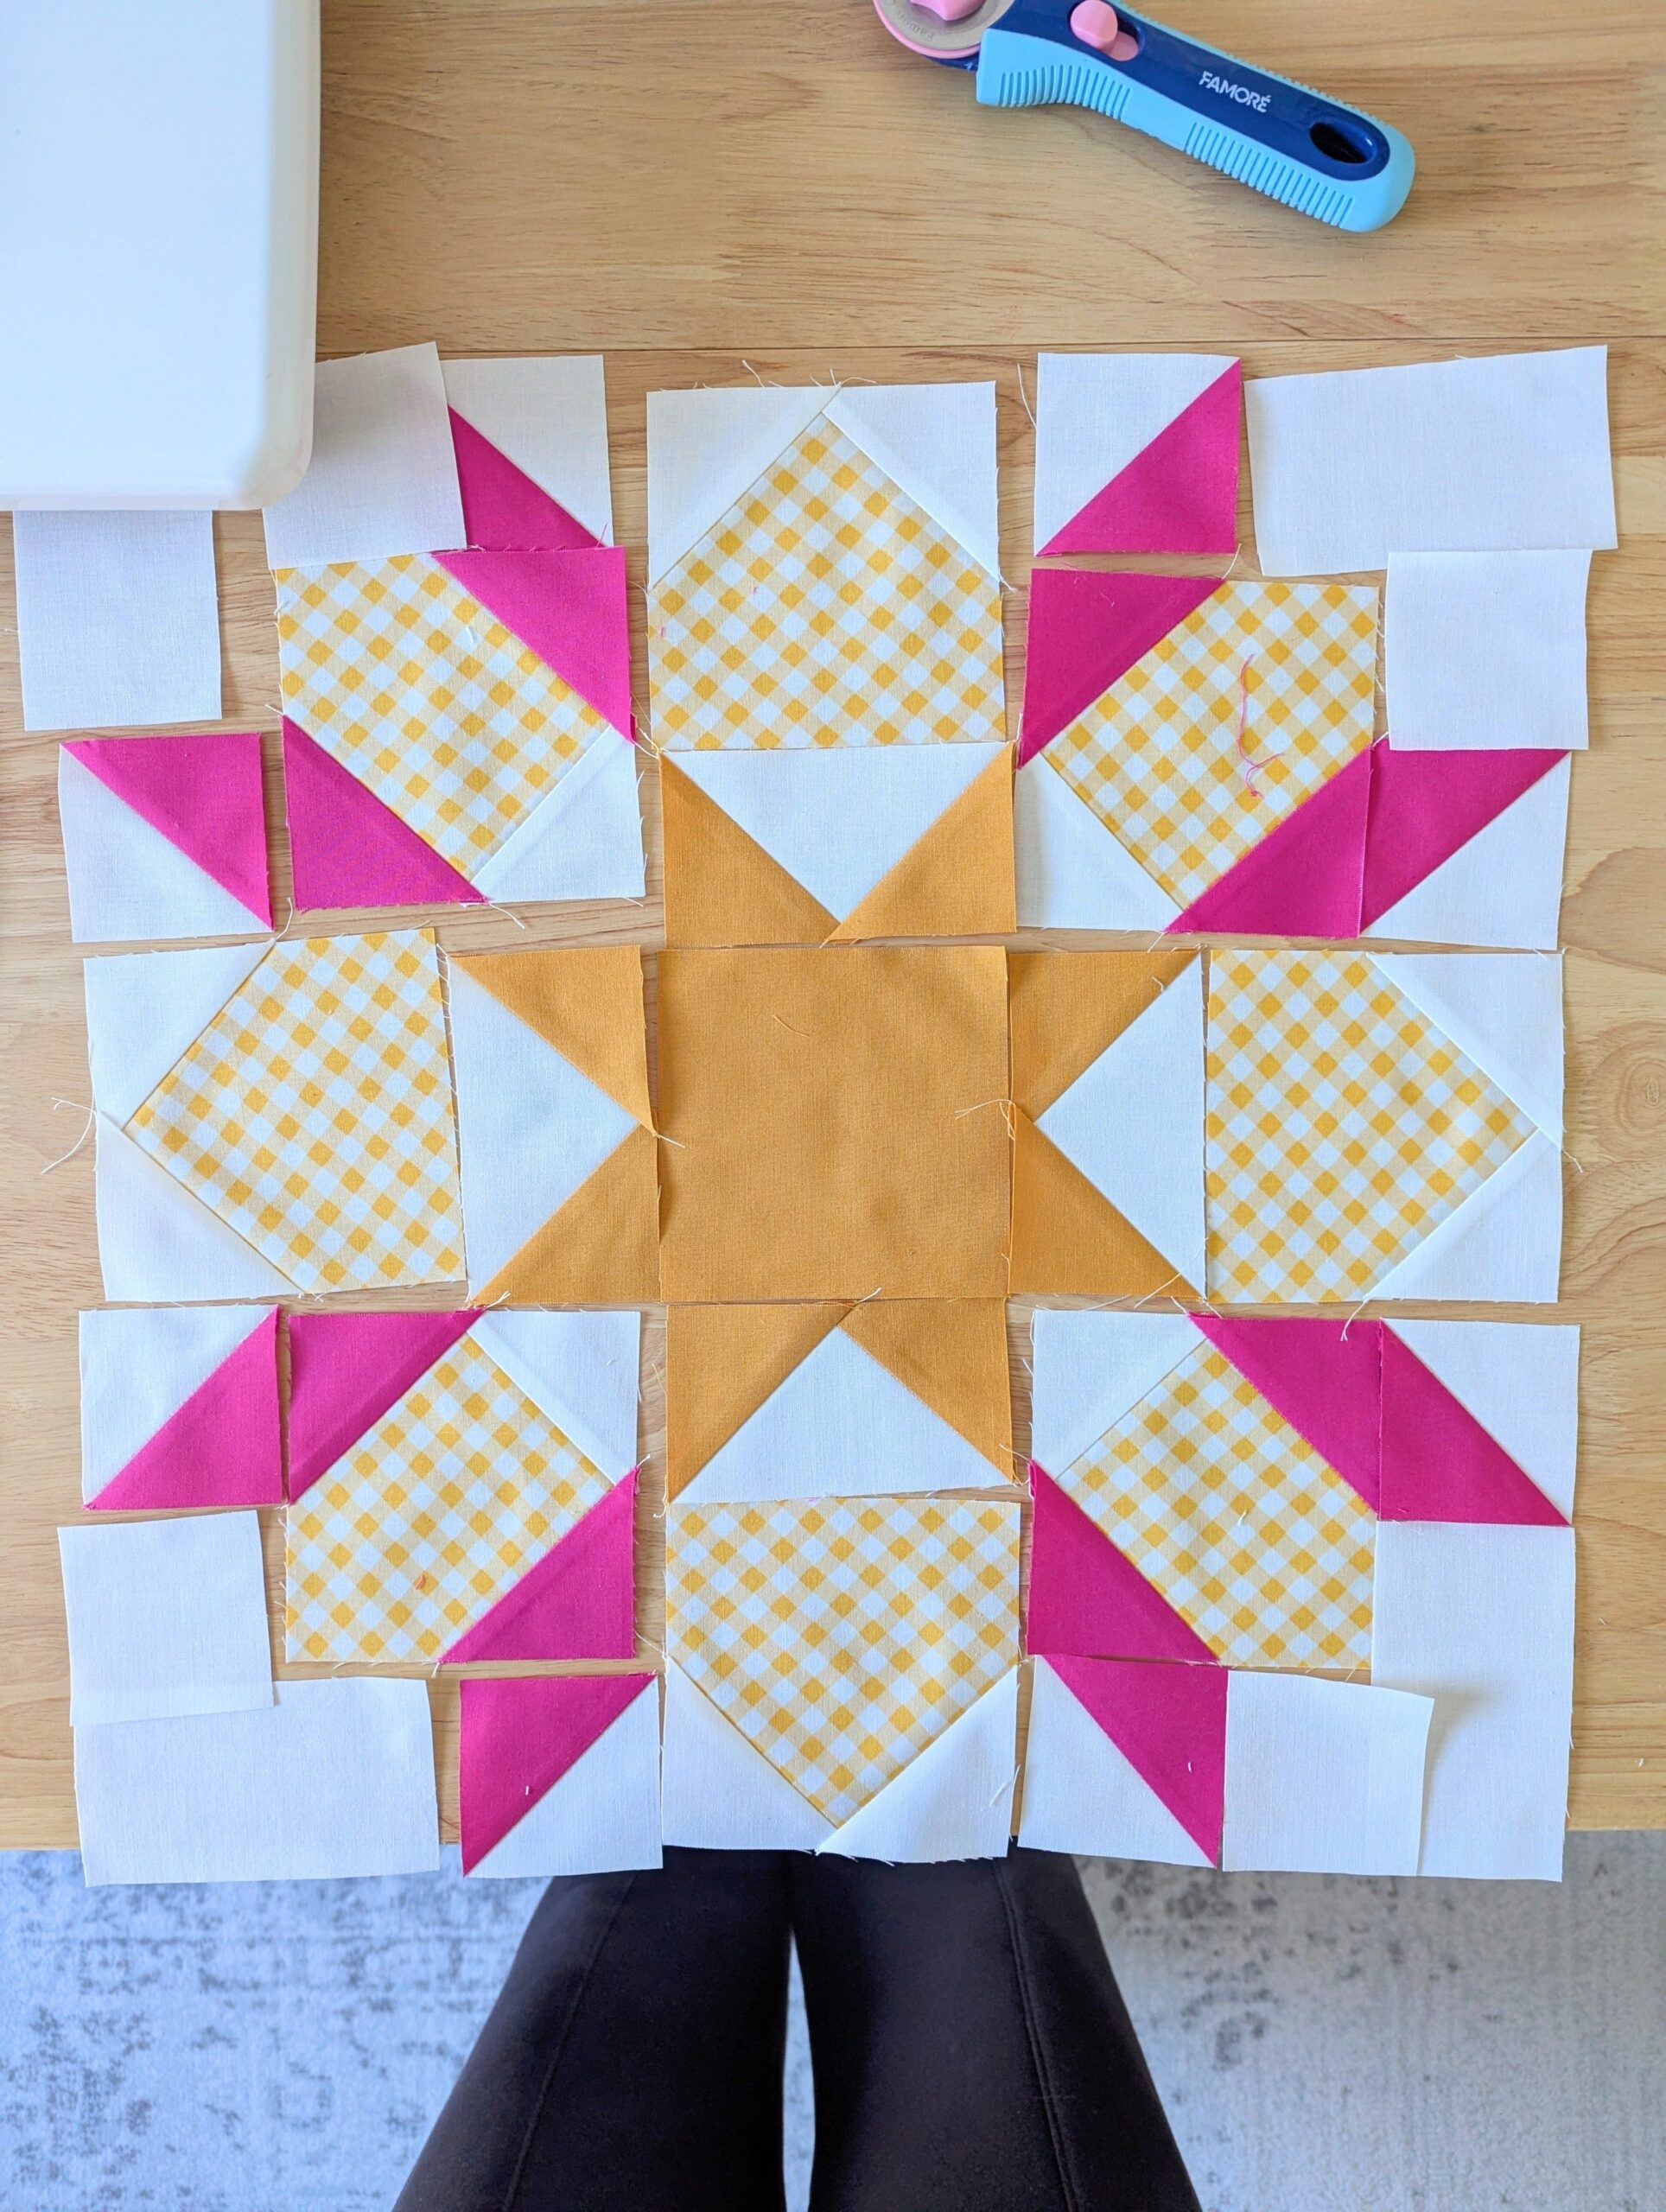
You take all the pieces you’ll need to make one block and put them on a single paper plate, then repeat for all the other blocks. I had made my test block at home, so I needed to make an additional 15 blocks at Retreat (hence the 15 plates).
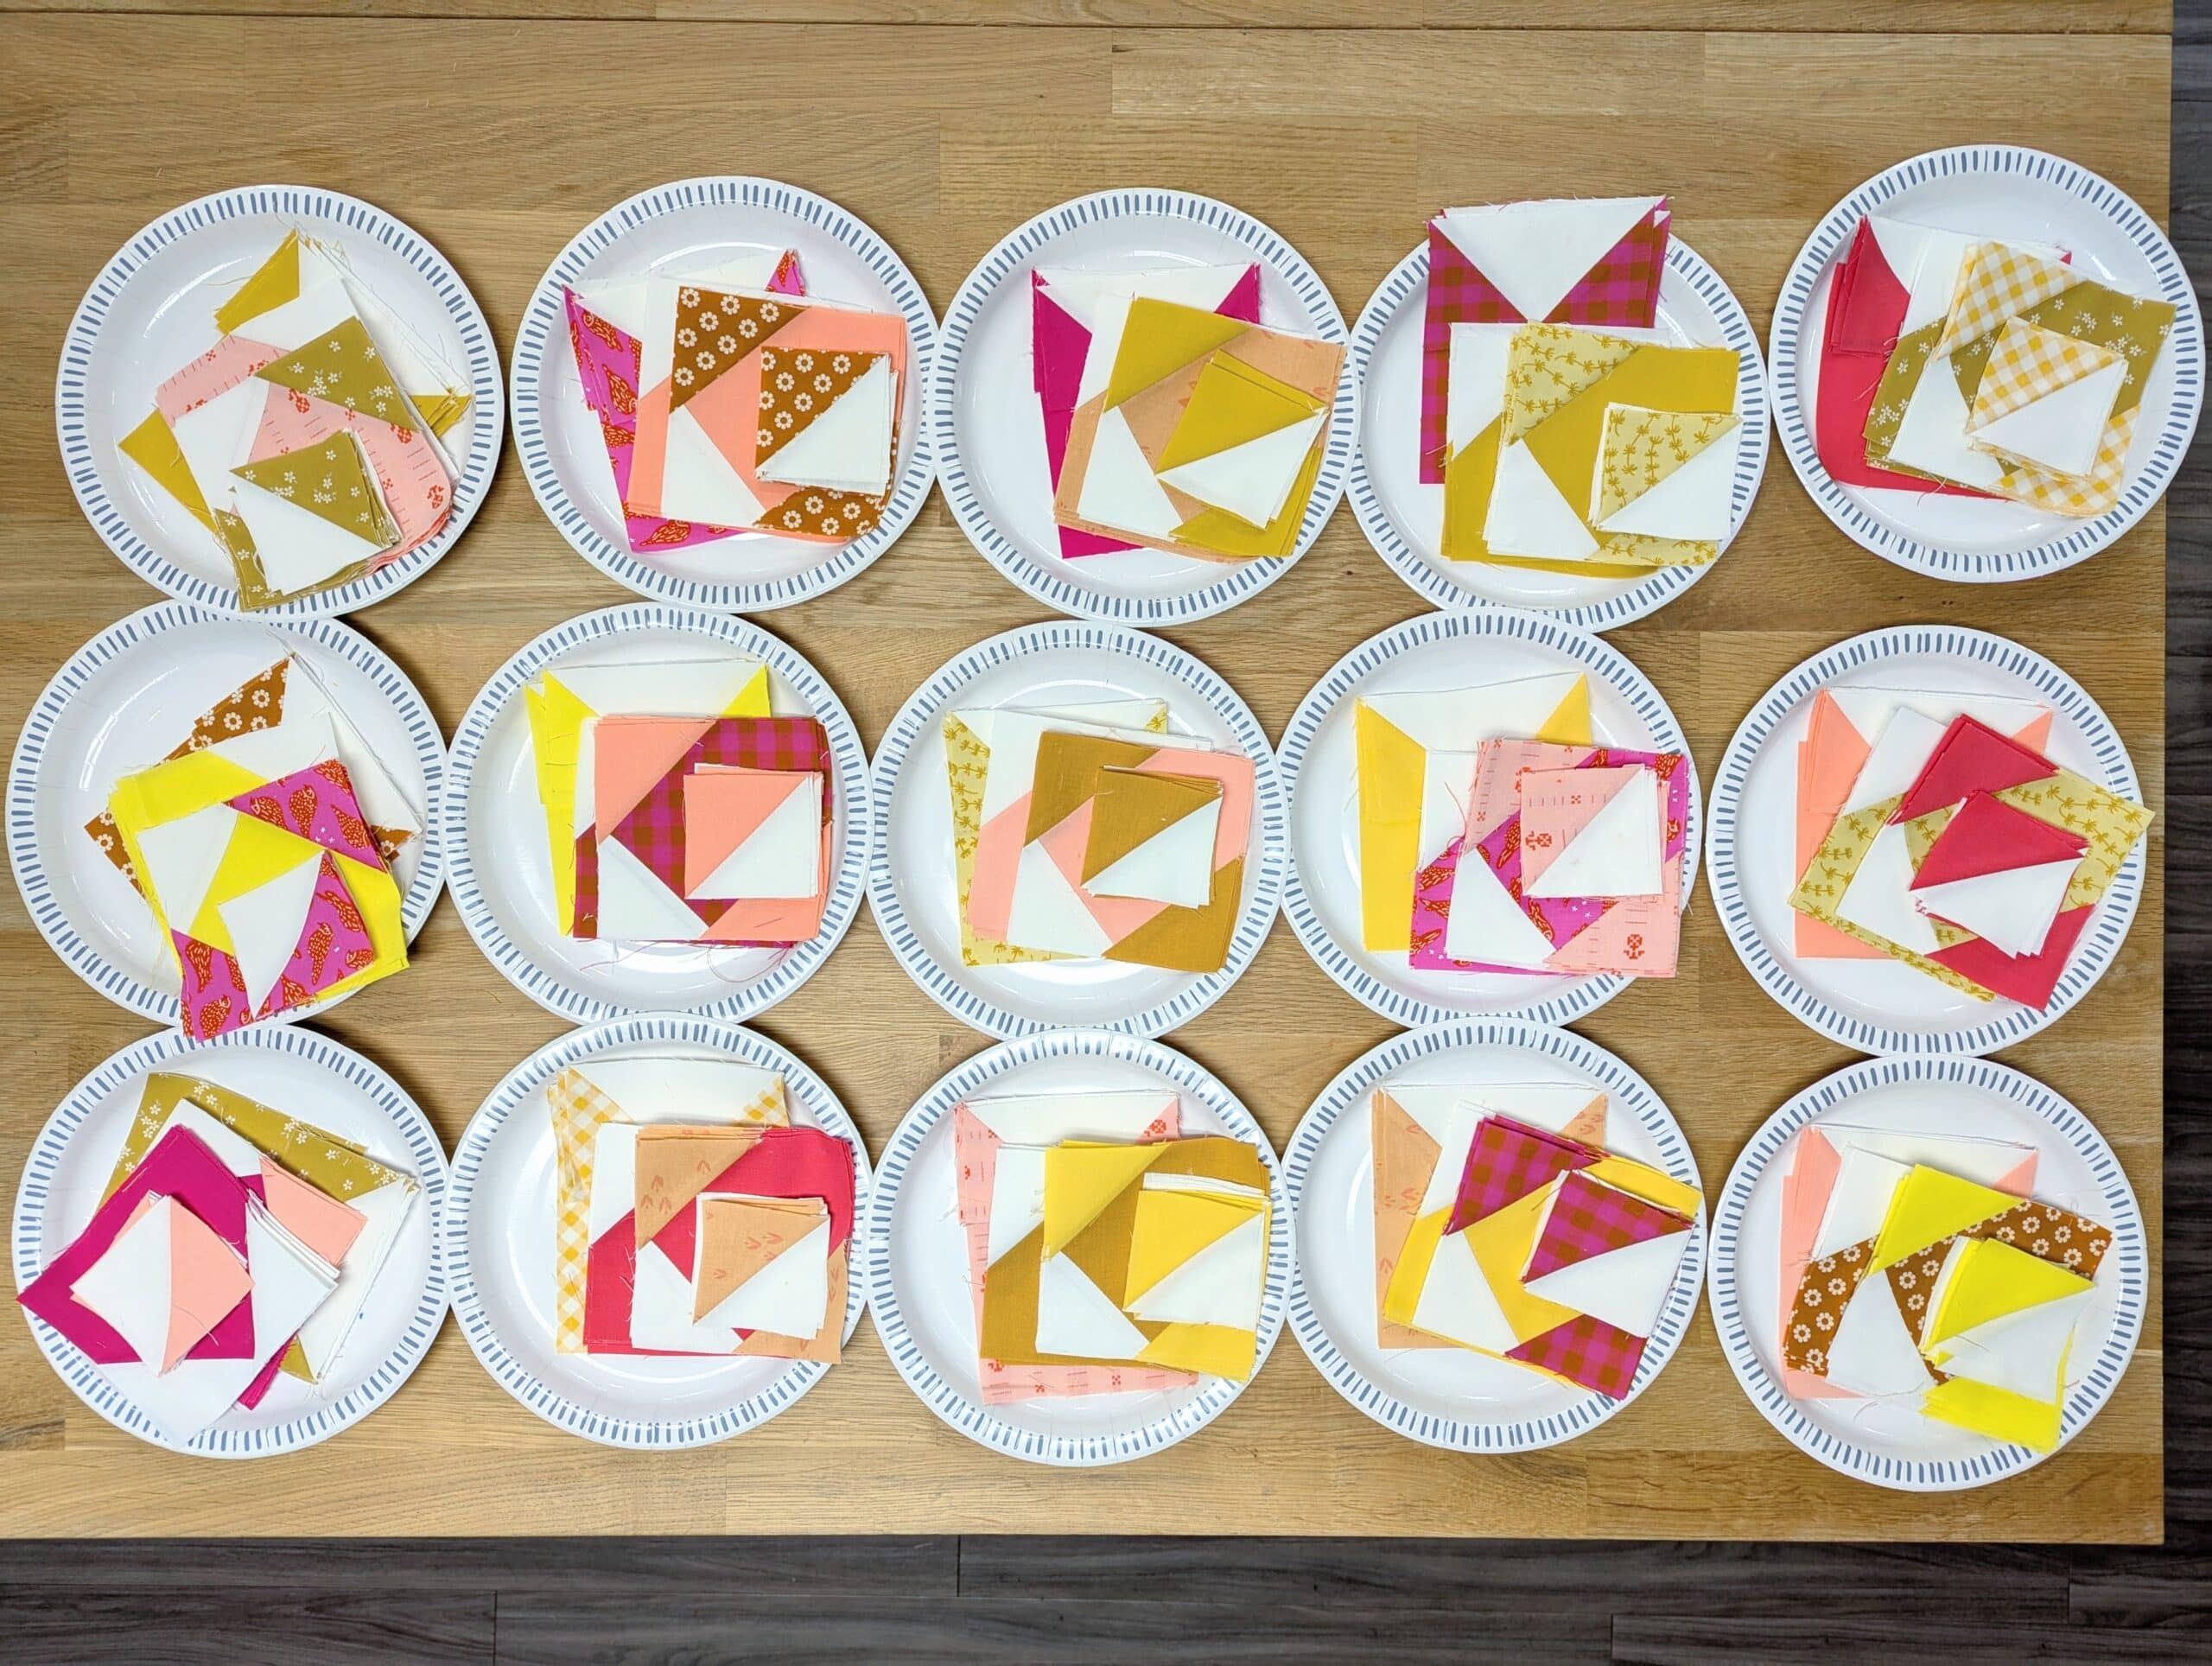
Then you can stack all your plates on top of each other and they take up very little space. When you finish one block, you just grab the next plate and you have everything you need. I love it!
Sewing my Swoon Sixteen Quilt
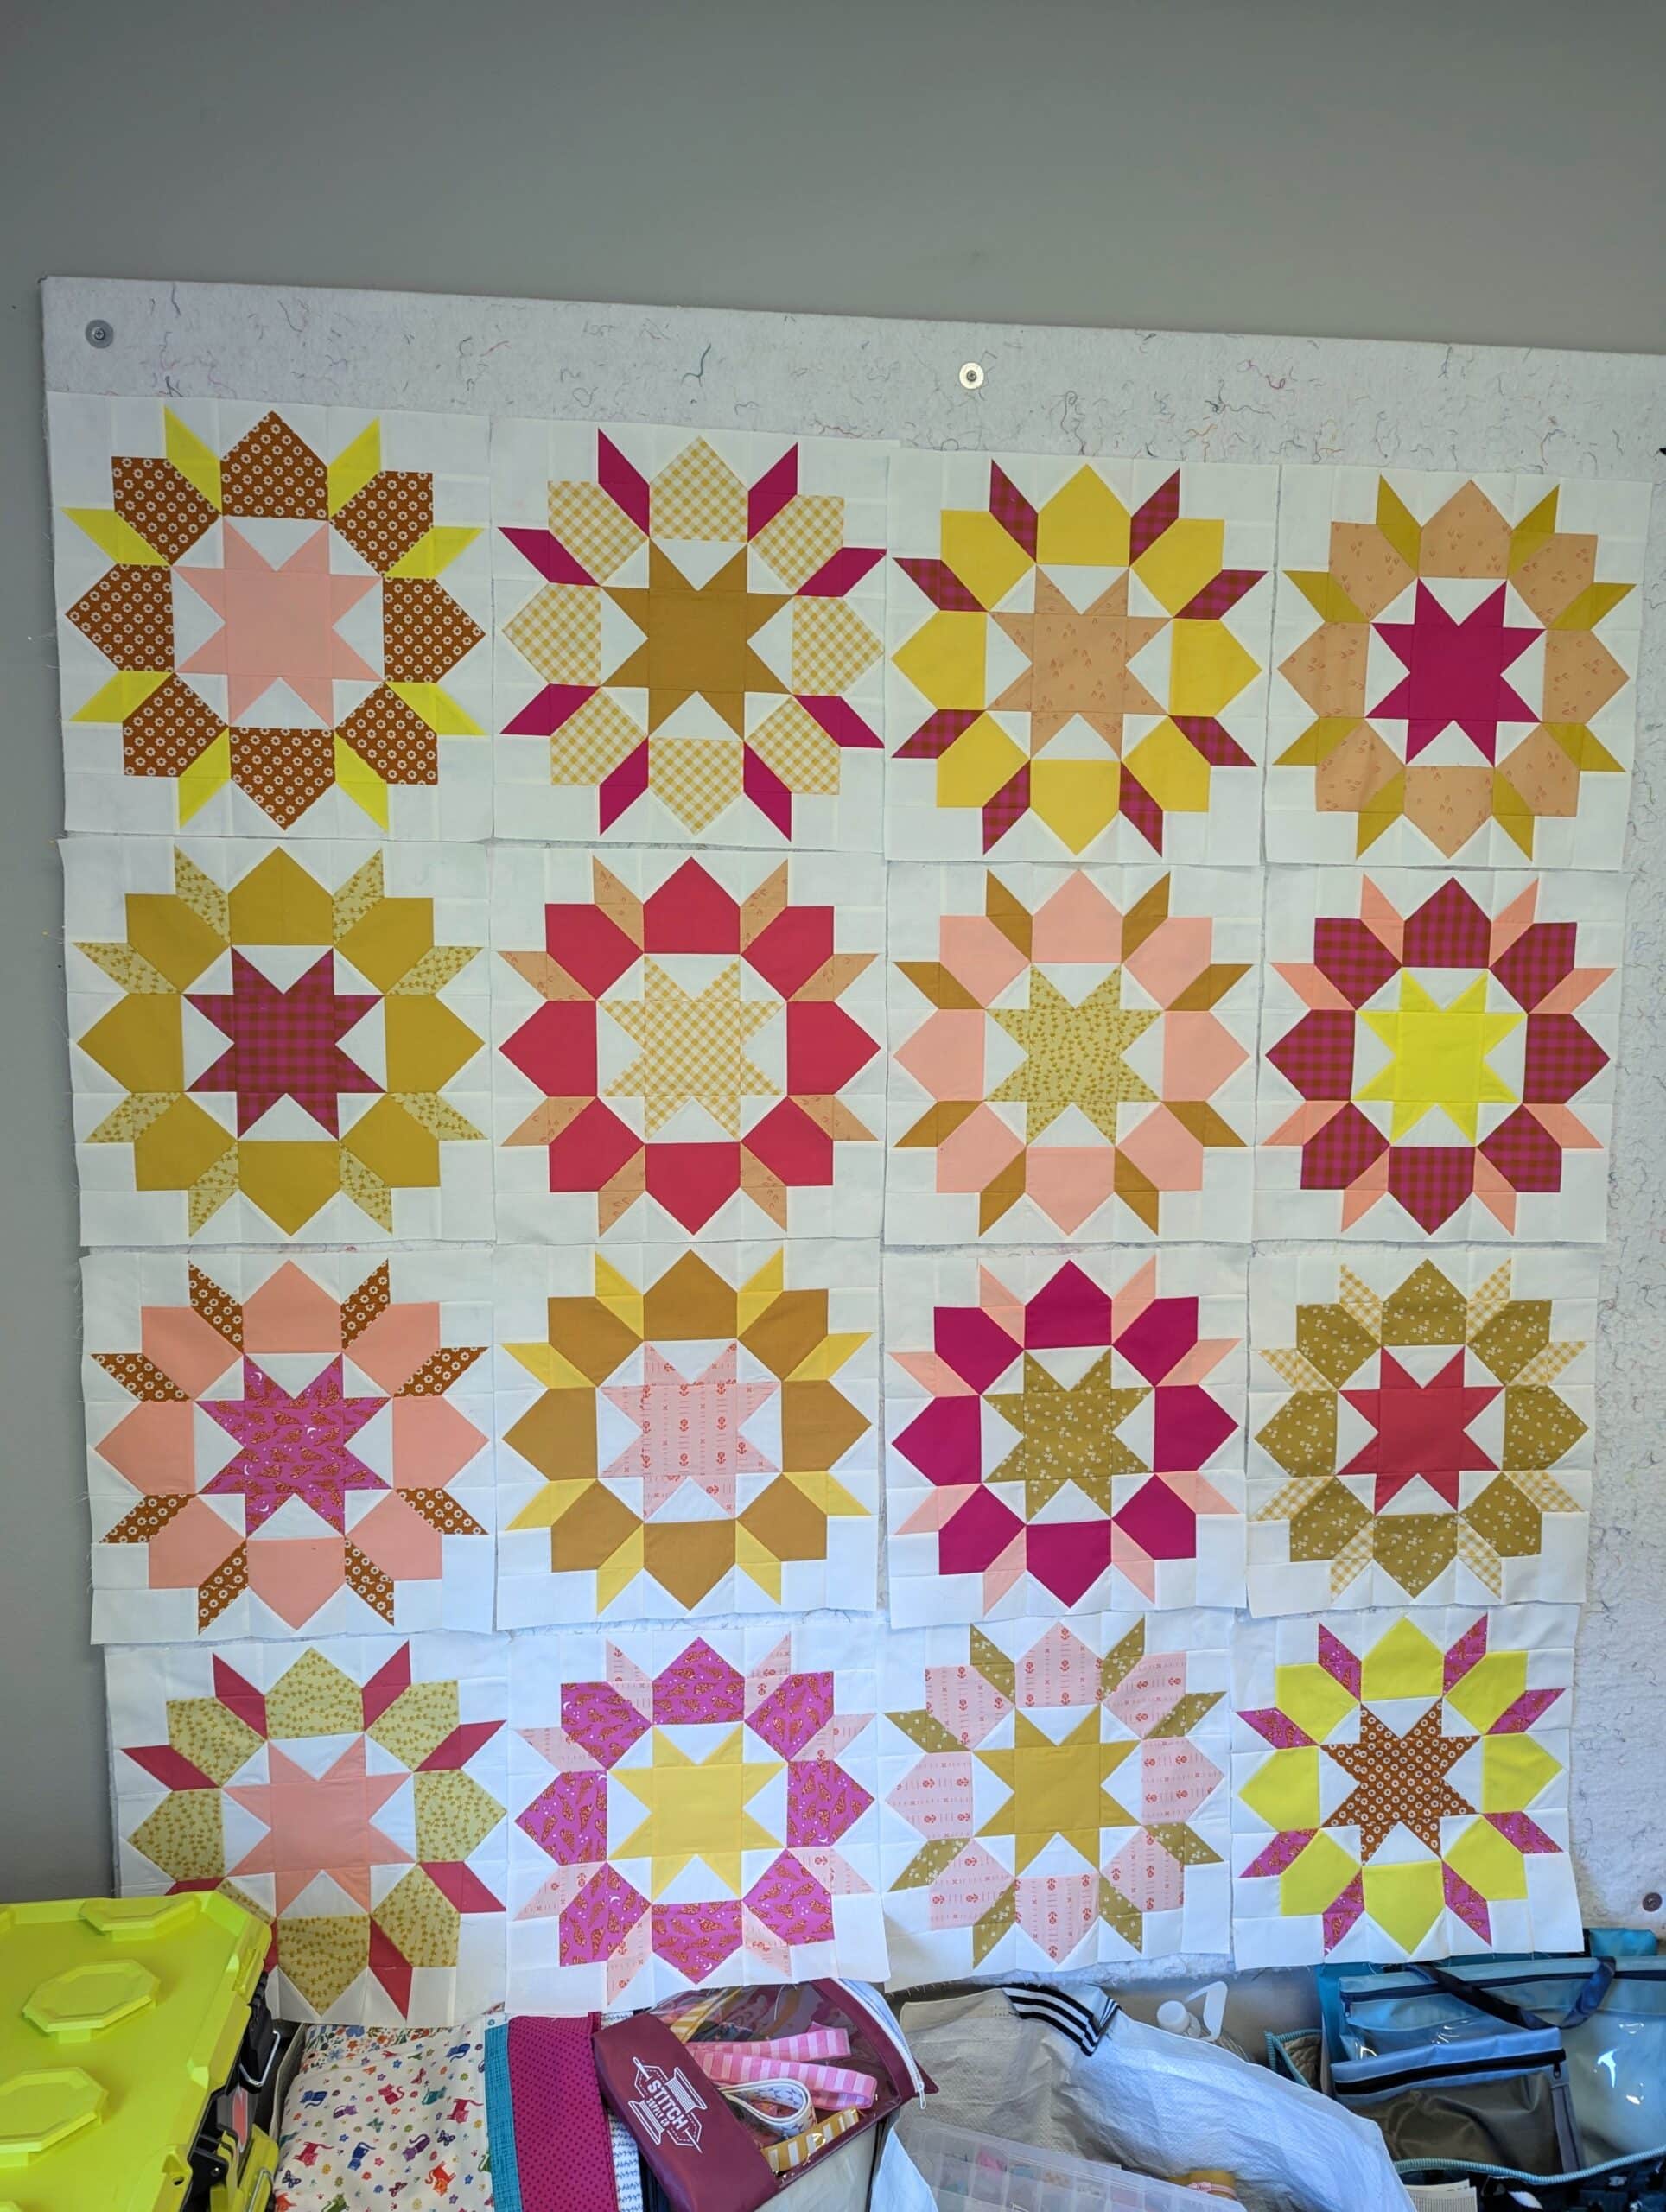
Taking the time to learn to make accurate snowball corners really paid off when I went to assemble my blocks. Everything came together so smoothly and easily, it was legitimately a joy to sew these blocks. I didn’t even have to use any pins and nearly all the points matched perfectly!
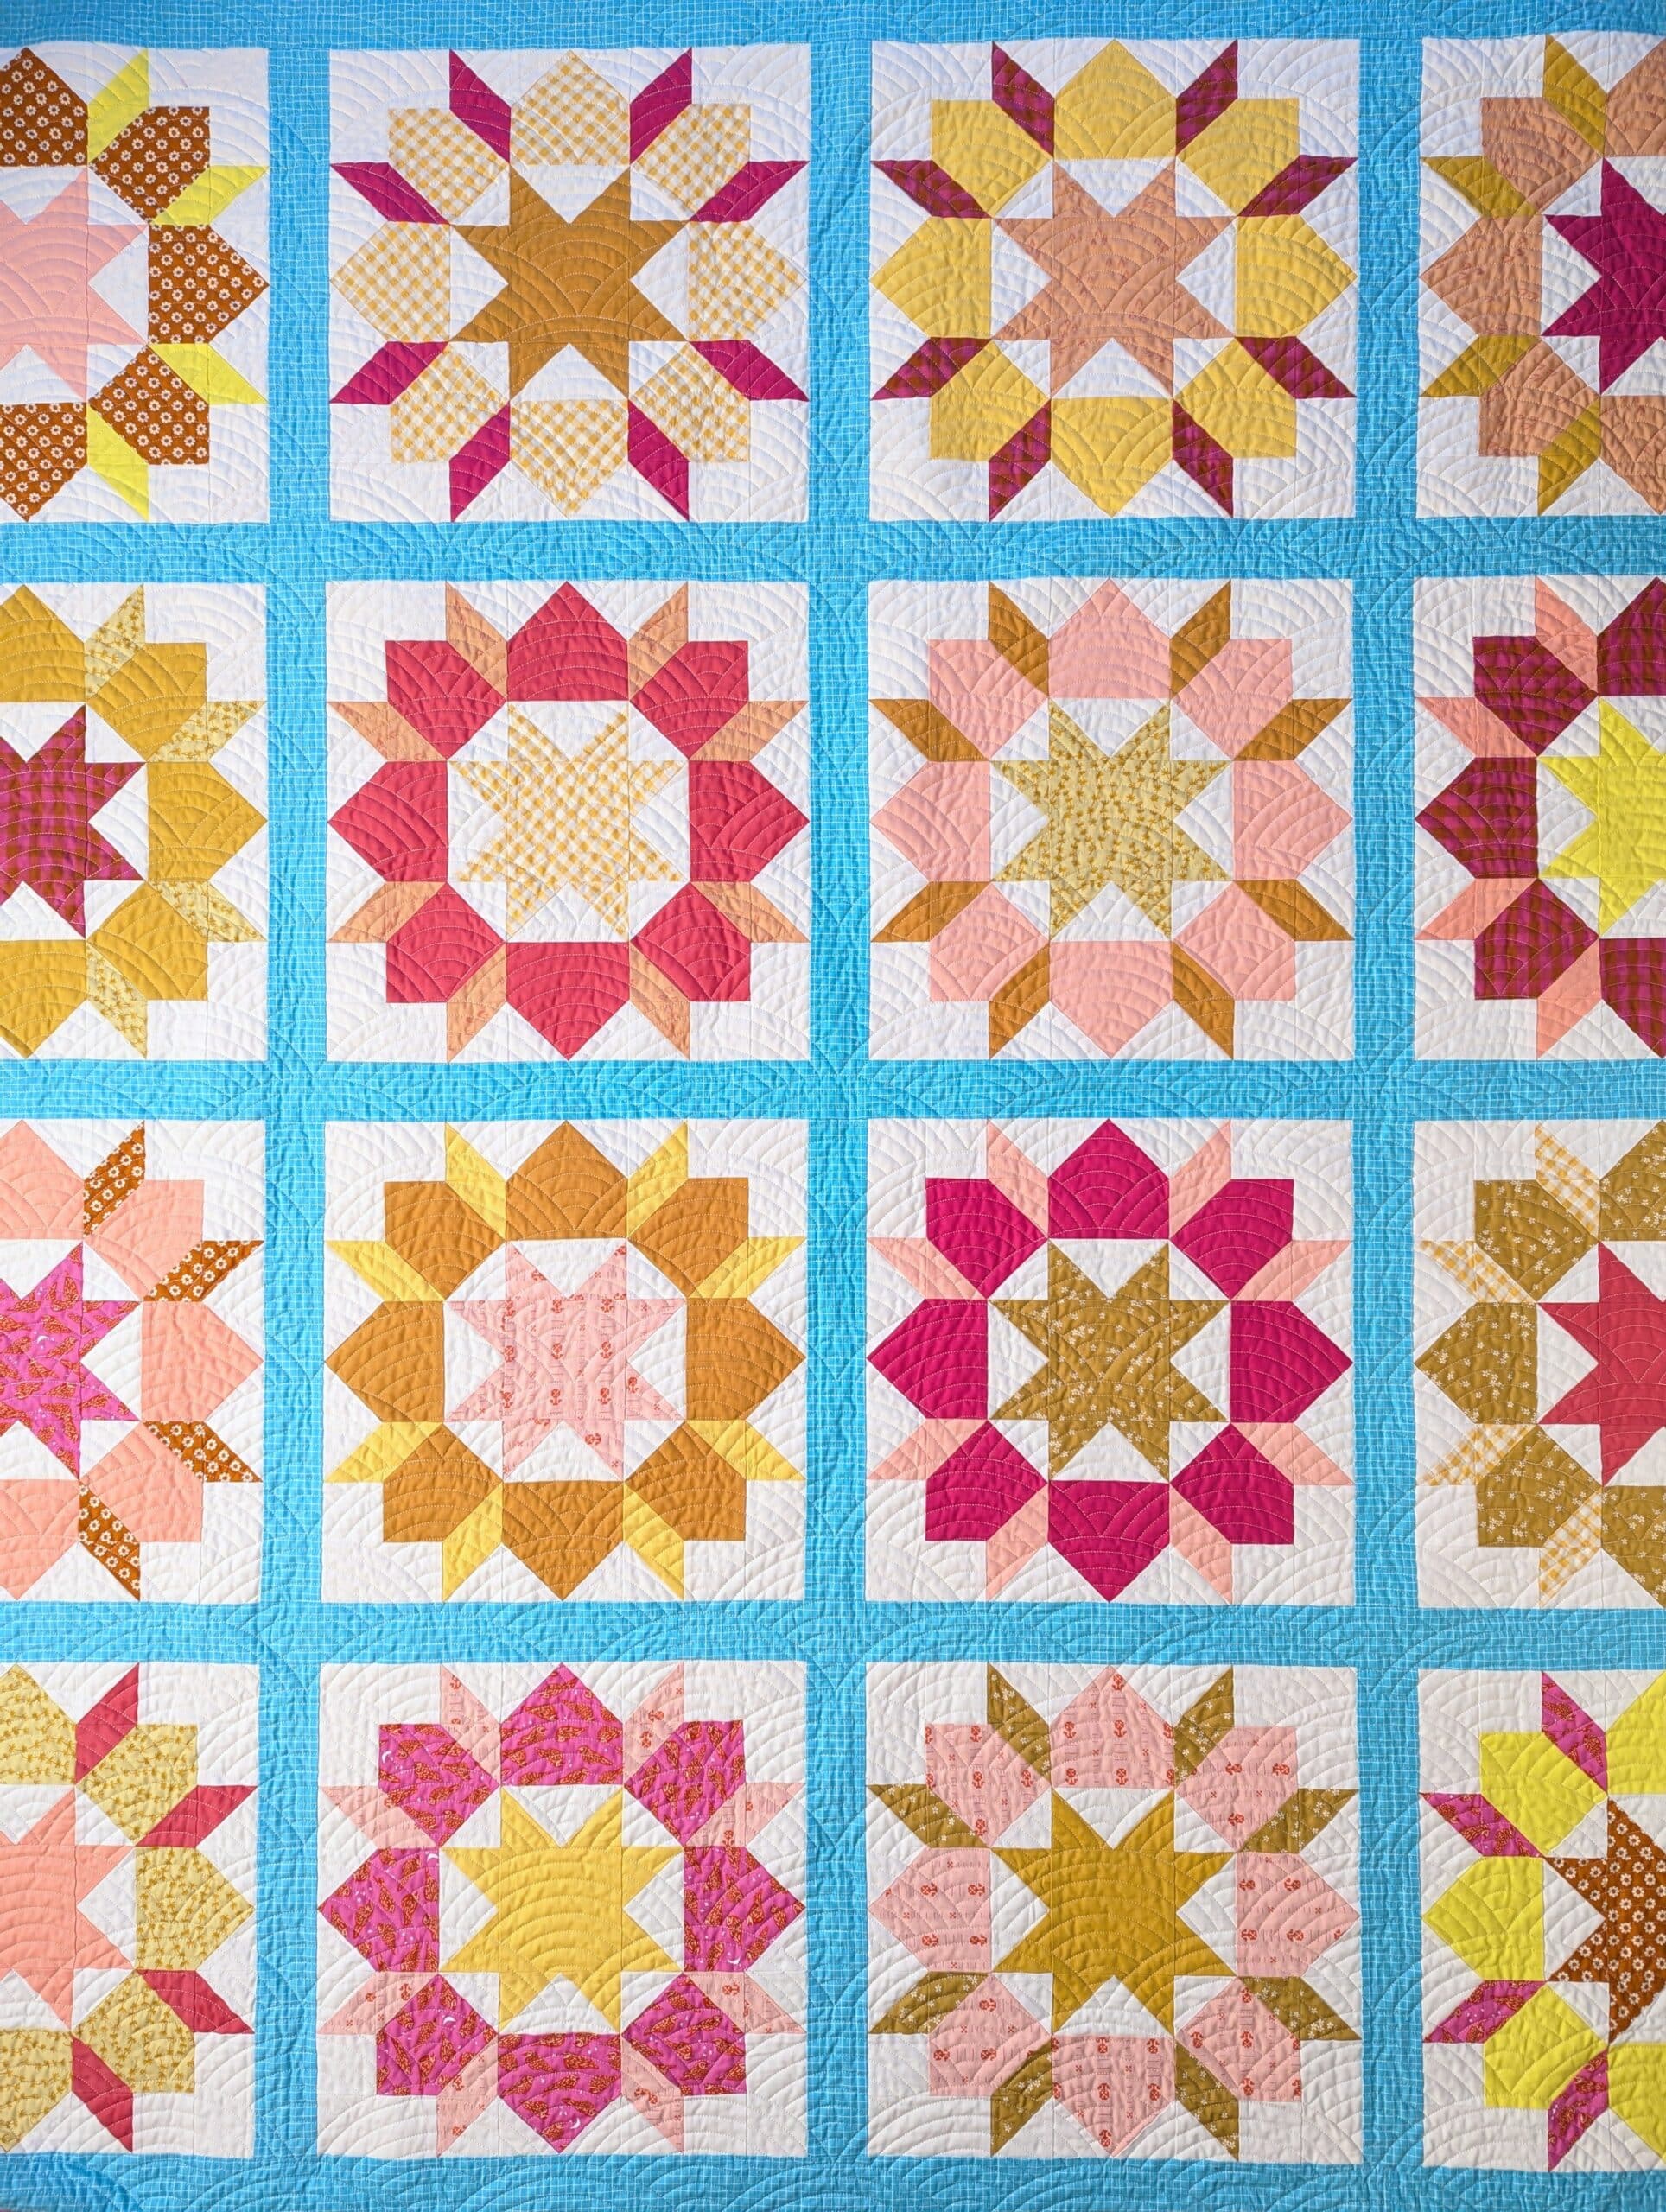
I was so happy every time I finished a block and was able to put it up on a design wall. It did become a bit repetitive around block 12 but I pushed through and got all of my Swoon Sixteen blocks made by lunch on Saturday.
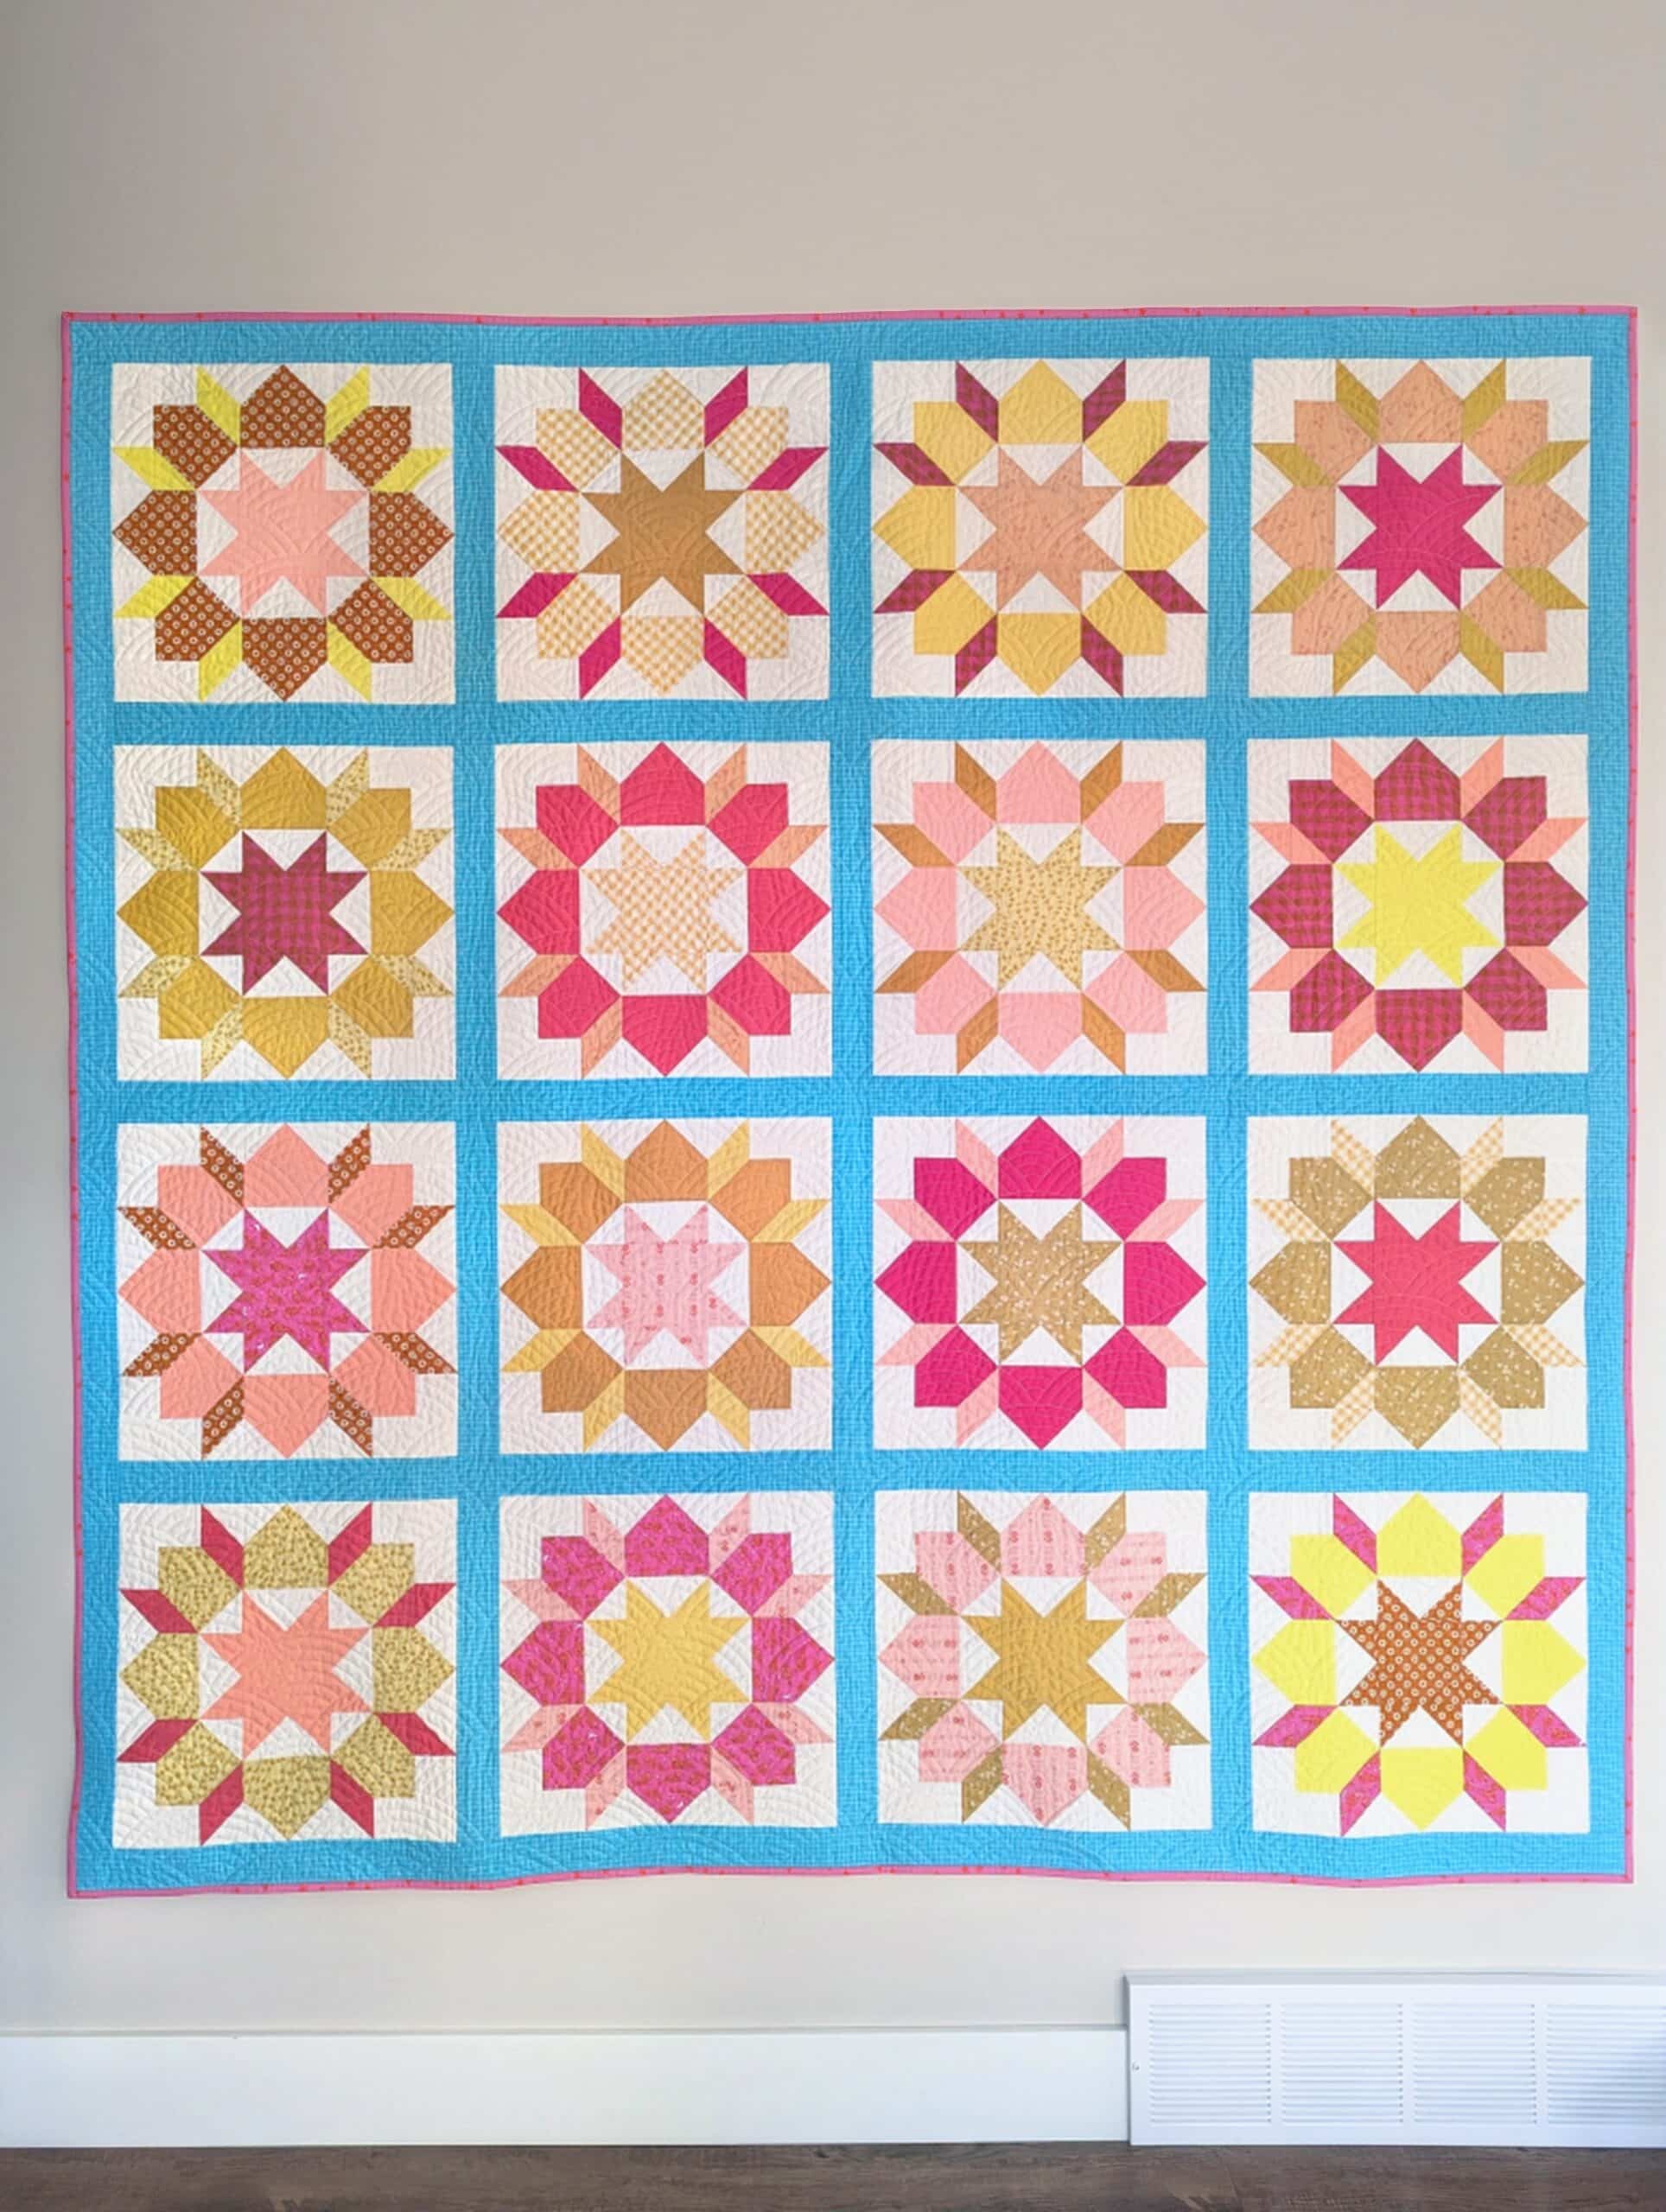
Deciding on the final layout of the blocks is never my favourite part of making a quilt, but I had the help of my quilty friends to figure out this final placement. Don’t tell me if you think I should have swapped any of these to different positions, okay?
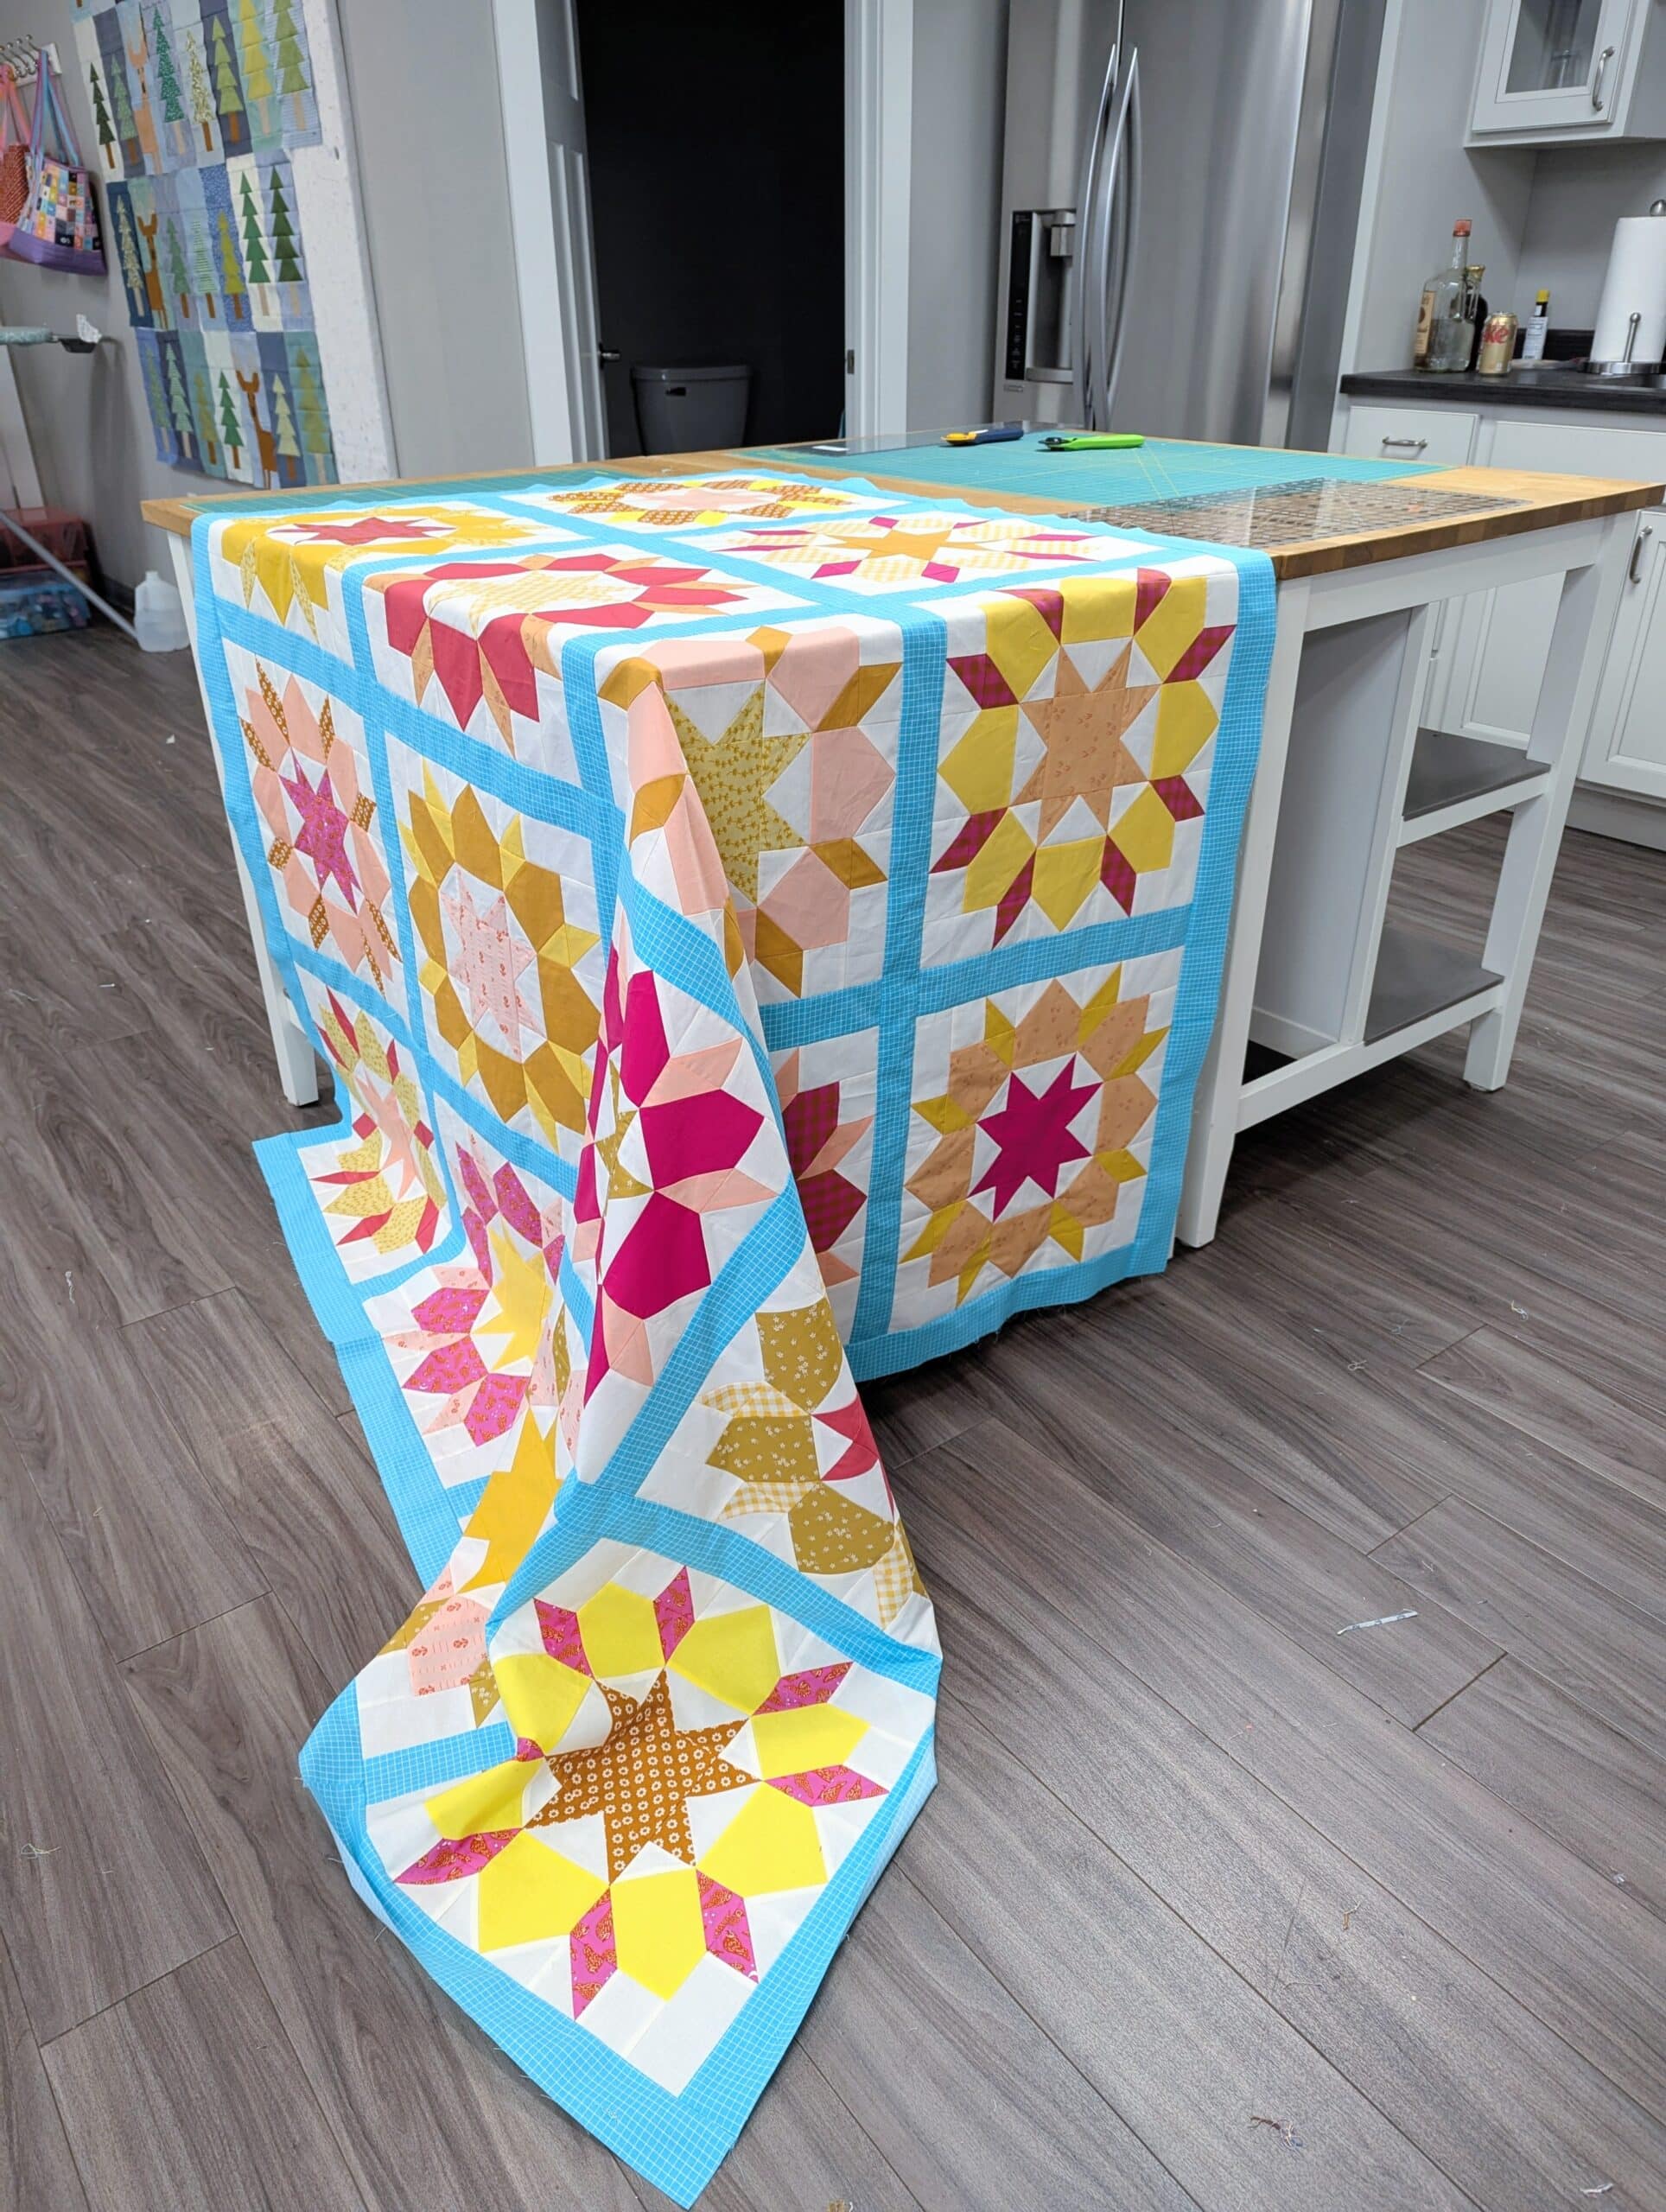
Sashings and borders are also not my favourite, but I really wanted to get this project finished before heading home, so I persevered.
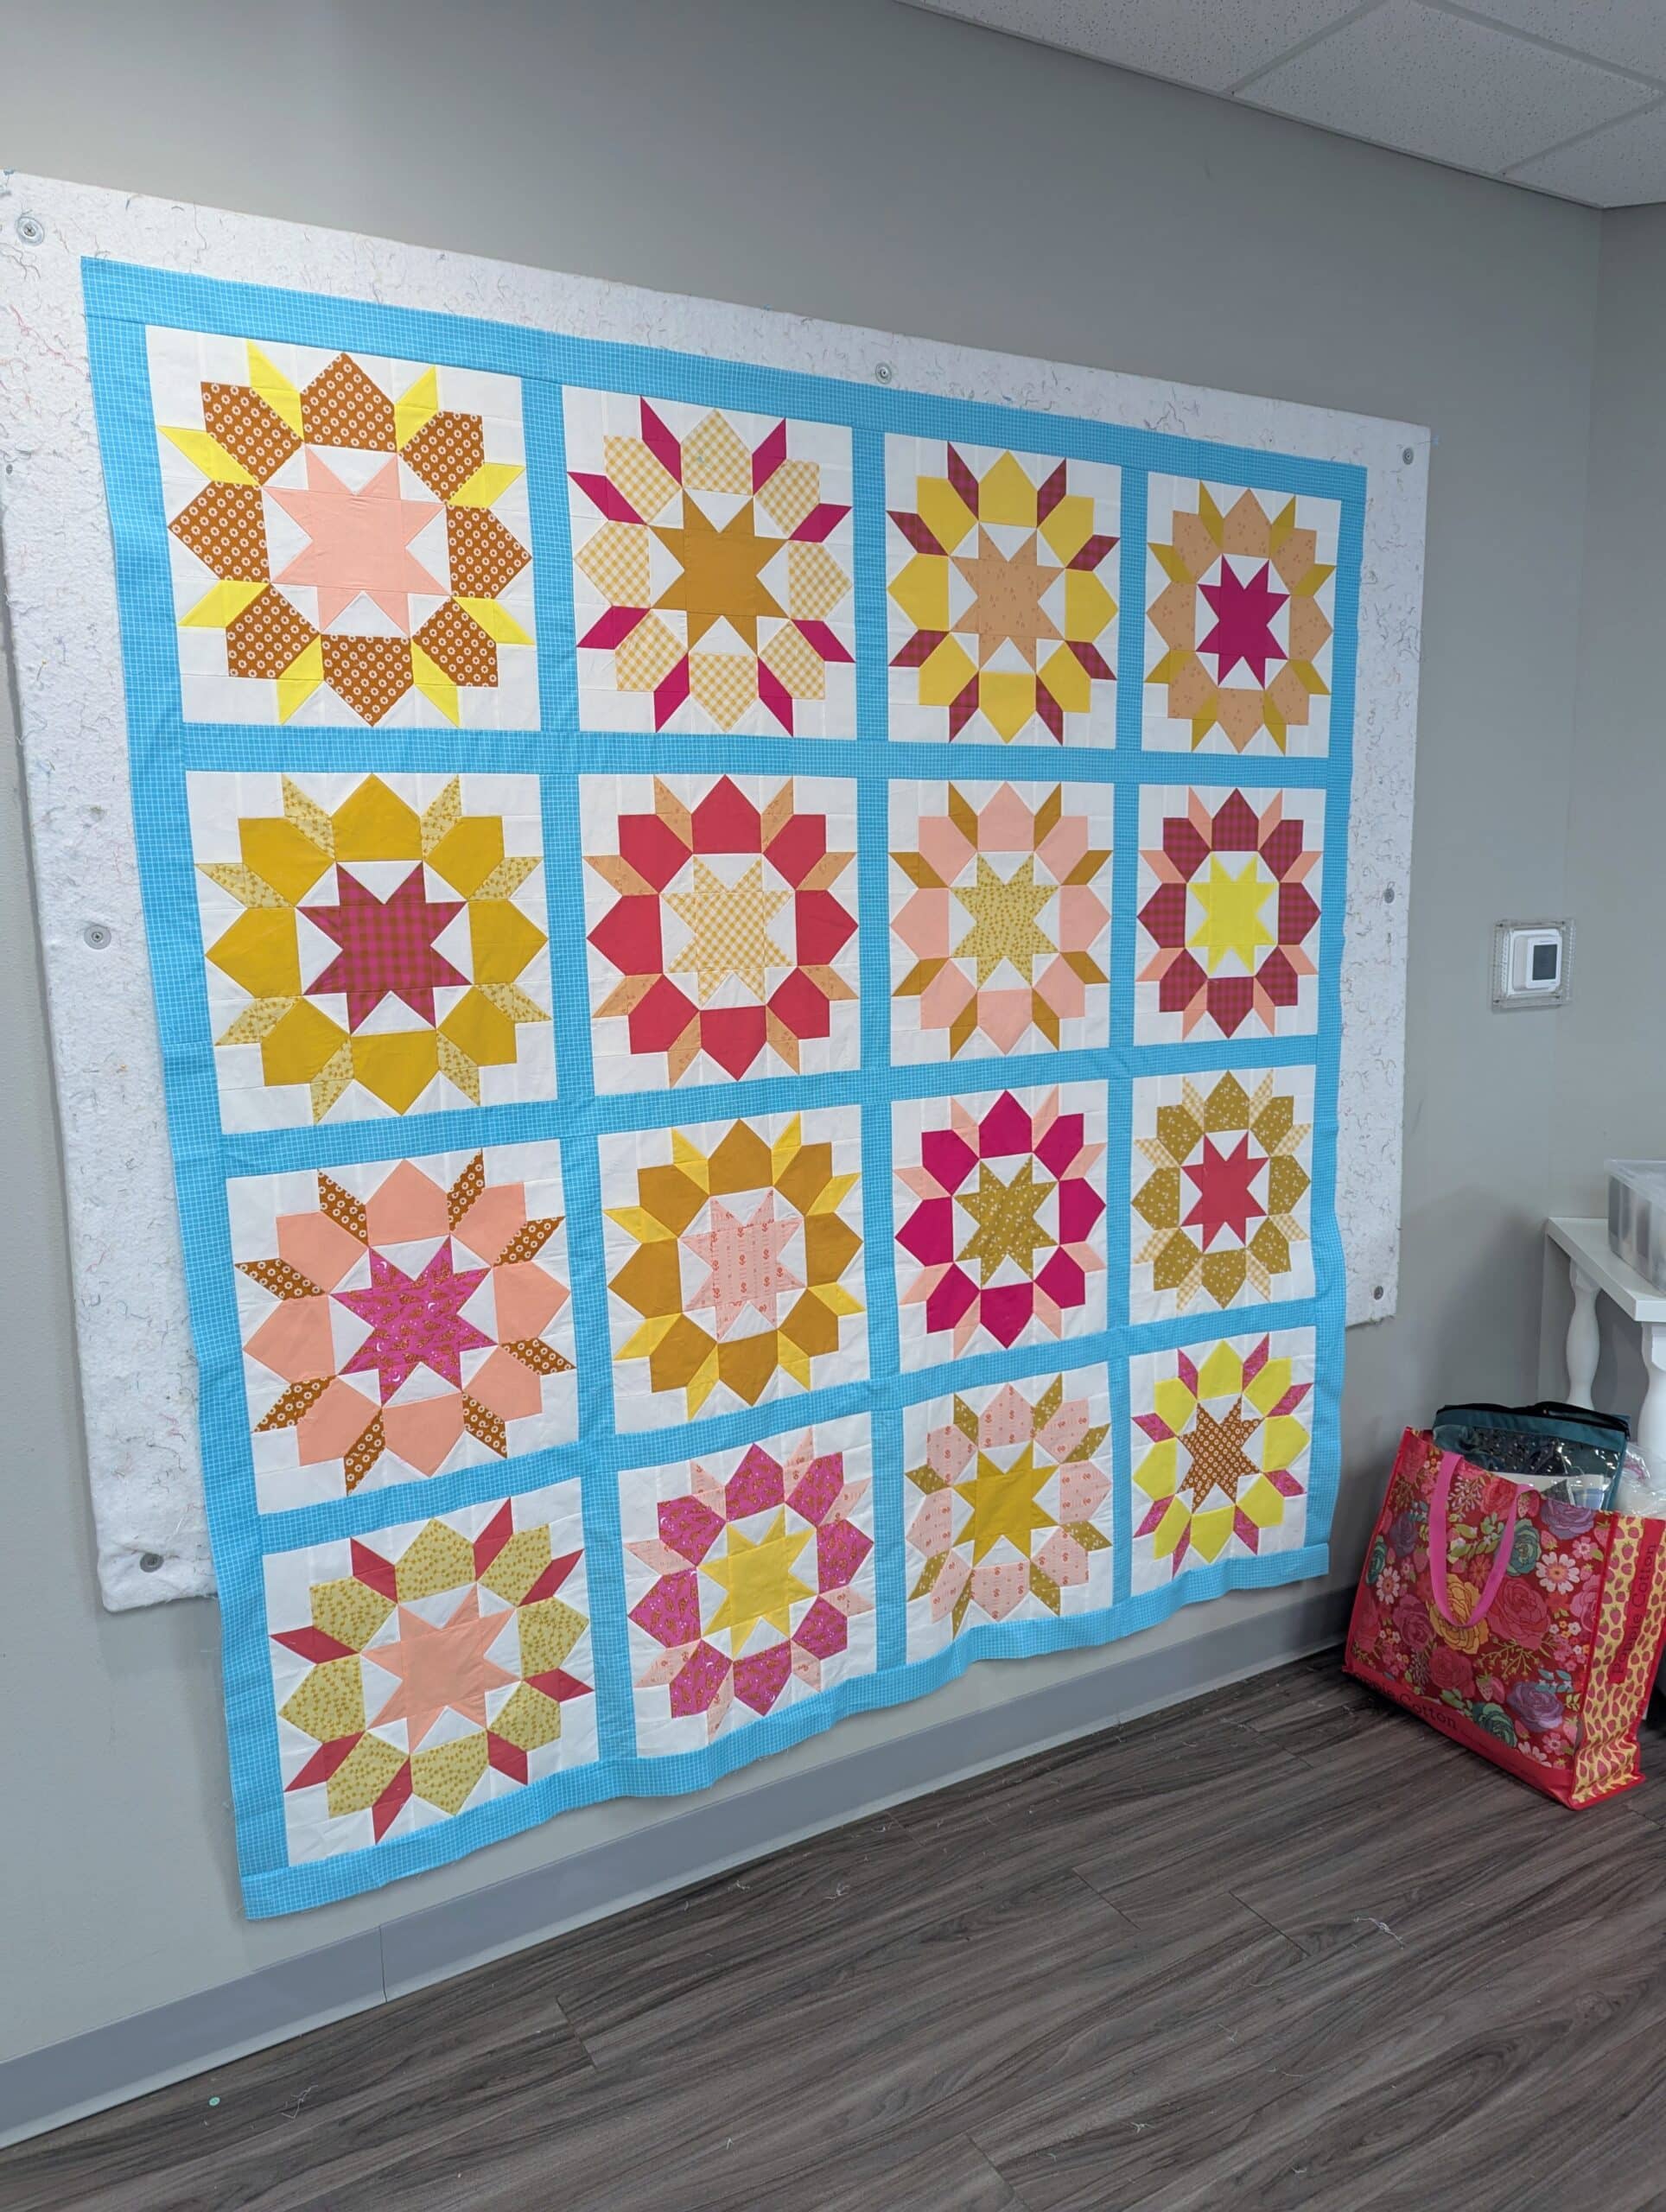
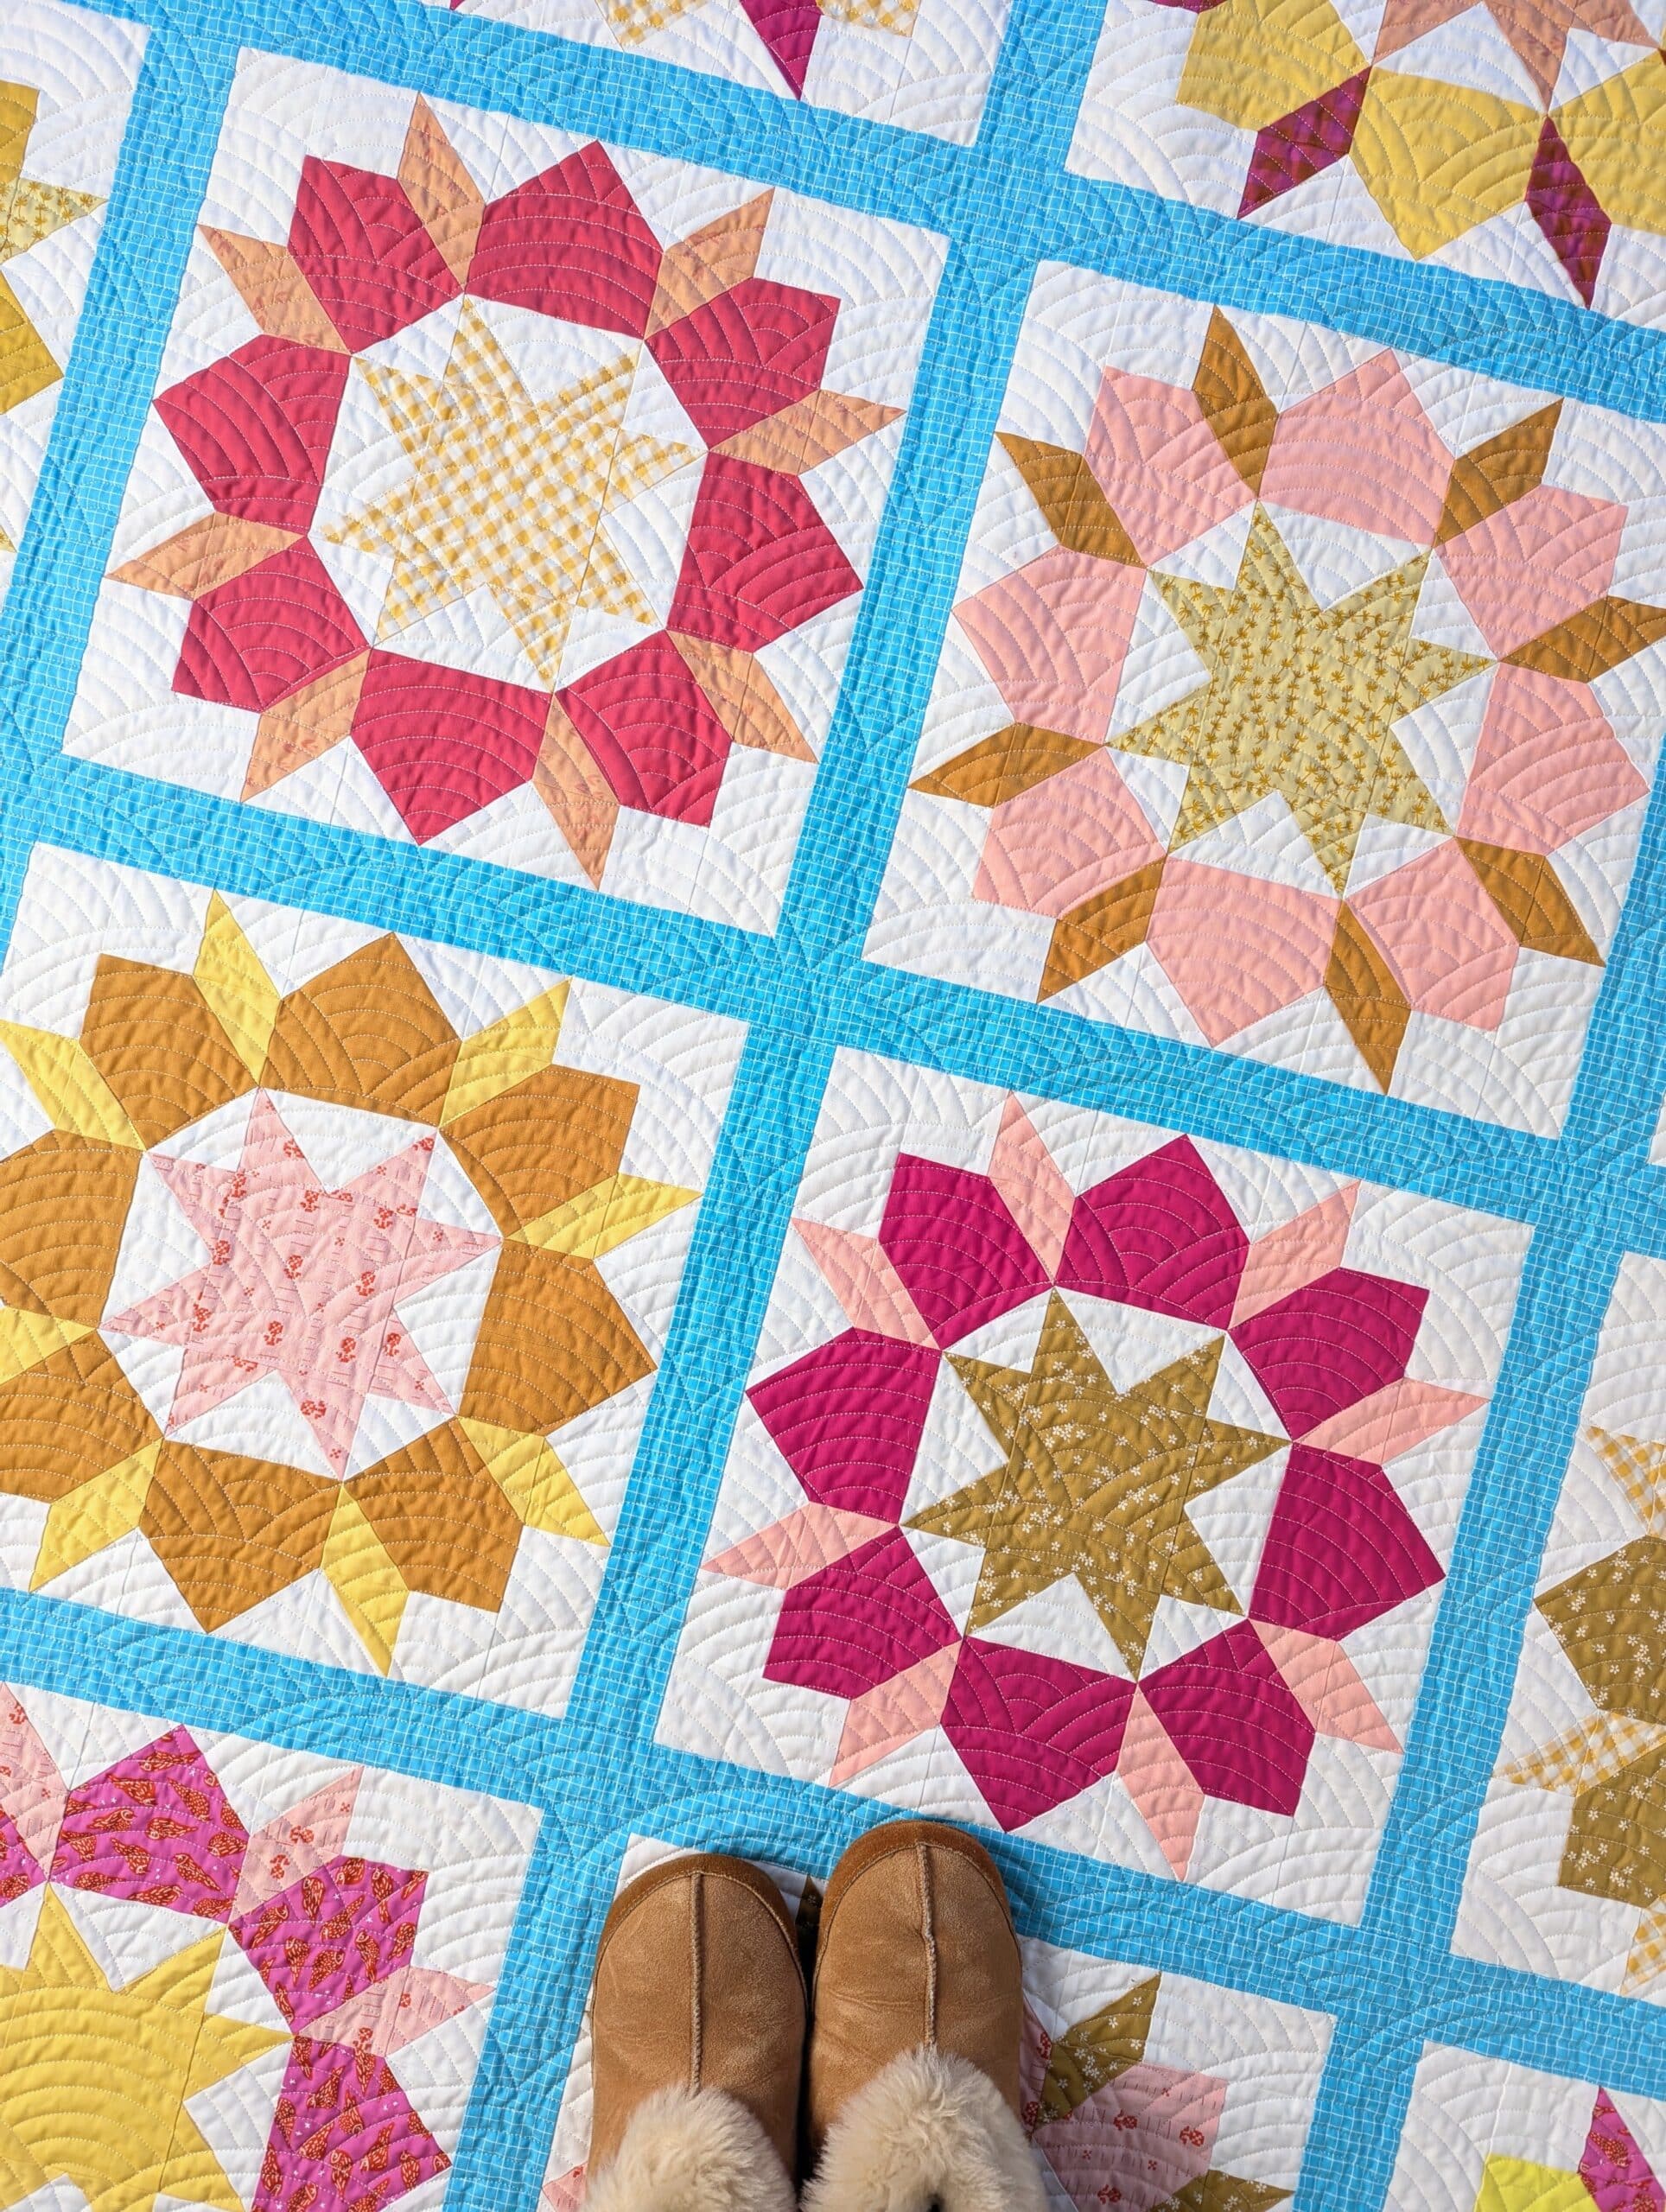
Can you even BELIEVE how different it looked once I added the blue fabric? Colour is magical, I tell you.

Longarming Inspiration
I brought my quilt top home and then let it linger in a closet for a few weeks while I decided what pantograph to use. In search of inspiration, I scoured Instagram for photos of completed Swoon Sixteen quilts, and found this picture that really spoke to me.
I thought “wowee, that’s a good lookin’ combo!” and then I thought “those are some really nice photos of that quilt!”
Upon closer inspection, I saw that this was a client quilt that I had longarmed (and those were my photos that I had posted to social media).😆 Oh man, at least I know what I like!
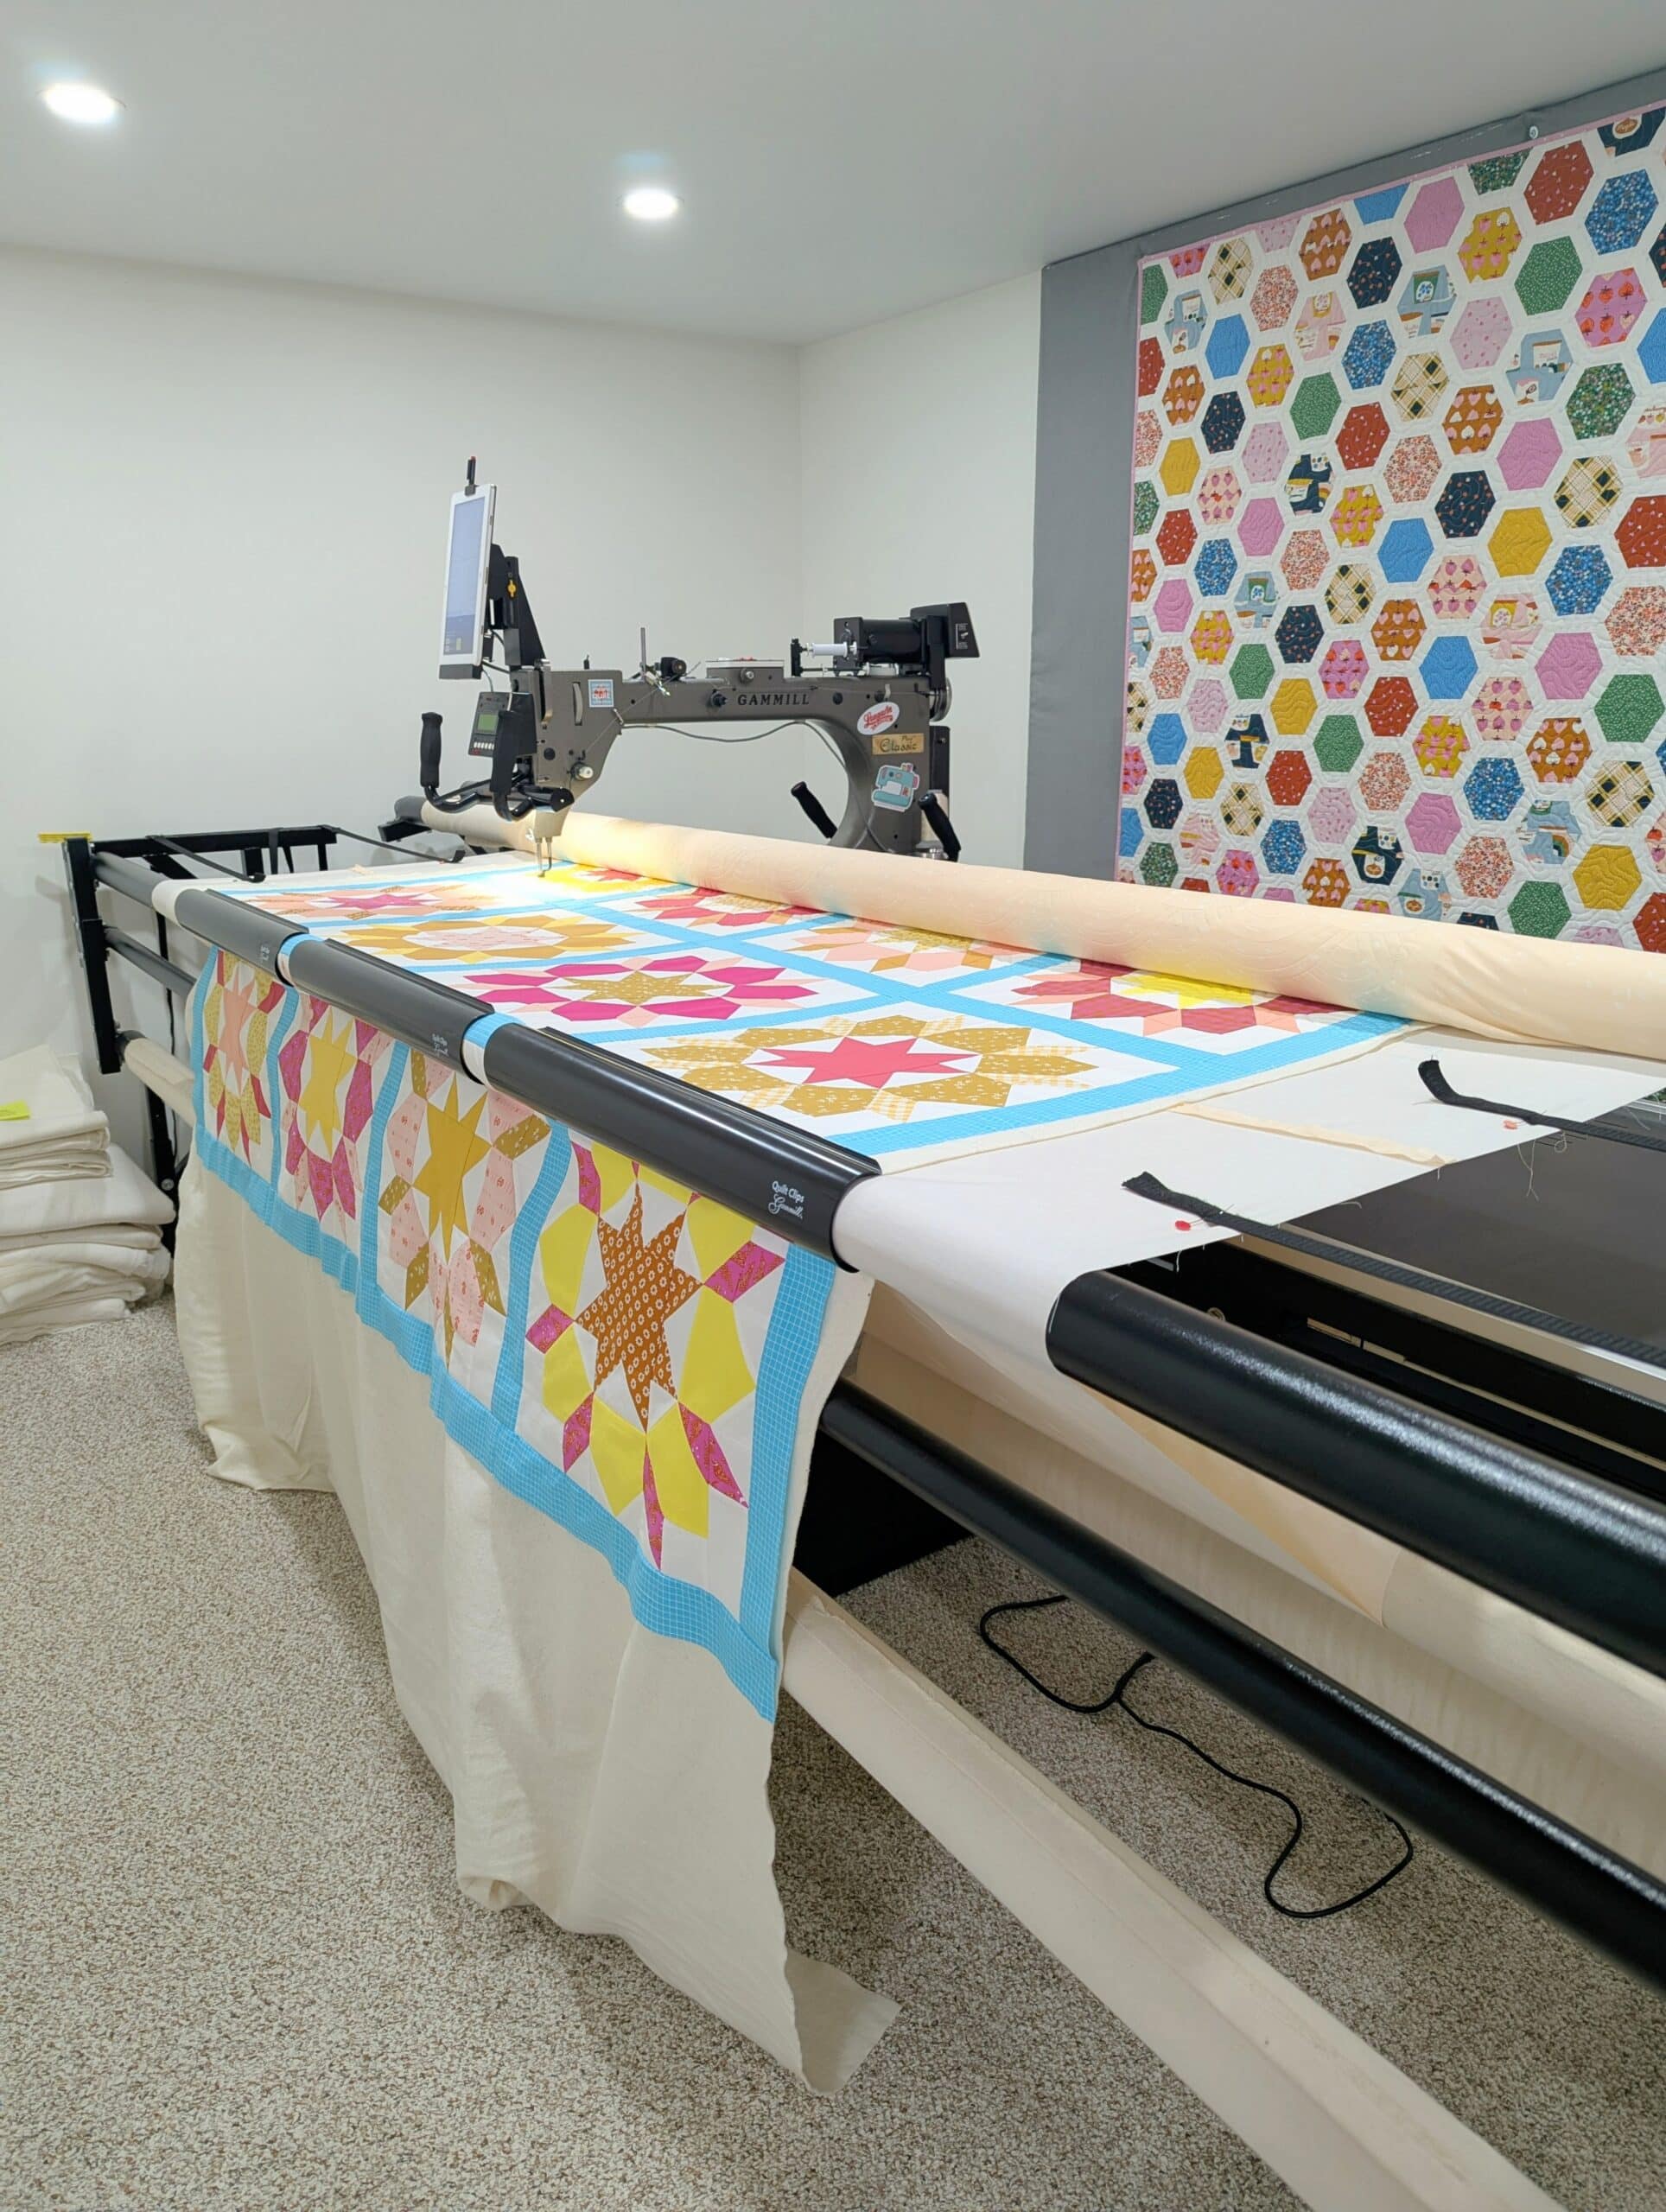
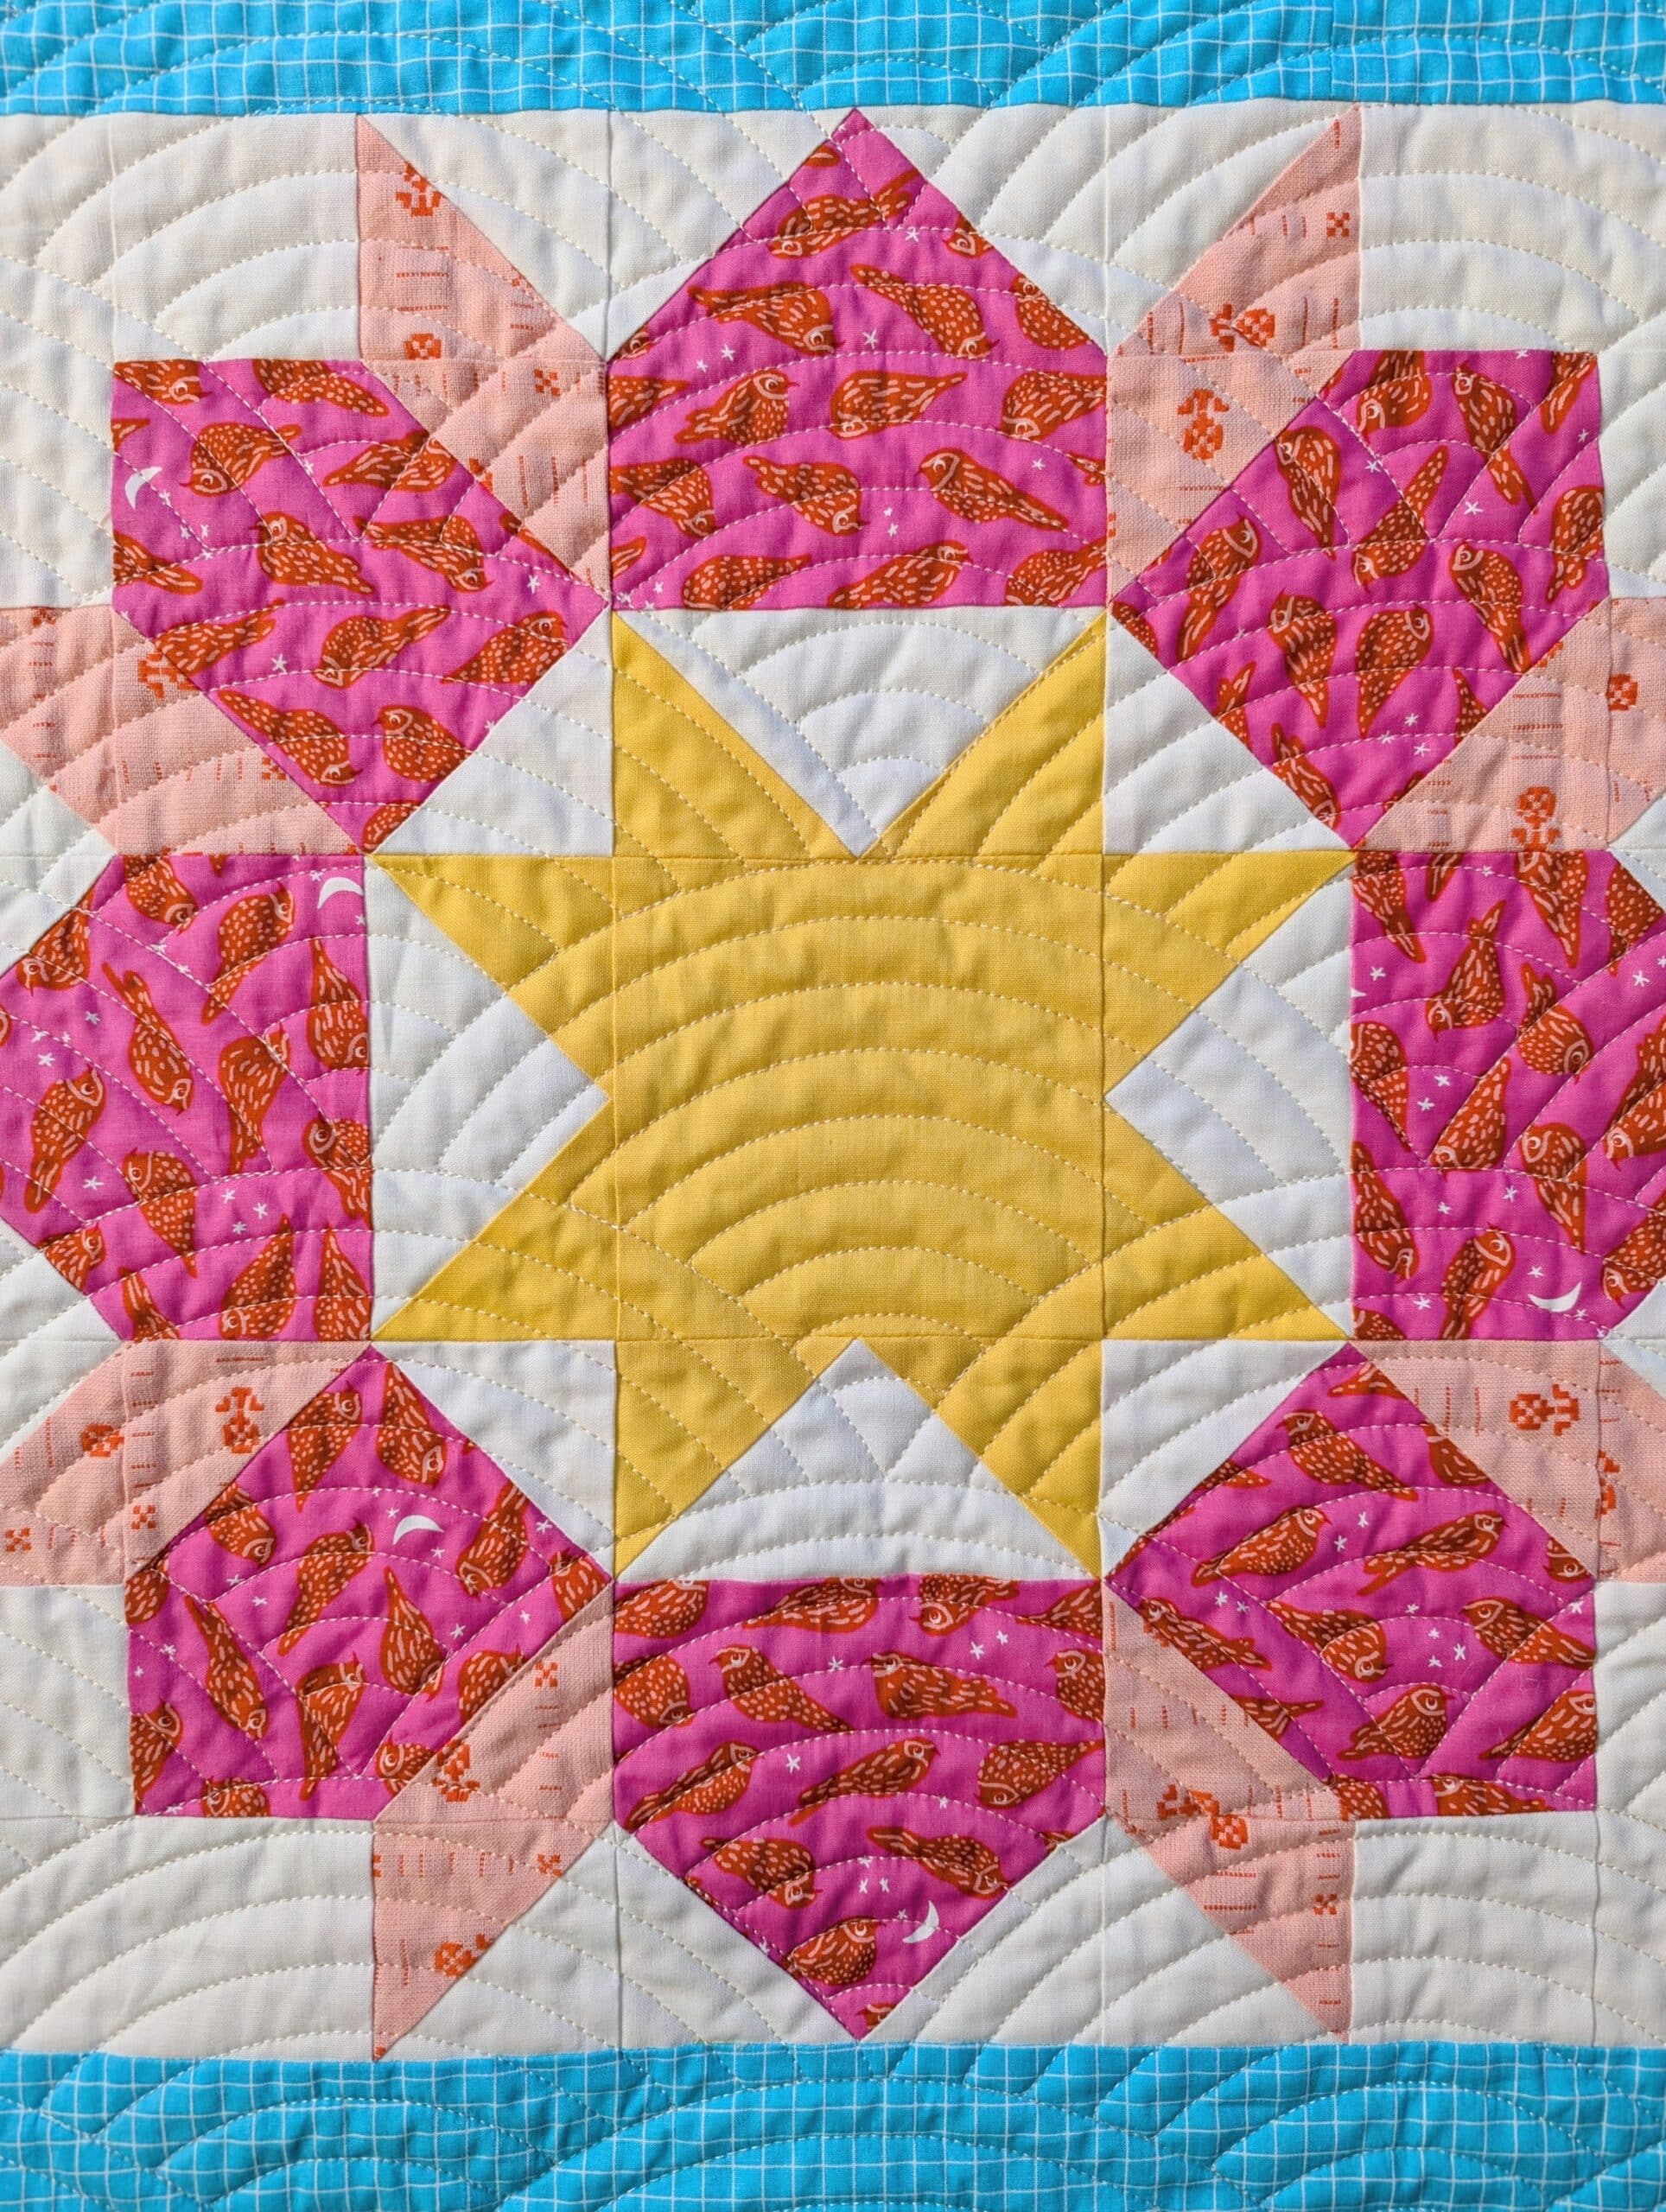
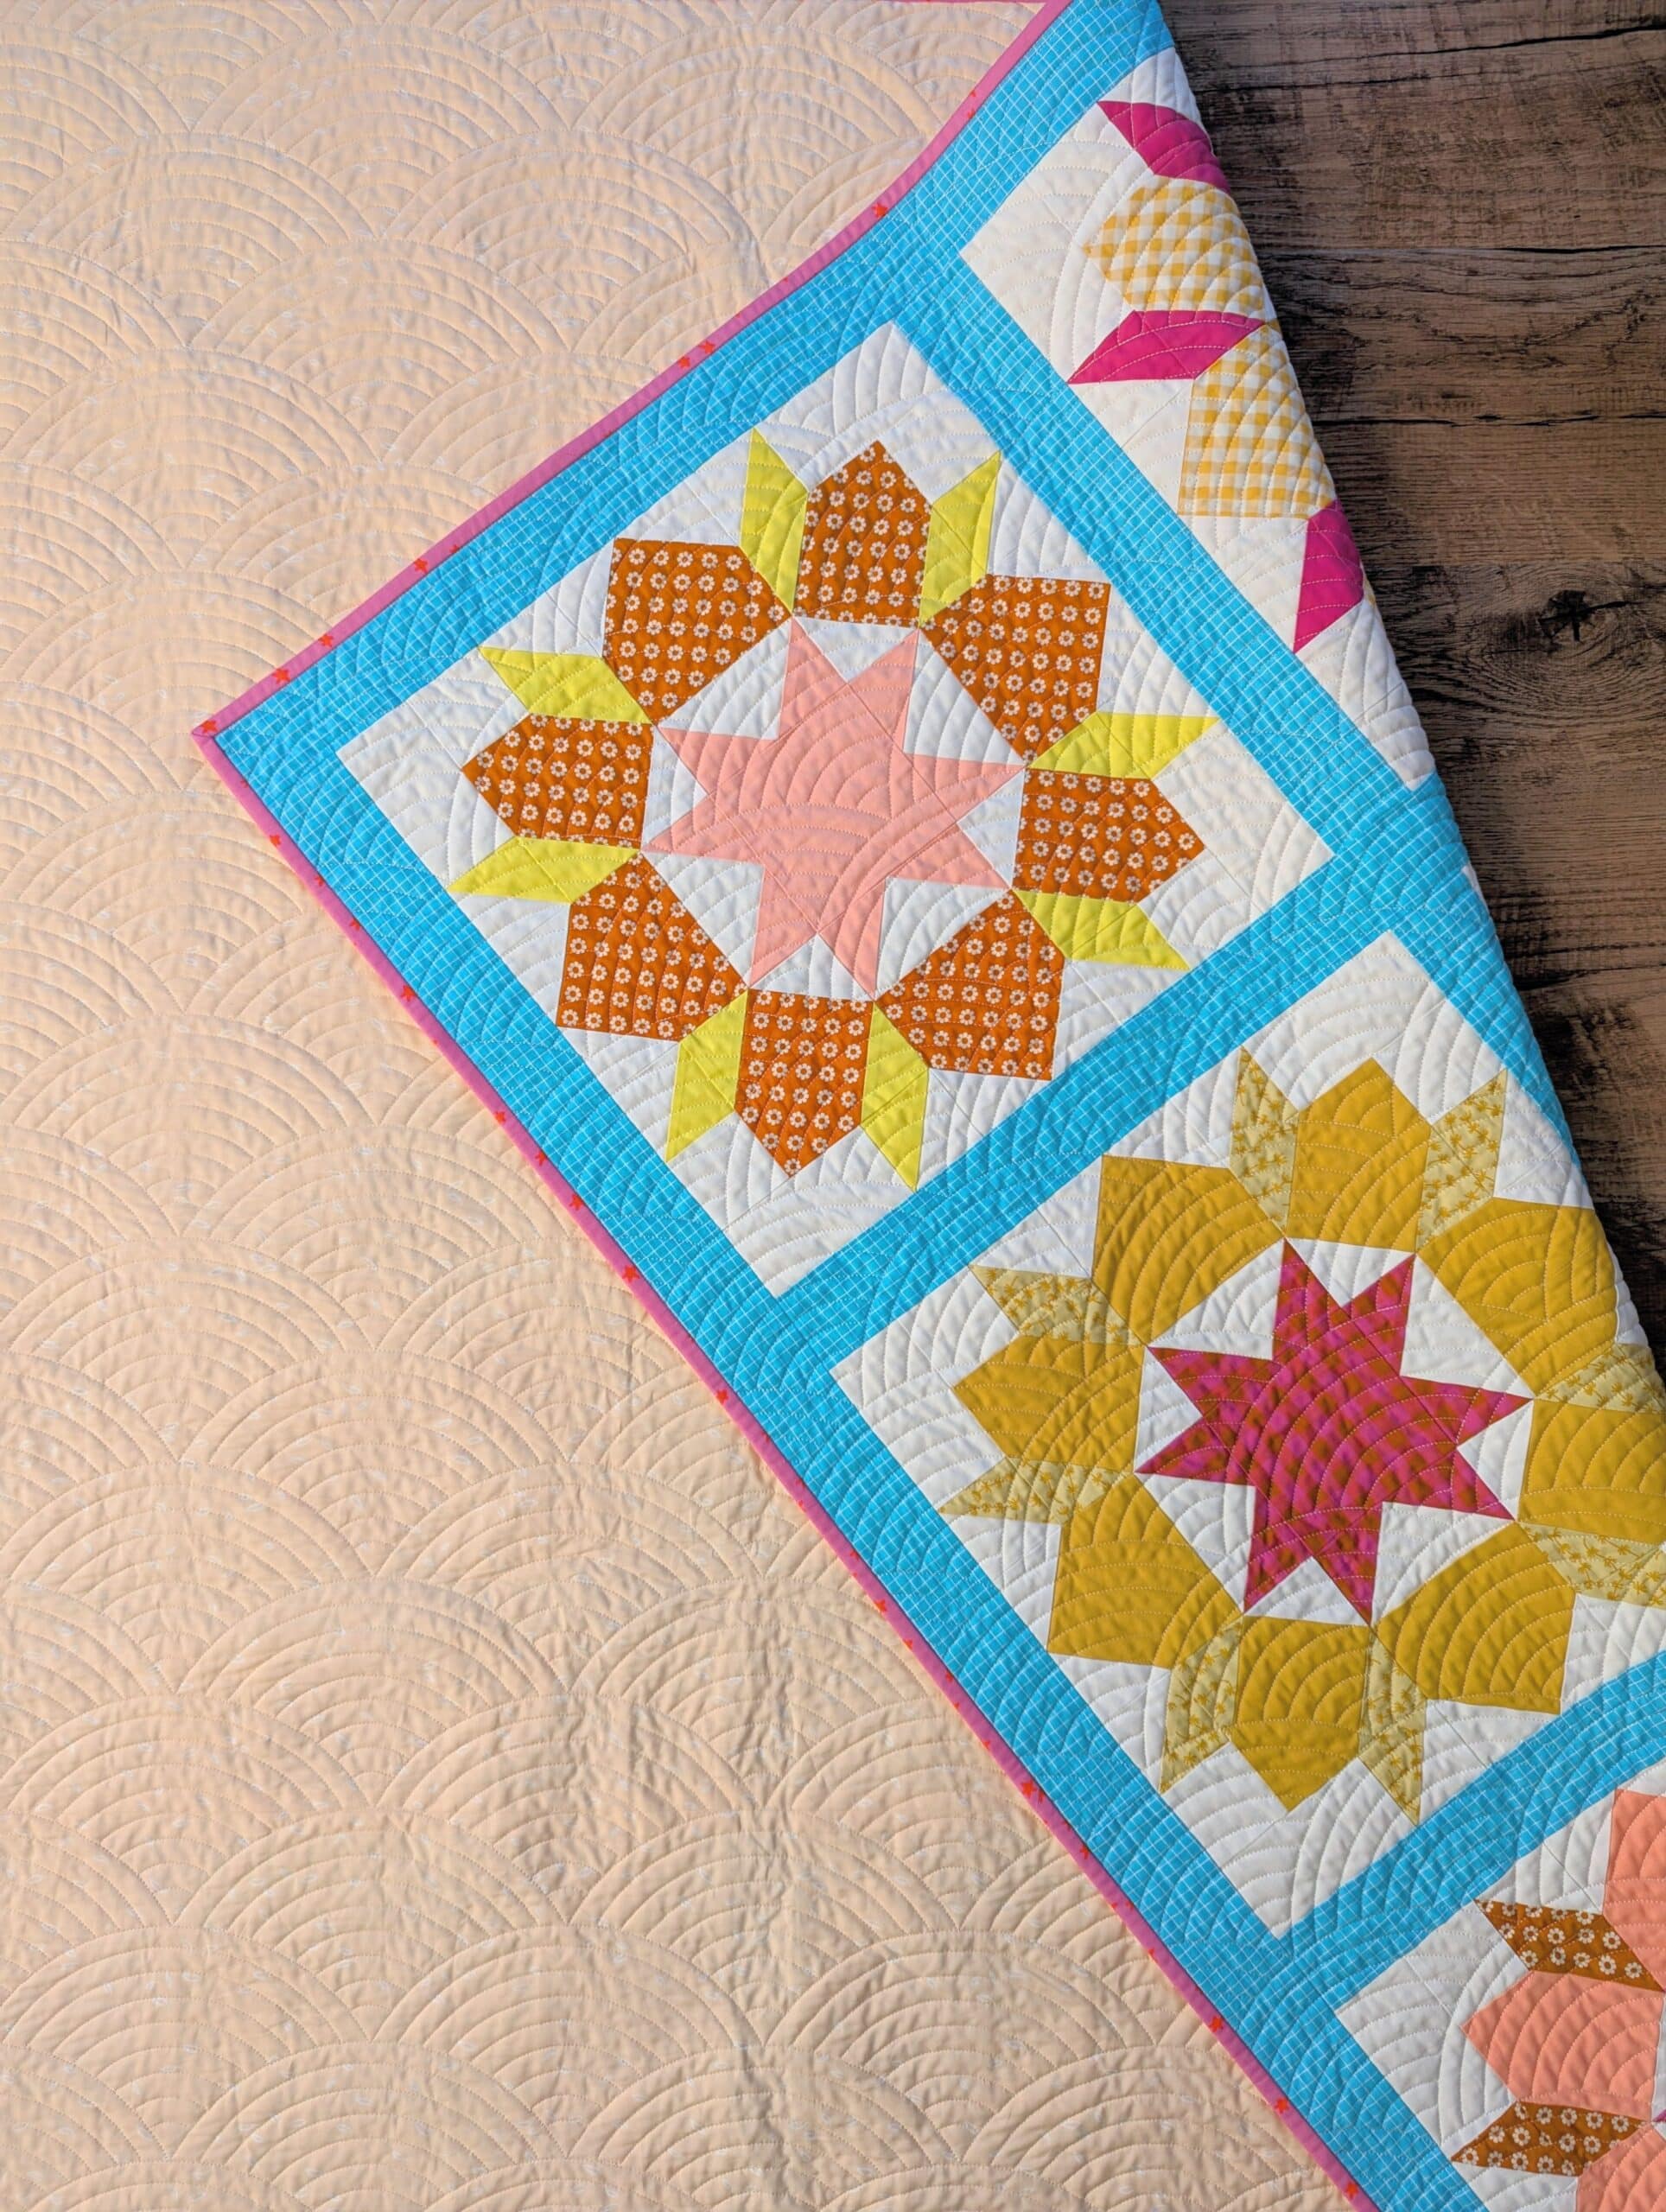
The quilting was super fast and easy. Although this design looks complicated to realign, it’s actually quite simple to accomplish. Plus, I love the look of this classic quilting design on this more traditional-looking quilt pattern.
Adding the Binding
For the binding, I wanted a fun pop of colour that would stand out against the blue borders. Hot pink to the rescue!
I used Starry in Vivid Pink and love that it reads as a solid from far away - you really only see the stars if you’re up close to the quilt.
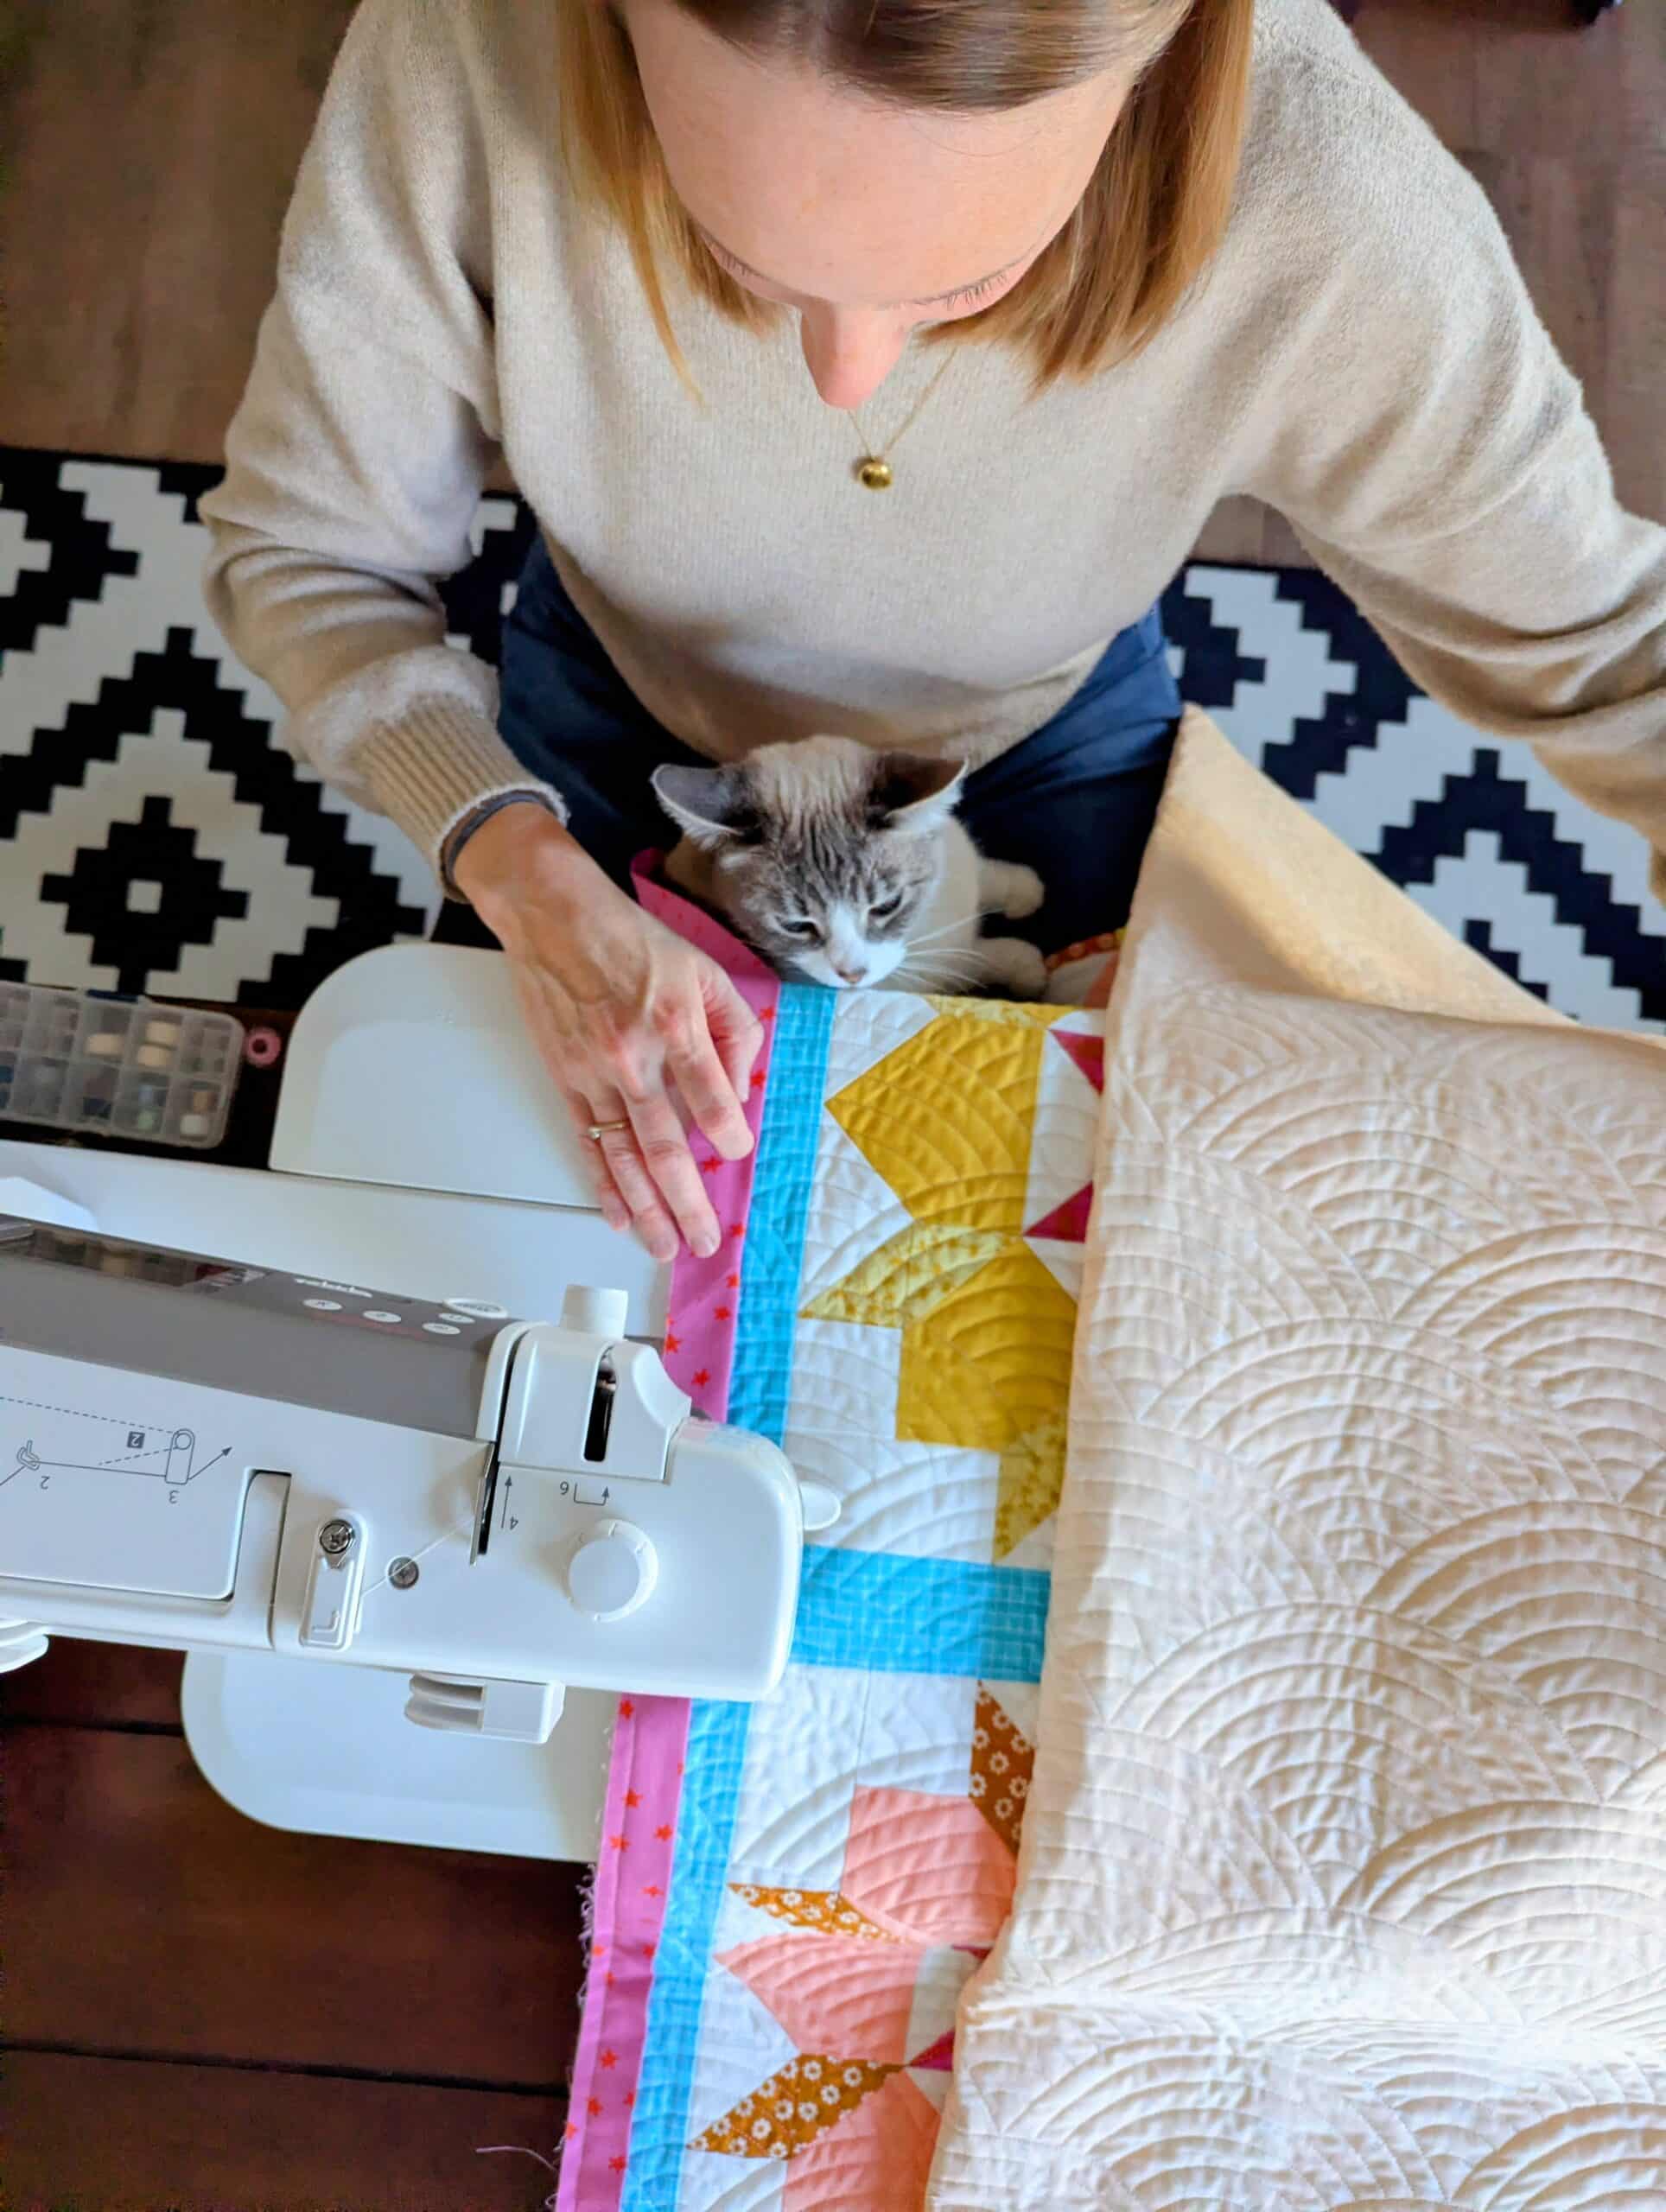
I chose to machine bind this quilt, and you can see that my furry friend Claire was a big helper with this step. She supervised as I attached the binding to the front of the quilt using my Janome MC 6700P sewing machine.
You can see in these photos that I used a near-solid peach print for the backing. I have no idea what fabric this is… I keep a stash of 5 yard cuts for backings, and then just pick one whenever it’s time to longarm one of my quilts.

To complete the binding, I wrapped it around to the back of the quilt, glue basted it in place, and then secured it by stitching in the ditch on the front of the quilt (and catching the binding on the back in the process). It’s a pretty slick technique that produces a really secure binding with almost no stitching visible on the front of the quilt. I have every confidence that this binding will stay in place for many years to come!


Admiring the Finished Quilt
I know I say this every time, but I honestly think this is my favourite quilt I’ve ever made.

It was such a roller coaster to make this thing… I started out hopeful (naive, maybe?), then felt really discouraged when I realized it wasn’t turning out the way I wanted. But I buckled down and learned a new technique so I could finish this project with precision and pride. By the end I was having a grand old time putting my blocks together, and would even consider making another one!
I mean… look at how pretty it turned out!!
Please enjoy the many pictures I’m about to share.

Lessons for Next Time
Would I make this quilt again? Possibly, yes!
I only say “possibly” because there are a lot of fabulous quilt patterns in the world, and I want to make a lot of them. Repeating a pattern is not something I do often, but I felt so amazing after finishing this one that I would entertain the idea.

BUT! If I were to do it again, I’d definitely take the time to see if there was enough fabric to make the flying geese four at a time.
Would I recommend this pattern to a beginner quilter? Probably not! I think it's a BIG undertaking, and it might result in a new quilter becoming discouraged / abandoning the project.
I feel that this project is better suited to intermediate quilters who either want to improve their snowball corners or show off their already-precise corners. If you're not concerned about your points matching, this will still turn out to be a beautiful finished quilt.
Let me know in the comments if you’ve ever made a Swoon Sixteen (or if it’s on your quilty bucket list)!

Your fabric selections for this quilt are gorgeous, and the quilt looks fresh and modern.
I made a king sized Swoon Sixteen last spring using a more traditional looking fat quarter set that had been in stash for 9 years or more. As you mention, those snow-balled corners were a challenge. Sticking to those last few blocks and the sashing was tough for me too. It might get made again given the right circumstances.
Thanks so much for these kind words, Gale! I’m glad to hear I’m not the only one who struggled with the snowball corners… they’re so deceptively simple, yet difficult to do accurately.😆
Wishing you all the best if you ever attempt this beast of a pattern again!
Congratulations! It is beautiful and the blue dashing is chef’s kiss
Thank you, Carol! I really do love this quilt and am glad I took the challenge / stuck with it!
Thanks so much for such a detailed explanation of your gorgeous quilt! It’s definitely on my bucket list especially now that you outlined the challenges and won’t be caught off guard. . I might just do another smaller and simpler quilt to practice that new-to-me snowball technique. I have done several but struggled mightily with those “so simple” blocks. No matter what the size! The quilting and your color choices all add up to a swoon worthy quilt.
Barbara, I wish you all the best with your snowball corners, and hope you find a method that works well for you. There are so many different ways to accomplish this one simple technique, there’s bound to be one that just “clicks” for you.👍
Happy sewing!
PS-can I just say the paper plate method sounds brilliant?? Can’t wait to put it into use!
Oh yes, I love it when there’s a simple and inexpensive solution to a quilting conundrum! ❤
I am going to be starting a quilt soon that uses the snowball method and I am going to give your technique a try. I love how you precut the corners which eliminates having to draw a line from corner to corner on each square. Looking forward to seeing how this works for me. Thank you for sharing!
Also, your swoon quilt is beautiful! The blue sashing was the perfect choice!
Thank you for the kind comments about the quilt – it really was a labour of love!
As for the snowball corners: if you like the idea of cutting before sewing, you might want to check out Doug Leko’s Simple Folded Corner Ruler (https://www.youtube.com/watch?v=N0d2t354T4M) or the Creative Grids Corner Clipper Tool. Soooooooo many people have told me that Doug’s ruler is a game changer, but I haven’t tried it myself.
Happy snowballing!
Your Swoon Sixteen quilt is absolutely beautiful! It is a pattern I have considered for the future! Love all your helpful hints!
Thank you so much! I’m super proud of this one, and legitimately enjoyed making it (once I got the hang of those corners).
Happy sewing! ❤
I made a Swoon Sixteen quilt years ago. I don't know how I finessed the pattern so the blocks worked, but I'm sure that I did because, like you, getting things *just right* in quilting is a big part of the reason I love it! It's the one area of my life where I can be really fiddly with how it turns out. It helps me to let go of the other things I can't control. Anyway, I started another Swoon Sixteen recently and totally forgot how involved it was! I set it aside immediately. Haha.
Haha, setting aside a Swoon Sixteen is so relatable. Hope you reach a state of flow with your project!! 😊
Shelly,
Congrats on your lovely finish! Beautiful fabric choices (you make it look so easy). The blue is genius!
I bought the pattern a while ago. After reading what you went through, I must wait until I have more experience before I try this one.
Thanks for the good read.
Barb
Thanks so much, Barb! This quilt truly has my heart, and I hope that someday you have a fabulous time making your version!❤
I’ve made two (both at the same time). I custom quilted the one and the other is still just a top. Love yours and agree fabric is magic! Love seeing the same pattern in different fabrics! Have another planned but not cut yet so plans could change
Ooh, making two at a time seems like a great idea! Quilting ninja!!
Lovely swoon quilt! And thanks for the great tips on snowballing corners! After a loooonnng quilting hiatus I decided to tackle a bed sized quilt as my first project back, and it’s full of snowballed corners which weren’t coming out right at all. I tried your method and now my blocks are perfect!!
Nicole! So nice to hear that you’re back to quilting. I’m delighted that my snowball journey was of use to someone else, and that it might help you get back on track with this project.
Happy sewing!