
I have always loved the Meadowland quilt… literally, since the moment that I saw Meghan from Then Came June post this photo to Instagram way back in May of 2018, I was instantly in love!! Since then, I created one in pink and greys, but always wanted to make another. When the 2020 Meadowland Quilt-Along (QAL) came around, I knew I wanted to join in. However, I didn’t have enough fat quarters to create the quilt top, so I contacted Nikki from Stacked Fabric Company, and the idea for the Sky Blue Pink Meadowland was born!
Finding the right fabric
Right off the bat, I knew I wanted help curating a special bundle for this project. I don’t have much of a fabric stash, and tend to purchase fabric for specific projects. If there’s one lady I know who is amazing at creating a curated bundle, it’s Nikki. I emailed her and asked if she had the time / bandwidth to help me pull some fat quarters together, and she said she was game! One thing I should mention: I know this type of customer service is incredibly time-consuming for a shop owner. As such, I know that not all shops can provide this type of a service / might not be able to *always* offer this service. I was just grateful that Nikki had the time to help me out in time for the 2020 Meadowland QAL!
Why was it so important for me to ask for help pulling a bundle together? Because I live in the middle of nowhere, and there are no “local” modern quilt shops. As a result, I do almost all of my fabric shopping online. Sure, there are pictures of fabrics on websites, but it’s hard to know if fabrics will actually look nice together in real life. Sometimes I order fabric that I *think* will look good together and then am disappointed when I see them together in my house.
There’s really no replacement for seeing (and touching) fabric in person. So when I wanted to make SURE I received a pile of fabric that looked great in person, I asked for Nikki’s expert eye. Have you SEEN the curated bundle section of her website? She’s got a real knack for pulling different patterns and colours together (maybe it has something to do with the fact that she studied design?? Or maybe just innate talent!) It also helps that her shop is one of the “most local” ones to me (just a quick four-hour drive away), so that makes me feel good as well.
I started off by showing Nikki a general palette for what I was looking for (as well as the number of FQs I wanted). She pulled a few bolts together and sent me a photo. I asked her to make a few minor adjustments (like adding more pink and less green), and she sent me this photo. Whoa! That was the winner! And so the Sky Blue Pink bundle was born. (Photo taken by Nikki of Stacked Fabric Company).

I see that the Sky Blue Pink bundle is still available through Stacked Fabric Company. Although the prints have changed over time due to availability (and may change again in the future), I love that this curated bundle lives on, and that you could also make a quilt from this palette!
Mixing and matching… and doubting
Shortly after receiving my bundle in the mail, I chopped it all up into the required pieces. While I don’t find cutting fabric to be the most exciting part of the quilting process, I sure do love to stare at a pile of neat little squares and rectangles.
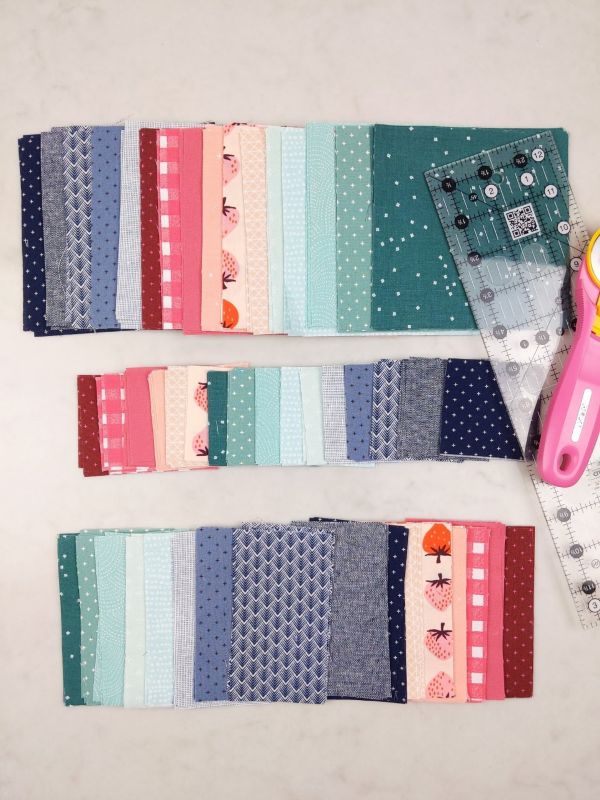
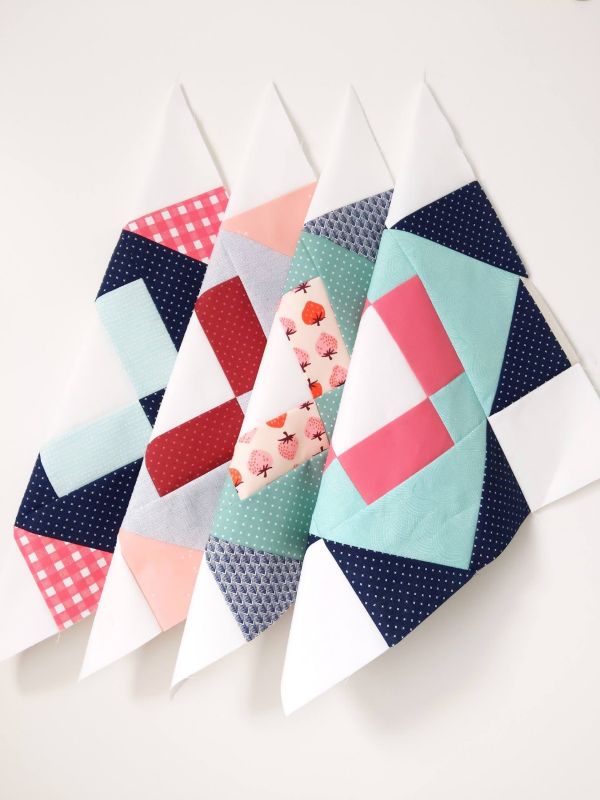
And then the fun begins! I find it both challenging and fun to mix and match all my pieces to come up with the combos that will eventually become my quilt blocks. I tend to approach this a bit scientifically – each Meadowland block uses three different fabrics, so I asked Nikki to pull fabrics in three general colourways (green-blue, blue, and pink) in a variety of values. For each block, I chose one fabric from each colourway.

Then I mixed and matched, choosing different values (light or dark) for the pieces that would be touching each other. For this step, I found it really useful to have a good understanding of what a finished block looked like. See below? The fabric for the “plus” in the middle and the “sky” of the flying geese units don’t touch, so it’s fine if they’re a similar value. I tried to make sure that there was a noticeable difference between the fabric for the geese “bodies” and the other two fabrics. That’s how I like to make my blocks – with lots of contrast so that the quilt design really stands out.

I also made an effort to mix prints with solids, and larger scale prints with smaller scale prints. FYI, in case you think this is easy for me: whenever I’m mixing my fabrics like this, I invariably end up at a point where I can’t stand to look at the fabrics anymore, and I feel like it might look like a pile of garbage when sewn together. The joys of the creative process! When I get to a sticking point like that, I’ll usually step away from a project for a few days. When I come back to it, I see it with fresh eyes and can usually see the beauty again.
I did eventually find some combos that made my heart sing, and I was ready to sew the blocks together for my Sky Blue Pink Meadowland. I was very impressed with myself that I kept up with the QAL schedule, making the required number of blocks each week. My only bottleneck was the flying geese – for some reason, I am always ALWAYS surprised that they take so long (even though they don’t actually take that long). You’d think I would know this by now, but no!
After the flying geese were finished, the blocks came together quickly. And then a new agony began – block placement! This is another step that takes me longer than I’d like to admit. I’m always trying to figure out how to place them so that there’s contrast between all the fabrics that are touching each other, and there’s a nice distribution of of dark and light fabrics across the entire quilt top. Taking photos of your quilt in black and white is an easy way to see if this step is going well. But then of course that leads to excessive rearranging until my eyes start to cross. Once again, I step away and return a few days later. If I’m short on time, I might forge ahead anyways, full of doubt about my layout. But it usually works out!!

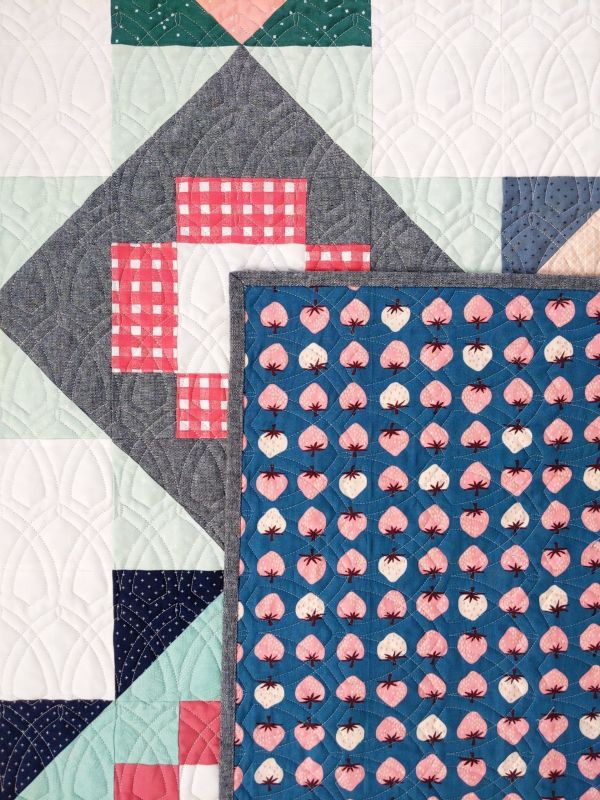
For the backing fabric, I was able to snag the last of Nikki’s blue strawberry fabric from the Darlings line by Ruby Star Society. This fabric is so incredibly soft – I just want to pet it!!
Quilting
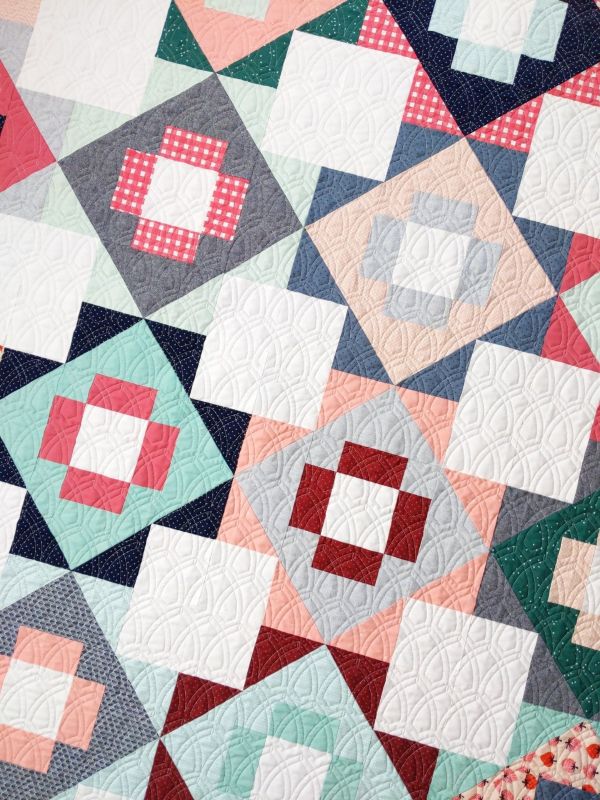
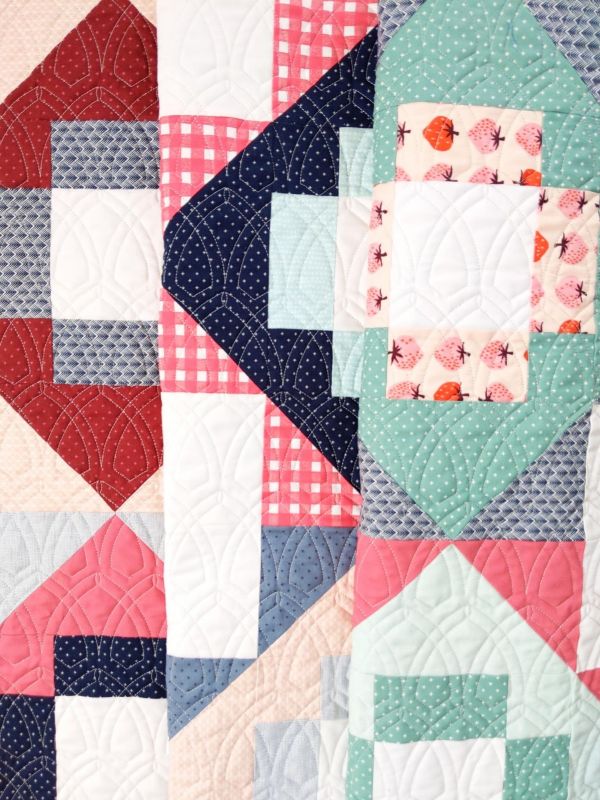
Did you notice that delicious quilting texture?? How could you not!?
As a longarm quilter, my favourite part of the quilting process is the quilting (obvs). As a super fun bonus: longarm quilting lets you skip the dreaded basting step. It might be the best part of of having a quilt longarmed!

When it came time to choosing the pantograph (digital quilting design), I knew that I wanted to use Hammersmith. I had recently seen a Meadowland quilted with this pattern, and was dying to recreate it with my own Blue Sky Pink Meadowland.

I wanted the quilting to be small in scale, but still relate to the Meadowland quilt design. If you’d like to read more about how I decide to size a panto, you can check out this blog post (where I go into detail about my process). Although it was the first time I had used this pantograph, it was a breeze to stitch and looks great!!
Do you have a quilt that you’d like me to stitch Hammersmith onto? I would love to help you! Just fill out my online form here and we’ll get this MC Hammer party started! Because why? This panto is 2 Legit 2 Quit.
I bound the quilt using an Essex Yarn Dyed Linen fabric (in Indigo). A linen binding looks and feels amazing, and for some reason it makes me think that it will be more durable than a normal quilting cotton. I have no proof of this – it’s just a feeling I have.

As per usual, I used my glue basting and machine binding technique. If you’d like to see a tutorial, you can check out the highlights in my Instagram profile. Just turn off the sound – for some reason I sound like a chipmunk in one of the videos (technology!).

Photographing my Sky Blue Pink Meadowland
Of course I did a living room photo shoot of this gorgeous Sky Blue Pink Meadowland as soon as it was finished (in March of 2020)… I just chose to not post about it for a full year because of…. life! You know how it is!
Are you loving these photos? Thank you! Are you looking to improve your quilt photography? Then I have great news! I’ve created an entire online course dedicated to this exact subject, and you don’t need a fancy camera or any previous photography knowledge to have success. You can check out all the details here!
As a quick preview to the course content, I’ve created a FREE shot list. It will guide you through the 10 photos I ALWAYS take of my finished quilts, and will ensure that you never again wonder what pictures you should take of your quilts. You can find it and download it here.
I’m also trying to make an effort to take an outdoor full-quilt shot of all my finished quilts. Not only does it give me a record, but it helps me flex my outdoor photography muscles (something I’m working on). Plus, it’s fun to go to random spots in the country to take these photos with Ian (that’s him behind the quilt).
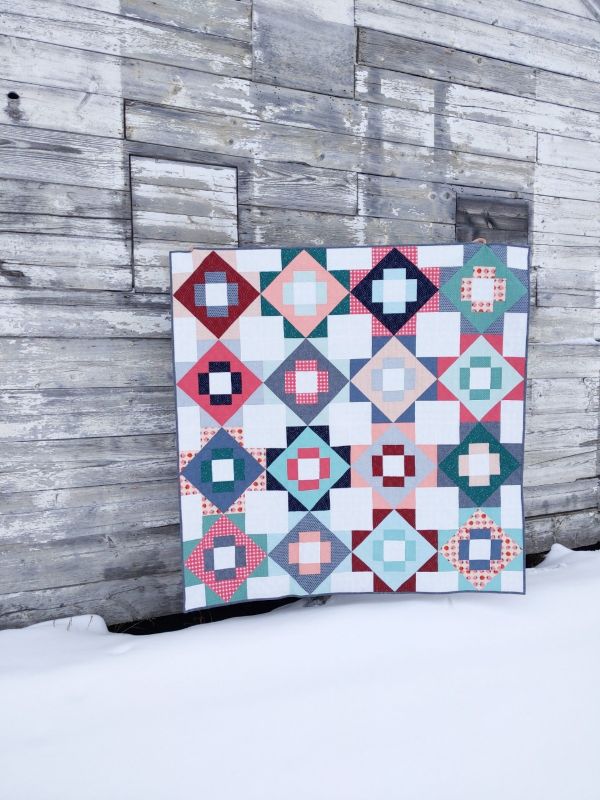
And that’s the story of my Sky Blue Pink Meadowland! What do you think? Is she a beauty, or what?? Despite the moments of doubt in the middle, I think it turned out really well.
And now I’m curious if you also have moments where you question your quilty decisions mid-project. If so, I’d love to hear about them below!

Wow! What a process! Thanks for sharing your story. So many questions I wouldn’t have thought of along myself, but will do now. May help explain why I’m not happy with many of my colour choices!
I find colour placement is one of the most crucial parts of the quilting process (which is maybe why I put so much pressure on myself at this stage). I hope my struggles will help you out! 🙂